Queue Up Your Tracks With A Well Placed Hexagon

Besides a few stalwart holdouts, most of us have have switched over listening to music in digital form, often via an online stream. As long as no data caps stand in your way, it’s a quick and easy way to listen to your favorite artists or discover new ones. But there’s something visceral about act of loading a piece of physical media into a player that can’t be replicated by just clicking or tapping on a screen.

Which is why [InfiniteVideo] put together this RFID playlist launcher peripheral. There’s an important distinction to be made here, as this device isn’t actually playing or even storing audio. A nearby Raspberry running Volumio handles the actual playback. This device is just an RFID reader with some clever tokens that the listener can use to select their favorite artists and albums with physical tokens. It’s certainly not a new concept, but we think the nuances of this particular build warrant a closer look.

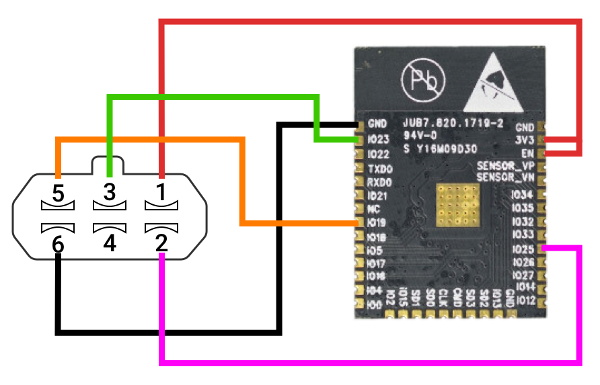
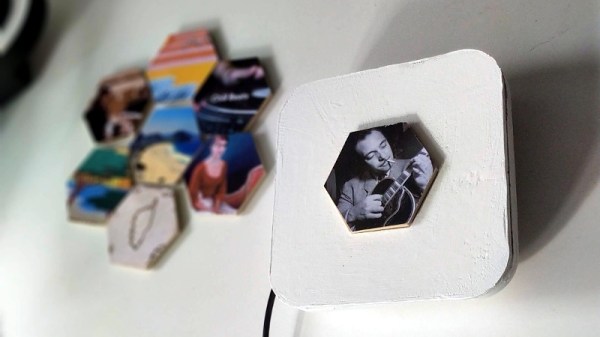
The “player” consists of a ESP8266 with a MFRC522 RFID reader wired directly to the GPIO pins. The pair are housed in a rather large 3D printed enclosure, which at first might seem a bit excessive. But it turns out that [InfiniteVideo] is actually trying to replicate a crowd sourced project called Qleek which is based around a similarly chunky reader.

Likewise, the hexagon tiles are also lifted from the Qleek concept. But rather than being made out of wood as in the original, [InfiniteVideo] is printing those as well. Halfway during the process, the print is paused and an RFID sticker is placed in the middle of the hexagon. Once resumed, the RFID tag becomes permanently embedded in the tile with no visible seams to reveal how the trick was pulled off. With the addition of a suitable label, each printed hexagon gets associated with the desired album or artist in software.

This project is notable for its convenience and visual flair, but using RFID tags for media identification can also be a practical choice. It can be used as an assistive technology, or as a way for young children to easily interact with devices.

Core Devs Say A Fond But Firm Farewell To Python 2

Saying that it was finally time for the community to bid a “fond but firm farewell to Python 2”, core developer Benjamin Peterson marked the release of Python 2.7.18 on April 20th; officially ending support for the 2.x branch of the popular programming language. It was hardly a snap decision. Python 3.0 was released all the way back in December 2008, and it was never a secret that the newer branch was not only incompatible with the earlier version, but that it would eventually superseded it to become the standard.

But migrating the incredible amount of Python code in the wild over to the latest and greatest was easier said than done. Millions upon millions of lines of code used in everything from Linux distributions to virtually every major web service needed to be reviewed and migrated over to Python 3. In many cases the changes were relatively minor, but when code is being used in mission critical applications, even the smallest of changes are often avoided unless it’s absolutely necessary. The voluntary migration took far longer than expected, and the end-of-life (EOL) for Python 2 was pushed back by years to accommodate developers who hadn’t made the necessary changes yet.

Given the somewhat fluid nature of the Python 2 EOL date, it seems fitting that this last final release would come several months after the “official” January 2020 deadline. The intention was for it to coincide with PyCon 2020, but just like so many of the events planned for the first half of the year, the in-person conference had to be canceled in favor of a virtual one due to the COVID-19 epidemic. That might have stymied the celebration somewhat, but the release of Python 2.7.18 will still be looked on as a special moment for everyone involved.

Continue reading “Core Devs Say A Fond But Firm Farewell To Python 2”

Millennium Falcon Docking Bay Doubles As Table

A glass table makes a perfect display case for showing off whatever’s important to you, but if you want keep the dust off of your treasures, closing up the sides is probably a wise move. It might not be a bad idea to put some lighting in there to make sure everything is easy to see. You might as well make the lights RGB and remote controlled, so you can fiddle with the look from across the room. Of course, you could go all in and just make the thing a diorama…

It’s not hard to imagine the line of thinking that convinced [Erv Plecter] he should turn a simple glass table into a docking bay for a model of the Millennium Falcon, and looking at the final results, we think it was the right move. With an incredible attention to detail, what started out a generic looking table and rather modest toy, have been combined into an interactive display that could woo even the staunchest of Trekkies.

If you’ve ever considered lighting a model, this project is an excellent example to follow. The Hasbro toy that [Erv] started with certainly wasn’t what you’d call studio quality; the little lighting it featured wasn’t even accurate to how the ship appears in the films. But with some reference material, fiber optic cables, and enough Arduinos to drive it all, the final lighting is truly a marvel. We’d say the engine is our favorite part, but those tiny lit panels in the cockpit are hard to beat.

While the Falcon is clearly the star of the show, the docking bay itself is certainly no afterthought. The back-lit panels, with their inscrutable Imperial design aesthetic, look fantastic. The addition of small details like crates and barrels, plus the glossy black PVC sheet used for the floor, really brings the whole scene to life. It’s almost a shame that the ship itself is so big, as a smaller model would have left more room to toss in a few Stormtroopers and droids out on patrol.

This isn’t the first time we’ve seen somebody augment a “toy” grade model with additional lighting effects. While the scale miniature aficionados in the audience might turn their nose up at some of the artistic liberties taken on these low fidelity models, we think any normal person would be blown away if they saw them in person.

Continue reading Millennium Falcon Docking Bay Doubles As Table”

Printed It: Collet Drill Stop

You’d think that being quarantined in your home would be perfect for hackers and makers like us, as we all have a project or two that’s been sitting on the back burner because we didn’t have the time to tackle it. Unfortunately, some are finding that the problem now is actually getting the parts and tools needed to do the job. When there’s a bouncer and a line outside the Home Depot like it’s a nightclub on Saturday night, even the simplest of things can be difficult to source when making in the time of COVID.

Which is exactly the situation I found myself in recently when I needed to drill a bunch of holes to the same depth. The piece was too big to put in the drill press, and while I contemplated just wrapping the bit in some tape to serve as a makeshift stop, I wasn’t convinced it would be accurate or repeatable enough. It occurred to me that a set of drill stop collars would be easy enough to design and 3D print, but before I fired up OpenSCAD, I decided to see what was already available online.

Which is how I found the “Collet Drill Stop” from Adam Harrison. Rather than the traditional ring and setscrew arrangement, his design uses a printable collet that will clamp down on the bit at an arbitrary position without tools. So not only could I avoid a trip to the store by printing this design out, it looked like it would potentially be an upgrade over what I would have bought.

Of course, it’s wise not to take anything for granted when dealing with 3D printing. The only way I could be sure that Adam’s design would work for me was to commit it to plastic and try it out.

Continue reading “Printed It: Collet Drill Stop”

3D Print Your Way To A Bartop Arcade Cabinet

Custom arcade machines have always been a fairly common project in the hacker and maker circles, but they’ve really taken off with the advent of the Raspberry Pi and turn-key controller kits. With all the internals neatly sorted, the only thing you need to figure out is the cabinet itself. Unfortunately, that’s often the trickiest part. Without proper woodworking tools, or ideally a CNC router, it can be tough going to build a decent looking cabinet out of the traditional MDF panels.

But if you’re willing to leave wood behind, [Gerrit Gazic] might have a solution for you. This bartop arcade, which he calls the simplyRetro D8, uses a fully 3D printed cabinet. He’s gone through the trouble of designing it so there are no visible screw holes, so it looks like the whole thing was hewn from a chunk of pure synthwave ore. He notes that this can make the assembly somewhat tricky in a few spots, but we think it’s a worthy compromise.

Given the squat profile of the simplyRetro, the internals are packed in a bit tighter than we’re accustomed to seeing in a arcade build. But there’s still more than enough room for the Raspberry Pi, eight inch touch screen HDMI panel, and all the controls. To keep things as neat as possible, [Gerrit] even added integrated zip tie mount points; a worthwhile CAD tip that’s certainly not limited to arcade cabinets.

[Gerrit] has included not only the STL files for this design, but also the Fusion 360 Archive should you want to make any modifications. There’s also a complete Bill of Materials, as well as detailed instructions on how to pull it all together. If you’ve ever wanted your own arcade machine but felt a bit overwhelmed about figuring out all the nuances on your own, the simplyRetro could be the project you’ve been waiting for.

Of course if you do have access to a CNC or laser cutter, then there are some designs you could produce quite a bit faster.

ESP32 Refines Game Boy Bluetooth Adapter

Last year we brought word of a project from [Shyri Villar] that turned a stock Game Boy Advance into a Bluetooth controller by exploiting the system’s “multiboot” capability. The prototype hardware was a bit ungainly, but the concept was certainly promising. We’re now happy to report that the code has been ported over to the ESP32, making the project far more approachable.

To clarify, the ESP32 is now the only component required for those who want to play along at home. Just five wires connect the microcontroller to the GBA’s Link Cable connector, which is enough to transfer a small ROM over to the system and ferry user input to the Bluetooth hardware. Even if you aren’t interested in using it as a game controller, this project is an excellent example of how you can get your own code running on a completely stock GBA.

While the original version of the hardware was a scrap of perfboard dangling from the handheld’s expansion connector, reducing the part count to one meant [Shyri] was able to pack everything into a tidy enclosure. Specifically, a third party GBA to GameCube link cable. This not only provides a sleek case for the microcontroller that locks onto the handheld with spring loaded tabs, but also includes a male Link Cable connector you can salvage. It looks as though there’s a bit of plastic trimming involved to get the ESP32 to fit, but otherwise its a very clean installation.

The GBA will be 20 years old soon, but that doesn’t mean the hardware and software exploration is over. The original Game Boy is over 30, and people are still giving talks about it.

New Part Day: An Open Source Ethernet Switch In The Palm Of Your Hand

When you can get a WiFi-enabled microcontroller for $3, it’s little surprise that many of the projects we see these days have ditched Ethernet. But the days of wired networking are far from over, and there’s still plenty of hardware out there that can benefit from being plugged in. But putting an Ethernet network into your project requires a switch, and that means yet another piece of hardware that needs to get crammed into the build.

Seeing the need for a small and lightweight Ethernet switch, BotBlox has developed the SwitchBlox. This 45 mm square board has everything you need to build a five device wired network, and nothing you don’t. Gone are the bulky RJ45 jacks and rows of blinkenlights, they won’t do you any good on the inside of a robot’s chassis. But that’s not to say it’s a bare bones experience, either. The diminutive switch features automatic crossover, support for input voltages from 7 V all the way up to 40 V, and management functions accessible over SPI.

If you want to get up and running as quickly as possible, a fully assembled SwitchBlox is available to purchase directly from BotBlox for £149.00. But if you’re not in any particular rush and interested in saving on cost, you can spin up your own version of the Creative Commons licensed board. The C++ management firmware and Python management GUI isn’t ready for prime time just yet, but you’ll be able to build a “dumb” version of the switch with the provided KiCad design files.

The published schematic in their repo uses a Microchip KSZ8895MQXCA as the Ethernet controller, with a Pulse HX1344NL supplying the magnetics for all the ports in a single surface mount package. Interestingly, the two images that BotBlox shows on their product page include different part numbers like H1102FNL and PT61017PEL for the magnetics, and the Pulse H1164NL for the Ethernet controller.

Make Networks Wired Again

There’s no question that WiFi has dramatically changed the way we connect devices. In fact, there’s an excellent chance you’re currently reading these words from a device that doesn’t even have the capability to connect to a wired network. If you’re looking to connect a device to the Internet quickly, it’s tough to beat.

But WiFi certainly isn’t perfect. For one, you have to contend with issues that are inherent to wireless communications such as high latency and susceptibility to interference. There’s also the logistical issues involved in making that initial connection since you need to specify an Access Point and (hopefully) an encryption key. In comparison, Ethernet will give you consistent performance in more or less any environment, and configuration is usually as simple as plugging in the cable and letting DHCP sort the rest out.

Unfortunately, that whole “plugging in” part can get tricky. Given their size, putting an Ethernet switch into your project to act as an internal bus only works if you’ve got space to burn and weight is of little concern. So as appealing as it might be to build a network into your robot to connect the Raspberry Pi, motor controllers, cameras, etc, it’s rarely been practical.

This little switch could change that, and the fact it’s released under an open source license means hackers and makers will be free to integrate it into their designs. With the addition of an open source management firmware, this device has some truly fascinating potential. When combined with a single board computer or suitably powerful microcontroller, you have the makings of a fully open source home router; something that the privacy and security minded among us have been dreaming of for years.