Lighting Up A Very Wiry Candle

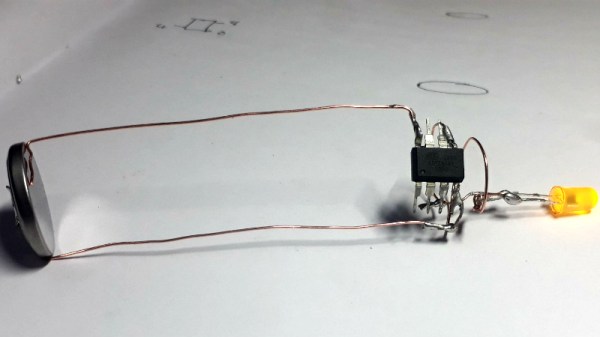
Entries into the Circuit Sculpture Contest tend to be pretty minimalist by nature, and this LED candle by [Amal Mathew] is a perfect example. The idea here was to recreate the slim and uncomplicated nature of a real candle but with a digital twist, and we think he’s pulled it off nicely with a bare minimum part count and exaggerated wire length that gives it the look of a thin pillar candle.

To give the LED a fading effect, [Amal] uses a ATtiny85 programmed with the Arduino IDE. His code uses the 
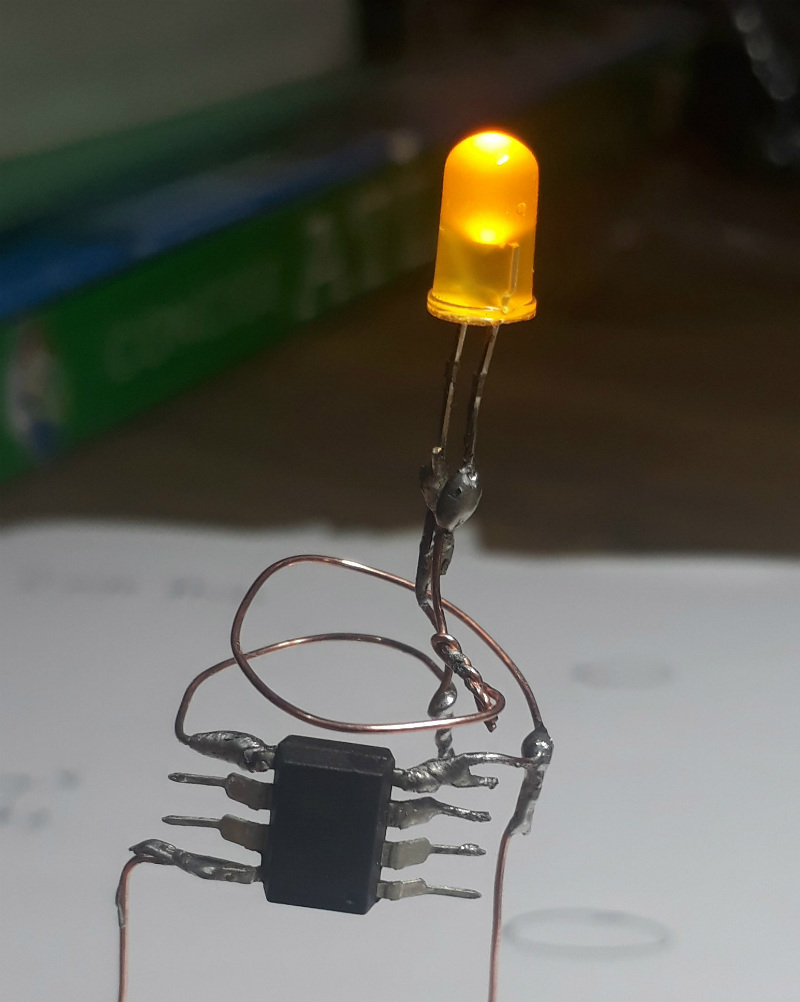
analogWrite() in a loop to gradually increase and then decrease the PWM frequency. With the LED connected directly to one of the pins on the ATtiny85, the simple program achieves the fading effect without needing any additional components.

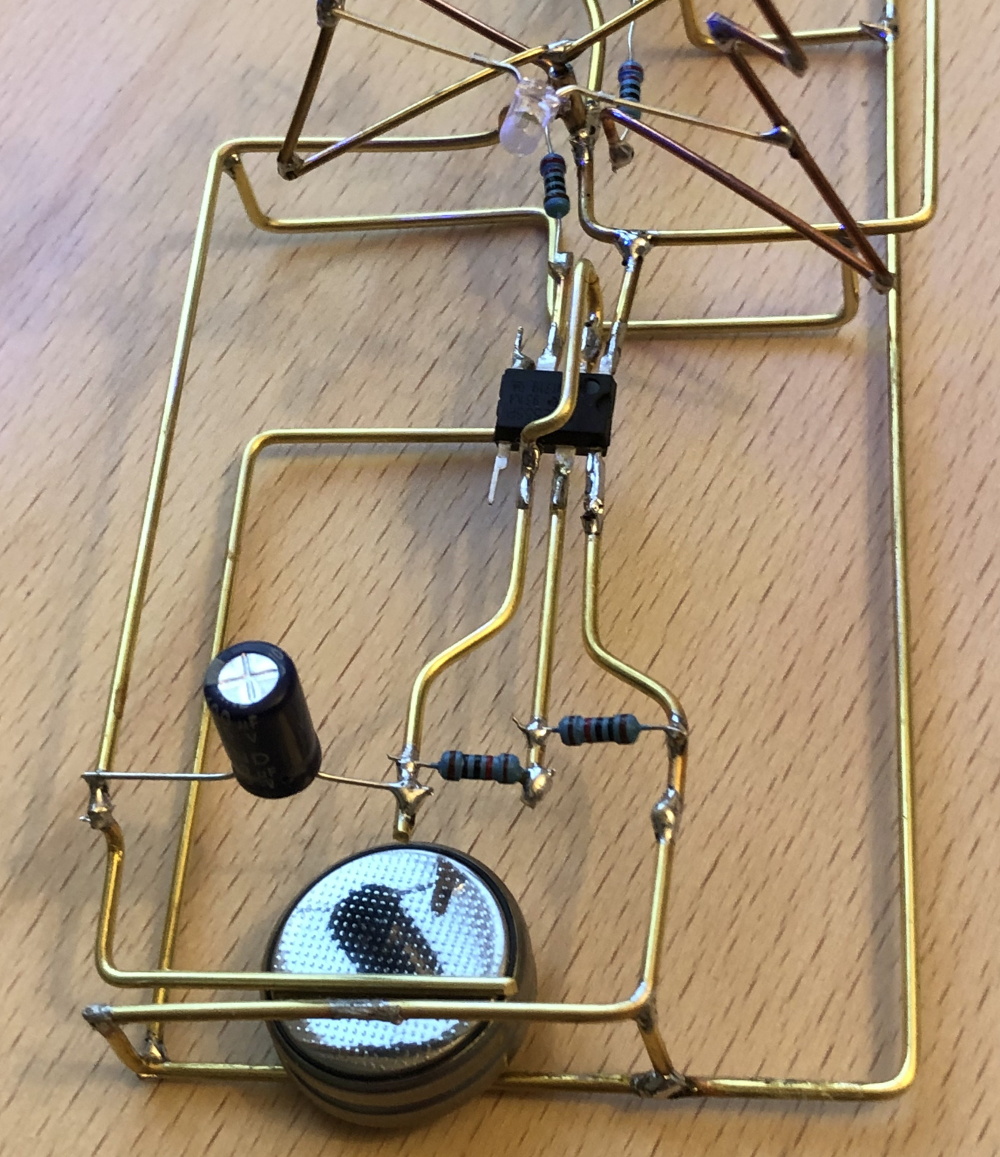
On the opposite side of the candle, connected by long copper wires, is the single CR2032 which provides power for the circuit. In a nice touch, [Amal] has turned the battery 90 degrees relative to the rest of the circuit, so it can serve as a weighted base. We imagine getting it to stand up might be a little fiddly from the looks of it, but once it’s up and merrily fading in and out, it really helps sell the candle idea.

The finished product might look fairly straight-forward, but in his write-up on Hackaday.io, [Amal] gives detailed instructions on how to build your own version if you’re not a bare microcontroller wizard. This includes direction on how to program the ATtiny85 using an Arduino Uno; a neat trick to know even if you aren’t planning on making any candles in the near future. The next logical step is making it so you can “blow out” the LED, which should only take the addition of a resistor and some updated code.

There’s still plenty of time to enter your own functional piece of art in the Circuit Sculpture Contest. Just write it up on Hackaday.io and submit it before the January 8th, 2019 deadline.

Continue reading “Lighting Up A Very Wiry Candle”

Arduino Heart Rate Monitor Has Star Trek Chic

Building a real-life version of the Star Trek tricorder has been the goal of engineers and hackers alike since the first time Dr McCoy complained about being asked to work outside of his job description. But while modern technology has delivered gadgets remarkably similar in function, we’ve still got a long way to go before we replicate 24th century Starfleet design aesthetic. Luckily there’s a whole world of dedicated hackers out there who are willing to take on the challenge.

[Taste The Code] is one such hacker. He wanted to build himself a practical gadget that looked like it would be at home on Picard’s Enterprise, so he gathered up the components to build a hand-held heart rate monitor and went in search for a suitable enclosure. The electronics were simple enough to put together thanks to the high availability and modularity we enjoy in a post-Arduino world, but as you might expect it’s somewhat more difficult to put it into a package that looks suitably sci-fi while remaining functional.

Internally his heart rate monitor is using an Arduino Pro Mini, a small OLED screen, and a turn-key pulse sensor which was originally conceived as a Kickstarter in 2011 by “World Famous Electronics”. Wiring is very simple: the display is connected to the Arduino via I2C, and the pulse sensor hooks up to a free analog pin. Everything is powered by 3 AA batteries delivering 4.5 V, so he didn’t even need a voltage regulator or the extra components required for a rechargeable battery pack.

Once everything was confirmed working on a breadboard, [Taste The Code] started the process of converting a handheld gyroscopic toy into the new home of his heart rate monitor. He kept the battery compartment in the bottom, but everything else was stripped out to make room. One hole was made on the pistol grip case so that a finger tip could rest on the pulse sensor, and another made on the side for the OLED screen. This lets the user hold the device in a natural way while getting a reading. He mentions the sensor can be a bid fiddly, but overall it gives accurate enough readings for his purposes.

If you’re more interested in the practical aspects of a real-life Star Trek tricorder we’ve seen several projects along those lines over the years, including a few that were entered into the Hackaday Prize.

Continue reading “Arduino Heart Rate Monitor Has Star Trek Chic”

A Perfectly Orderly Way To Manage Your Time

[Paul Gallagher] has spent years separating his tasks into carefully measured out blocks, a method of time management known as the Pomodoro Technique. If that’s not enough proof that he’s considerably more organized and structured than the average hacker, you only need to take a look at this gorgeous Pomodoro Timer he’s entered into the Circuit Sculpture Contest. Just don’t be surprised if you suddenly feel like your own time management skills aren’t cutting it.

While [Paul] has traditionally just kept mental note of the hour-long blocks of time he breaks his work into, he thought it was about time he put together a dedicated timer to make sure he’s running on schedule. Of course he could have used a commercially available timer or an application on his phone, but he wanted to make something that was simple and didn’t cause any distractions. A timer that was easy to start, reliable, and didn’t do anything extraneous. We’re not sure if looking like the product of a more advanced civilization was part of his official list of goals, but he managed to achieve it in any event.

The timer is broken up into two principle parts: the lower section which has the controls, USB port, a handful of passive components, and an ATmega328 microcontroller, and the top section which makes up the three digit LED display. The two sections are connected by a header on the rear side which makes it easy for [Paul] to take the timer apart if he needs to get back into it for any reason. Notably absent in the design is a RTC; the relatively short duration of the timer (up to a maximum of 95 minutes) means the ATmega328 can be trusted to keep track of the elapsed time itself with an acceptable amount of drift.

The display side of the timer is really a sight to behold, with the legs of each LED soldered to a pair of carefully bent copper wires so they match the angle of the front panel. The associated resistors have been artfully snipped so that their bodies sit flat on the PCB while their leads reach out to the perfect length. It looks like a maintenance nightmare in there, but we love it anyway.

As we near the half-way mark of the Circuit Sculpture Contest, there’s still plenty of time to submit your own piece of functional art. If you’ve got a project that eschews the printed circuit board for a chance to bare it all, write it up on Hackaday.io and be sure to send it in before the January 8th, 2019 deadline.

Continue reading “A Perfectly Orderly Way To Manage Your Time”

We’re Dreaming Of A Circuit Sculpture Christmas

Whether or not you chose to believe our claim that we planned it this way, the holidays happen to fall right smack in the middle of our ongoing Circuit Sculpture Contest, which challenges hackers to build circuits that double as bona fide works of art. It’s become almost too easy to spin up your own PCB, so why not try your hand at building in three dimensions and without a net? The holidays are a perfect time for it as it’s not only a reprieve from the work, school, or forced labor camp that usually ties up our waking hours, but can also be a source of inspiration.

Case in point, this festive LED Christmas tree entry that comes our way courtesy of [Vincent Mkes]. This one really has it all: a recognizable theme, fantastic wire work, copious amounts of LEDs, and in a touch that is sure to delight even the electronics Scrooges amongst our readership, he does it all with the venerable 555 timer. It’s really what the Circuit Sculpture Contest is all about: taking a circuit that might otherwise be pretty ordinary and turning it into something truly unique.

The astute Hackaday reader (as if there was any other type) will likely notice there are actually two NE555 timers under the tree, each blinking their respective bank of LEDs at a different frequency. This makes the final result a bit more vibrant, and through some last-minute revisions, [Vincent] was able to hook them both up to a single power supply to really capture the minimalist spirit of the Contest.

As an early Christmas gift to us all, [Vincent] has done an excellent job documenting this build so anyone who wishes to infuse their end of year party with a little diode-driven holiday cheer can follow along. He’s included build instructions as well as diagrams of the circuit, though we encourage anyone looking to make one of their own to experiment a bit and put their own spin on it. After all, this is supposed to be art.

There’s still plenty of time to get your own entry into the Circuit Sculpture Contest, Yule-related or otherwise. Just document your build on Hackaday.io and submit it before the January 8th, 2019 deadline. Remember that entries can’t just look cool, they still need to be functional. Words to live by in general, but doubly important when they’re the rules of a contest.

Power Wheels Gets Real With Real Wheels

We’re no stranger to Power Wheels modifications, from relatively simple restorations to complete rebuilds which retain little more than the original plastic body. These plastic vehicles have the benefit of nostalgia to keep the adults interested, and naturally kids will never get tired of their own little car or truck to tear around the neighborhood in. Many toys come and go, but we don’t expect Power Wheel projects to disappear from our tip line anytime soon.

Today’s project starts with a straightforward Power Wheels restoration story: [myromes] picked up a well-worn Jeep and decided that it needed a fresh coat of paint and some tweaks before handing the keys over to the next generation. But in an interesting spin, he decided to try mounting proper pneumatic tires on it in hopes they might imbue the pint-sized Jeep with some of the abilities of its full scale inspiration. But as it turned out, the project wasn’t quite the Sunday drive he was hoping for.

For one thing, the new wheels were much thicker than the old ones. This meant cutting away some of the plastic where they mounted so he could get the shafts to slide all the way through. At 5/16″, the original Power Wheels shafts were also thinner than what the axle the wheels were designed for. Luckily, [myromes] found that a small piece of 1/2″ PEX water pipe made a perfect bushing. Then it was just a matter of buying new push nuts to lock them in place.

That got the front wheels on, but that was the easy part. The rears had to interface with the Jeep’s motors somehow. To that end, he cut out circles of plywood and used an equal amount of Gorilla Glue and intense pressure to bond them to the new wheels. He then drilled four holes in them which lined up with the original motor mounts so he could bolt them on.

Things were going pretty well until he tried to replace the Jeep’s rear axle with a length of threaded rod from the hardware store. It wasn’t nearly strong enough, and sagged considerably after just a few test rides. He eventually had to place it with a correctly sized piece of cold rolled steel rod to keep the car from bottoming out.

While the new wheels certainly perform better than the original hard-plastic ones, there’s a bit of a downside to this particular modification. The slippy plastic wheels were something of a physical safety to keep the motors and gearboxes from getting beat up to bad; with wheels that have actual grip, the Jeep’s stock gears are probably not long for this world. But [myromes] says he’s got plans for future upgrades to the powertrain, so hopefully the issue will be resolved before the little ones need a tow back home.

For more tales from the Power Wheels garage, you might want to take a look at this fantastic rebuild complete with digital speedometer or just head straight to the big leagues with some seriously upgraded rides.

GoPro Factory Goes Nomad To Dodge Tariff Threat

Despite the fact that the United States and China are currently in the middle of a 90-day “cease fire” in their ongoing trade war, with new tariffs on hold until March 2019 while the two countries try to reach agreement, not everyone is waiting around to see who comes out on top. In a recent press release, action camera manufacturer GoPro has announced their intention to move some production out of China in the face of potential tariff expansions; which many analysts fear will be the result of the current stalemate. That’s right, only some of their production is moving.

“We’re proactively addressing tariff concerns by moving most of our US-bound camera production out of China,” says GoPro CFO Brian McGee. “We believe this diversified approach to production can benefit our business regardless of tariff implications.” Reading his words carefully, the key phrase here is “diversified approach”. GoPro doesn’t intend to move their entire production capability out of China, but only the production of the cameras which are designated for importation into the United States. GoPro models which are to be sold to other parts of the world will still be made in China.

This might seem an extravagant move just to avoid US tariffs, but with better than 40% of GoPro’s revenue for the third quarter of 2018 coming from the Americas, the company stands to be hit hard by the proposed 25% tax. Combined with the fact they shuttered their drone division last year citing “an extremely competitive aerial market”, and the proliferation of “GoPro clones” available for pennies on the dollar, it seems pretty clear that belt-tightening is the name of the game for the company that was once synonymous with action cameras.

Continue reading “GoPro Factory Goes Nomad To Dodge Tariff Threat”

Does Library Bloat Make Your Smartphone App Look Fat?

While earlier smartphones seemed to manage well enough with individual applications that only weighed in at a few megabytes, a perusal of the modern smartphone software store uncovers some positively monstrous file sizes. The fact that we’ve become accustomed to mobile applications requiring 100+ MB downloads on what’s often a metered Internet connection in only a few short years is pretty crazy if you stop to think about it.

Seeing reports that the Nest app for iOS tipped the scales at nearly 250 MB, [Alexandre Colucci] decided to investigate. On his blog he not only documents the process of taking the application apart piece by piece to find out just what’s eating up all that space, but lists some potential fixes which could shave a bit off the top. Even if you aren’t planning a spelunking expedition into your pocket supercomputer’s particular variant of the Netflix app, the methodology and tools he uses here are fascinating in their own right and might be something worth adding to your software bag of tricks.

By passing the application’s files through a disk usage visualizer called GrandPerspective, [Alexandre] immediately identified some rather large blocks of content. The bundled Apple Watch version of the app takes up 23 MB, video and audio used to walk the user through the device setup weigh in at 22 MB, and localization files for various languages consumes a surprising 33 MB. But the biggest single contributor to the application’s heft is the assorted libraries and frameworks which total up to an incredible 67 MB.

Of course the question is, how much of it is really necessary? It’s hard to be sure from an outsider’s perspective, but [Alexandre] notes that a few of the libraries used seem to be redundant or obsolete. In some cases this could be the result of old code still lurking in the project, but the four different libraries used for user tracking probably aren’t in there by accident. It also stands to reason that the instructional videos could be offloaded to something like YouTube, so that only users who need to view them have to expend their bandwidth on it.

Getting a little deeper into things, [Alexandre] notes that some of the localization images appear to be redundant. As a specific example, he points to the images of the Nest itself displaying Fahrenheit and Celsius temperatures. While logically this should only be two image files, there are actually eight copies of the Celsius image, each filed away as language-specific. These redundant localization images could easily be stripped out, but with gains measured in only a few hundred kilobytes, it probably wasn’t considered worth the effort during development.

In the end there’s really not as much bloat as we might like to believe. There were some redundant files, maybe a few questionable library inclusions, and the Apple Watch version of the app could surely be separated out. All together, it might get you a savings of 30 – 40%, but still not enough to bring it down under 100 MB.

All signs point to the fact that modern smartphone software development is just a lot more burdensome than us hackers might like. Save for projects looking to put control back into the hand’s of the users, it looks like mobile operating systems aren’t going to be slimming down anytime soon.