Maze Generator Keeps Plotter (and Kids) Busy

We can tell that [Jon Howell] is our kind of guy. After updating his vintage 1985 Hewlett-Packard plotter with WiFi and the ability to load SVG files, he obviously needed to find a bunch of stuff to run off with it. Gotta justify those hacks somehow. So he doubled down and decided support a hack with another hack by writing a maze generator to keep his plotter well fed. He was kind enough to unleash his creation on an unsuspecting Internet as an open source project, and now we all can benefit from a couple of reams worth of mazes.

The generator itself is written in Java, and should work on whatever operating system your box happens to be running thanks to the *nix and Windows wrapper scripts [Jon] provides. To create a basic maze, one simply needs to provide the script with the desired dimensions and the paper size. You can define the type of paper with either standard sizes (such as --paper a4) or in the case of a plotter with explicit dimensions (--paper 36x48in).

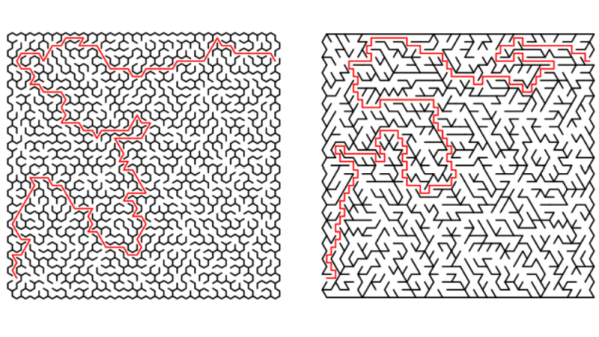
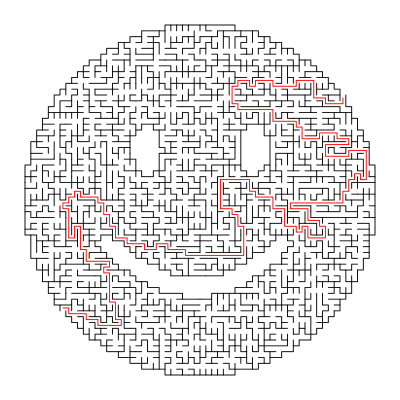
If you aren’t a big fan of right angles, there’s support for changing the internal geometry of the maze to use a hexagonal or triangle grid. You can even pass the program a black and white PNG “mask” which it will use as the boundaries for the maze itself, allowing for personalized puzzles of whatever shape catches your fancy. [Jon] even ran the Wrencher though his software, leading to the creation of a maze which we can neither confirm nor deny will be making an appearance on our Christmas cards this year.

Whether you need to prove to your significant other that the hours you spent fiddling with your plotter are well spent, or an easy way to entertain the junior humans in your life, you can thank [Jon] for your solution.

Vintage Plotter Turned Fruit Spectrometer

Fruit can be a tricky thing: if you buy it ripe you’ll be racing against time to eat the pieces before they turn into a mushy mess, but if you buy the ones which are a bit before their prime it’s not always easy to tell when they’re ready to eat. Do you smell it? Squeeze it? Toss it on the counter to see if it bounces? In the end you forget about them and they go bad anyway. That’s why here at Hackaday we sustain ourselves with only collected rainwater and thermo-stabilized military rations.

But thankfully Cornell students [Christina Chang], [Michelle Feng], and [Russell Silva] have come up with a delightfully high-tech solution to this decidedly low-tech problem. Rather than rely on human senses to determine when a counter full of fruit has ripened, they propose an automated system which uses a motorized spectrometer to scan an arrangement of fruit. The device measures the fruit’s reflectance at 678 nm, which can be used to determine the surface concentration of chlorophyll-a; a prime indicator of ripeness.

If that sounds a bit above your pay grade, don’t worry. The students were able to build a functional prototype using a 1980’s era plotter, a Raspberry Pi, and a low-cost AS7263 NIR spectral sensor from SparkFun which just so happens to have a peak responsivity of 680 nm. The scanning is performed by a PIC32MX250F128B development board with an attached TFT LCD display so the results can be easily viewed. The Raspberry Pi is used in conjunction with a Adafruit PCA9685 I2C PWM driver to control the plotter’s stepper motors. The scanning and motor control could be done with the PIC32 alone, but to save time the students decided to use the Raspberry Pi to command the PCA9685 as that was what the documentation and software was readily available for.

To perform a scan, the stepper motors home the AS7263 sensor module, and then passes it under the fruit which is laying on a clear acrylic sheet. Moving the length of the acrylic sheet, the sensor is able to scan not only multiple pieces of fruit but the entirety of each piece; allowing it to determine for example if a section of a banana has already turned. The relative ripeness of the fruit is displayed to the user on the LCD display as a heatmap: the brighter the color the more ripe it is.

At the end of their paper, [Christina], [Michelle], and [Russell] note that while the scanner worked well there’s still room for improvement. A more scientific approach to calculating how ripe each fruit is would make the device more accurate and take out the guess work on the part of the end user, and issues with darker colored fruit could potentially be resolved with additional calibration.

While a spectrometer might sound like the kind of equipment that only exists in multi-million dollar research laboratories, we occasionally see projects like this which make the technology much more accessible. This year we saw a compact spectrometer in the Hackaday Prize, and going a bit farther back in time we even featured a roundup of some of the most impressive spectrometer builds on Hackaday.io.

Continue reading “Vintage Plotter Turned Fruit Spectrometer”

Arduino-Powered Rocket Test Stand

If you’re into amateur rocketry, you pretty quickly outgrow the dinky little Estes motors that they sell in the toy stores. Many hobbyists move on to building their own homebrew solid rocket motors and experimenting with propellant mixtures, but it’s difficult to know if you’re on the right track unless you have a way to quantify the thrust you’re getting. [ElementalMaker] decided he’d finally hit the point where he needed to put together a low-cost test stand for his motors, and luckily for us decided to document the process and the results.

The heart of the stand is a common load cell (the sort of thing you’d find in a digital scale) coupled with a HX711 amplifier board mounted between two plates, with a small section of vertical PVC pipe attached to the topmost plate to serve as a motor mount. This configuration is capable of measuring up to 10 kilograms with an 80Hz sample rate, which is critically important as these type of rocket motors only burn for a few seconds to begin with. The sensor produces hundreds of data points during the short duration of the burn, which is perfect for graphing the motor’s thrust curve over time.

Given such a small window in which to make measurements, [ElementalMaker] didn’t want to leave anything to chance. So rather than manually igniting the motor and triggering the data collection, the stand’s onboard Arduino does both automatically. Pressing the red button on the stand starts a countdown procedure complete with flashing LED, after which a relay is used to energize a nichrome wire “electronic match” stuck inside the motor.

In the video after the break you can see that [ElementalMaker] initially had some trouble getting the Arduino to fire off the igniter, and eventually tracked the issue down to an overabundance of current that was blowing the nichrome wire too fast. Swapping out the big lead acid battery he was originally using with a simple 9V battery solved the problem, and afterwards his first test burns on the stand were complete successes.

If model rockets are your kind of thing, we’ve got plenty of content here to keep you busy. In the past we’ve covered building your own solid rocket motors as well as the electronic igniters to fire them off, and even a wireless test stand that lets you get a bit farther from the action at T-0.

Continue reading “Arduino-Powered Rocket Test Stand”

Every Computer Deserves A Rotary Encoder

In the era of touch screens and capacitive buttons, we’d be lying if we said we didn’t have the occasional pang of nostalgia for the good old days when interfacing with devices had a bit more heft to it. The physical clunk and snap of switches never seems to get old, and while you can always pick up a mechanical keyboard for your computer if you want to hear that beautiful staccato sound while firing off your angry Tweets, there’s a definite dearth of mechanical interface devices otherwise.

[Jeremy Cook] decided to take matters into his own hands (literally and figuratively) by designing his own multipurpose USB rotary input device. It’s not a replacement for the mouse or keyboard, but a third pillar of the desktop which offers a unique way of controlling software. It’s naturally suited to controlling things like volume or any other variable which would benefit from some fine tuning, but as demonstrated in the video after the break even has some gaming applications. No doubt the good readers of Hackaday could think of even more potential applications for a gadget like this.

The device is built around the diminutive Arduino-compatible PICO board by MellBell, which features a ATmega32u4 and native USB. This allowed him to very rapidly spin up a USB Human Interface Device (HID) with minimal headaches, all he had to do was hang his buttons and rotary encoder on the PICO’s digital pins. To that end, he [Jeremy] used the fantastic I2C rotary encoder designed by [fattore.saimon], which readers may remember as a finalist in the Open Hardware Design Challenge phase of the 2018 Hackaday Prize. He also added a NeoPixel ring around the encoder to use for some visual feedback and because, well, it just looks cool.

Since all of the core components are digital, there’s not a whole lot required in the way of wiring or passive components. This let [Jeremy] put the whole thing together on a piece of perfboard, freeing him up to spend time designing the 3D printed enclosure complete with translucent lid so he can see the NeoPixel blinkenlights. He got the tolerances tight enough that the whole device can be neatly press-fit together, and even thought to add holes in the bottom of the case so he could push the perfboard back out if he needed to down the line.

[Jeremy] spends a good chunk of the video going over the software setup and development of the firmware, and details some of the nuances he had to wrap his head around when working with the I2C encoder. He also explains the math involved in getting his encoder to emulate a mouse cursor moving in a circle, which he thinks could be useful when emulating games that originally used an encoder such as Tempest or Pong.

We’ve seen similar USB “knobs” in the past for controlling volume, but the additional inputs that [Jeremy] built into his version definitely makes it a bit more practical. Of course we’re suckers for interesting USB input devices to begin with.

Continue reading “Every Computer Deserves A Rotary Encoder”

A Pi Cluster To Hang In Your Stocking With Care

It’s that time of year again, with the holidays fast approaching friends and family will be hounding you about what trinkets and shiny baubles they can pretend to surprise you with. Unfortunately there’s no person harder to shop for than the maker or hacker: if we want it, we’ve probably already built the thing. Or at least gotten it out of somebody else’s trash.

But if they absolutely, positively, simply have to buy you something that’s commercially made, then you could do worse than pointing them to this very slick Raspberry Pi cluster backplane from [miniNodes]. With the ability to support up to five of the often overlooked Pi Compute Modules, this little device will let you bring a punchy little ARM cluster online without having to build something from scratch.

The Compute Module is perfectly suited for clustering applications like this due to its much smaller size compared to the full-size Raspberry Pi, but we don’t see it get used that often because it needs to be jacked into an appropriate SODIMM connector. This makes it effectively useless for prototyping and quickly thrown together hacks (I.E. everything most people use the Pi for), and really only suitable for finished products and industrial applications. It’s really the line in the sand between playing around with the Pi and putting it to real work.

[miniNodes] calls their handy little device the Carrier Board, and beyond the obvious five SODIMM slots for the Pis to live in, there’s also an integrated gigabit switch with an uplink port to get them all connected to the network. The board powers all of the nodes through a single barrel connector on the side opposite the Ethernet jack, leaving behind the masses of spider’s web of USB cables we usually see with Pi clusters.

The board doesn’t come cheap at $259 USD, plus the five Pi Compute Modules which will set you back another $150. But for the ticket price you’ll have a 20 core ARM cluster with 5 GB of RAM and 20 GB of flash storage in a 200 x 100 millimeter (8 x 4 inch) footprint, with an energy consumption of under 20 watts when running at wide open throttle. This could be an excellent choice for mobile applications, or if you just want to experiment with parallel processing on a desktop-sized device.

Amazon is ready for the coming ARM server revolution, are you? Between products like this and the many DIY ARM clusters we’ve seen over the years, it looks like we’re going to be dragging the plucky architecture kicking and screaming into the world of high performance computing.

[Thanks to Baldpower for the tip.]

MakerBot Moves Away From Makers With New Printer

If you’ve been following the desktop 3D printing market for the last couple years, you’re probably aware of the major players right now. Chinese companies like Creality are dominating the entry level market with machines that are priced low enough to border on impulse buys, Prusa Research is iterating on their i3 design and bringing many exciting new features to the mid-range price point, and Ultimaker remains a solid choice for a high-end workhorse if you’ve got the cash. But one name that is conspicuously absent from a “Who’s Who” of 3D printing manufacturers is MakerBot; despite effectively creating the desktop 3D printing market, today they’ve largely slipped into obscurity.

So when a banner popped up on Thingiverse (MakerBot’s 3D print repository) advertising the imminent announcement of a new printer, there was a general feeling of surprise in the community. It had been assumed for some time that MakerBot was being maintained as a zombie company after being bought by industrial 3D printer manufacturer Stratasys in 2013; essentially using the name as a cheap way to maintain a foothold in the consumer 3D printer market. The idea that they would actually release a new consumer 3D printer in a market that’s already saturated with well-known, agile companies seemed difficult to believe.

But now that MakerBot has officially taken the wraps off a printer model they call Method, it all makes sense. Put simply, this isn’t a printer for us. With Method, MakerBot has officially stepped away from the maker community from which it got its name. While it could be argued that their later model Replicator printers were already edging out of the consumer market based on price alone, the Method makes the transition clear not only from its eye watering $6,500 USD price tag, but with its feature set and design.

That said, it’s still an interesting piece of equipment worth taking a closer look at. It borrows concepts from a number of other companies and printers while introducing a few legitimately compelling features of its own. While the Method might not be on any Hackaday reader’s holiday wish list, we can’t help but be intrigued about the machine’s future.

Continue reading “MakerBot Moves Away From Makers With New Printer”

Open Hardware Board For Robust USB Power Monitoring

We’ve all seen the little USB power meters that have become popular since nearly every portable device has adopted some variation of USB for charging. Placed between the power source and the device under test, they allow you to see voltage and current in real time. Perfect for determining how long you’ll be able to run a USB powered device on batteries, or finding out if a USB power supply has enough current to do the business.

[Jonas Persson] liked the idea of these cheap little gadgets, but wanted something a bit more scientific. His design, which he refers to as UPM, is essentially a “smart” version of those ubiquitous USB gadgets. Instead of just showing the data on a little LCD screen, it can now be viewed on the computer and analyzed. His little gadget even allows you to cut power to the device under test, potentially allowing for automated testing of things such as inrush current.

Essentially the UPM works in much the same way as the simple USB meters: one side of the device goes towards the upstream power source, and the device under test plugs into the other side. Between the two devices is a 16 bit ADC and differential amplifier which measures the voltage and current. There’s a header on the board which connects to the ADC if you wanted to connect the UPM to an external microcontroller or other data logging device.

But most likely you would be using the internal microcontroller to analyze the output of the ADC over I2C, which [Jonas] very cleverly connected to the upstream port with an integrated USB hub. One side of the hub goes off to the device being tested, and the other to the microcontroller. So the host device will see both the UPM’s integrated microcontroller and the target device at the same time. From there, you can use the ncurses user interface to monitor and control the device in real-time.

While the hardware looks more or less finished, [Jonas] has some more plans for the software side of UPM, including support for remote control and monitoring over TCP/IP as well as robust logging capabilities. This is definitely a very interesting project, and we’re excited to see it develop further.

In the past we’ve seen homebrew USB power meter builds, and even commercial offerings which boasted computer-based logging and analysis, so it was only a matter of time before somebody combined them into one.