Talking To Laptop Batteries With The ESP8266

It’s not something you often give a lot of thought to, but the modern consumer laptop battery is a pretty advanced piece of technology. Not only does it pack several dozen watt-hours of energy into a relatively small and lightweight package, but it features integrated diagnostic capability to make sure all those temperamental lithium cells are kept in check. Widely available and extremely cheap thanks to the economies of scale (unless you try to get them from the OEM, anyway), they’re a very compelling option for powering your projects.

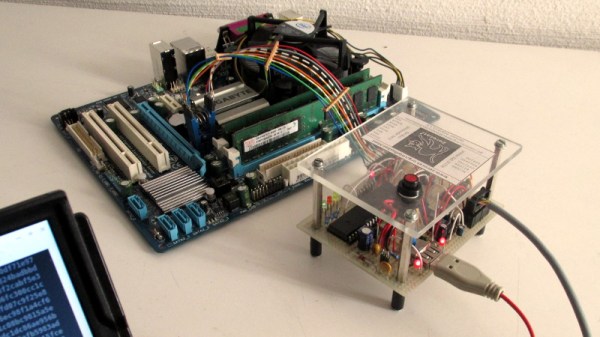
Of course, it also helps if, like [teliot] you have a bunch of the things lying around. For reasons we won’t get into, he’s got a whole mess of Acer AL12x32 battery packs which he wanted to use for something other than collecting dust. He had the idea of hooking one up to a solar panel and using it as a power supply for some ESP8266 projects but wanted to be able to talk to the battery for status and diagnostic information. After studying the Smart Battery System (SBS) protocol the batteries use, he was able to come up with some code that lets him pull 37 separate fields of information from the pack’s onboard electronics using his ESP8266.

Battery consumption over time

It took some fiddling with a multimeter to figure out which pin did what on the eight pin interface of the battery. Two of the pins need to be shorted to enable the dual 12 VDC pins to kick in. Technically that’s all you really need to do if you want to utilize the battery in a low-tech sort of way. But to actually get some information from the battery, [teliot] had to identify the two pins which are for the System Management Bus (SMBus) interface where the SBS data lives.

Once he knew which pins to talk to the battery on, the rest was fairly easy. SBS is well documented, and the SMBus interface is very similar to I2C. Like all the cool kids are doing these days, his code publishes the battery info to MQTT where he can plot it and get finely grained info on the performance of his solar power system.

This isn’t the first time we’ve seen a hacker wrangle laptop batteries through SMBus, but it’s always nice to get multiple perspectives on a topic. If you plan on making this kind of thing part of your standard bag of tricks, you might even want to take the time to build a dedicated SMBus scanner.

[via /r/esp8266]

“Watch Dogs” Inspired Hacking Drone Takes Flight

They say that life imitates art, which in modern parlance basically means if you see something cool in a video game, movie or TV show, you might be inclined to try and build your own version. Naturally, such things generally come in the form of simple props, perhaps with the occasional embedded LED or noise making circuit. It’s not as if you can really build a phaser from Star Trek or a phone booth that’s bigger on the inside.

But after seeing the hacking quadcopter featured in the video game Watch Dogs 2, [Glytch] was inspired to start work on a real-world version. It doesn’t look much like the drone from the game, but that was never the point. The idea was to see how practical a small flying penetration testing platform is with current technology, and judging by the final build, we’d say he got his answer.

All the flight electronics are off the shelf quadcopter gear. It’s running on a Betaflight OMNIBUS F4 Pro V2 Flight controller with an M8N GPS mounted in the front and controlling the 2006 2400KV motors with a DYS F20A ESC. Interestingly [Glytch] is experimenting with using LG HG2 lithium-ion cells to power the quad rather than the more traditional lithium-polymer pack, though he does mention there are some issues with the voltage curve between the two battery technologies.

But the real star of the show is the payload: a Hak5 Pineapple Nano. As the Pineapple provides a turn-key penetration testing platform on its own, [Glytch] just needed a way to safely carry it and keep it powered. The custom frame keeps it snug, and the 5 Volt Battery Eliminator Circuit (BEC) on the DYS F20A ESC combined with a female USB port allows powering the Pineapple without having to make any hardware modifications.

We’ve seen quadcopters with digital weaponry before, though not nearly as many as you might think. But as even the toy grade quadcopters become increasingly capable, we imagine the airborne hacking revolution isn’t far away.

Continue reading ““Watch Dogs” Inspired Hacking Drone Takes Flight”

Flash Your Libre Firmware With A Libre Programmer

Whether or not you personally agree with all the ideals of the Free Software Foundation (FSF), you’ve got to give them credit: they don’t mess around. They started by laying the groundwork for a free and open source operating system, then once that dream was realized, started pushing the idea of replacing proprietary BIOS firmware with an open alternative such as Libreboot. But apparently, even that’s not enough, as there’s still more freedom to be had. We’re playing 4D Libre Chess now, folks.

To flash your libre boot firmware on your libre OS running computer without any proprietary funny business, you’re going to need a libre chip programmer. Luckily, the FSF has just awarded the Zerocat Chipflasher their “Respects Your Freedom” certification, meaning every element of the product is released under a free license for your hacking enjoyment. According to the FSF, this is a major milestone towards their goal of providing users a truly free and open source computer, from the browser all the way down to the BIOS.

Of course, you don’t need to be Richard Stallman to appreciate a fully open chip programmer. With the software, wiring diagrams, and PCB files available on the Chipflasher’s website, the project is an excellent educational reference. Is also means that with a clone the Chipflasher’s Git repository, you’re well on the way to spinning up your own build of the device.

Given the roughly $350 USD price tag on the first generation Zerocat Chipflasher, it seems fairly likely we’ll be seeing some DIY builds of this device before too long. Not that we want to deprive Zerocat commercial success for this very neat piece of gear, but for many it’s a mighty steep price; even if you do get all the Freedoms.

It may use a device of slightly more nebulous morality than the Zerocat Chipflasher, but our own [Bryan Cockfield] documented the saga of getting Libreboot installed on a Thinkpad X200 if you’d like to know more about the high stakes world of BIOS replacement. Whatever it takes to get that Intel Management Engine off your penguin-powered box.

A Custom Keypad With Vision

A combination of cheap USB HID capable microcontrollers, the ability to buy individual mechanical keys online, and 3D printing has opened up a whole new world of purpose-built input devices. Occasionally these take the form of full keyboards, but more often than not they are small boards with six or so keys that are dedicated to specific tasks or occasionally a particular game or program. An easy and cheap project with tangible benefits to anyone who spends a decent amount of time sitting in front of the computer certainly sounds like a win to us.

But this build by [r0ckR2] takes the concept one step farther. Rather than just being a simple 3×3 keypad, his includes a small screen that shows the current assignments for each key. Not only does this look really cool on the desk (always important), but it also allows assigning multiple functions to each key. The screen enables the user to switch between different pages of key assignments, potentially allowing a different set of hot keys or macros for every piece of software they use.

The case is entirely 3D printed, as are the key caps. To keep things simple, [r0ckR2] didn’t bother to design a full enclosure, leaving all the electronics exposed on the back. Some might think it’s a little messy, but we appreciate the fact that it gives you easy access to the internals if you need to fix anything. Rubber feet were added to the bottom so it doesn’t slide around while in use, but otherwise the case is a pretty straightforward affair.

As for the electronics, [r0ckR2] went with an STM32 “Blue Pill” board, simply because it’s what he had on hand. The screen is a ST7735 1.44 inch SPI TFT, and the keys themselves are Cherry MX Red clones he got off of eBay. All in all, most of the gear came from his parts bins or else was only a couple bucks online.

If you’re looking for something a bit bigger, check out this gorgeous Arduino-powered version, or this far more utilitarian version. Both are almost entirely 3D printed, proving the technology is capable of more than making little boats.

[via /r/functionalprint]

Animated Bluetooth Bike Turn Signals

Tired of risking his life every time he had to signal a turn using his hands while riding his bicycle in rainy Vancouver, [Simon Wong] decided he needed something a bit higher tech. But rather than buy something off the shelf, he decided to make it into his first serious Arduino project. Given the final results and the laundry list of features, we’d say he really knocked this one out of the park. If this is him getting started, we’re very keen to see where he goes from here.

So what makes these turn signals so special? Well for one, he wanted to make it so nobody would try to steal his setup. He wanted the main signal to be easily removable so he could take it inside, and the controls to be so well-integrated into the bike that they wouldn’t be obvious. In the end he managed to stuff a battery pack, Arduino Nano, and an HC-05 module inside the handlebars; with just a switch protruding from the very end to hint that everything wasn’t stock.

On the other side, a ATMEGA328P microcontroller along with another HC-05 drives two 8×8 LED matrices with MAX7219 controllers. Everything is powered by a 18650 lithium-ion battery with a 134N3P module to bring it up to 5 VDC. To make the device easily removable, as well as keep the elements out, all the hardware is enclosed in a commercial waterproof case. As a final touch, [Simon] added a Qi wireless charging receiver to the mix so he could just pull the signal off and drop it on a charging pad without needing to open it up.

It’s been some time since we’ve seen a bike turn signal build, so it’s nice to see one done with a bit more modern hardware. But the real question: will he be donning a lighted helmet for added safety?

Continue reading “Animated Bluetooth Bike Turn Signals”

VCF East 2018: The Desktop ENIAC

The ENIAC, or Electronic Numerical Integrator and Computer, is essentially the Great Great Grandfather of whatever device you’re currently reading these words on. Developed during World War II for what would be about $7 million USD today, it was designed to calculate artillery firing tables. Once word got out about its capabilities, it was also put to work on such heady tasks as assisting with John von Neumann’s research into the hydrogen bomb. The success of ENIAC lead directly into the development of EDVAC, which adopted some of the now standard computing concepts such as binary arithmetic and the idea of stored programs. The rest, as they say, is history.

But ENIAC wasn’t just hugely expensive and successful, it was also just plain huge. While it’s somewhat difficult for the modern mind to comprehend, ENIAC was approximately 100 feet long and weighed in at a whopping 27 tons. In its final configuration in 1956, it contained about 18,000 vacuum tubes, 7,000 diodes, 70,000 resistors, 10,000 capacitors, and 6,000 switches. All that hardware comes with a mighty thirst for power: the ENIAC could easily suck down 150 kW of electricity. At the time this all seemed perfectly reasonable for a machine that could perform 5,000 instructions per second, but today an Arduino would run circles around it.

This vast discrepancy between the power and size of modern hardware versus such primordial computers was on full display at the Vintage Computer Festival East, where Brian Stuart demonstrated his very impressive ENIAC emulator. Like any good vintage hardware emulator, his project not only accurately recreates the capabilities of the original hardware, but attempts to give the modern operator a taste of the unique experience of operating a machine that had its heyday when “computers” were still people with slide rules. Continue reading “VCF East 2018: The Desktop ENIAC”

SpaceX’s Next Giant Leap: Second Stage Recovery

With the successful launch of the Bangabandhu-1 satellite on May 11th, the final version of the Falcon 9 rocket has finally become operational. Referred to as the “Block 5”, this version of the rocket is geared specifically towards reuse. The lessons learned from the recovery and reflight of earlier builds of the F9 have culminated into rocket that SpaceX hopes can go from recovery to its next flight in as few as 24 hours. If any rocket will make good on the dream of spaceflight becoming as routine as air travel, it’s going to be the Falcon 9 Block 5.

While there might still be minor tweaks and improvements made to Block 5 over the coming years, it’s safe to say that first stage recovery of the Falcon 9 has been all but perfected. What was once the fodder of campy science fiction, rockets propulsively lowering themselves down from the sky and coming to rest on spindly landing legs that popped out of the sides, is now a reality. More importantly, not only is SpaceX able to bring the towering first stage back from space reliably, they’re able to refuel it, inspect it, and send it back up without having to build a new one for each mission.

But as incredible a technical accomplishment as this is, SpaceX still isn’t recovering the entire Falcon 9 rocket. At best, they have accomplished the same type of partial reusability that the Space Shuttle demonstrated on its first flight all the way back in 1981. Granted they are doing it much faster and cheaper than it was done on the Shuttle, but it still goes against the classic airplane analogy: if you had to replace a huge chunk of the airliner every time it landed, commercial air travel would be completely impractical.

SpaceX has already started experimenting with recovering and reusing the payload fairings of the Falcon 9, and while they haven’t pulled it off yet, they’ll probably get there. That leaves only one piece of the Falcon 9 unaccounted for: the second stage. Bringing the second stage back to Earth in one piece might well be the most challenging aspect of developing the Falcon 9. But if SpaceX can do it, then they’ll have truly developed humanity’s first fully reusable rocket, capable of delivering payloads to space for little more than the cost of fuel.

Continue reading “SpaceX’s Next Giant Leap: Second Stage Recovery”