Spared No Expense: Cloning The Jurassic Park Explorer

While you’d be hard pressed to find any serious figures on such things, we’d wager there’s never been a vehicle from a TV show or movie that has been duplicated by fans more than the Staff Jeeps from Jurassic Park. Which is no great surprise: not only do they look cool, but it’s a relatively easy build. A decent paint job and some stickers will turn a stock Wrangler into a “JP Jeep” that John Hammond himself would be proud of.

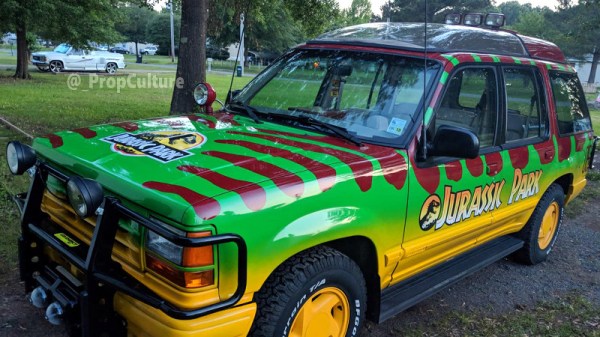
While no less iconic, there are far fewer DIY builds of the highly customized Ford Explorer “Tour Vehicles”. As a rather large stretch of the film takes place within them, the interiors were much more detailed and bears little resemblance to the stock Explorer. Building a truly screen accurate Jurassic Park Tour Vehicle was considered so difficult that nobody has pulled it off since the movie came out in 1993. That is until [Brock Afentul] of PropCulture decided to take on the challenge.

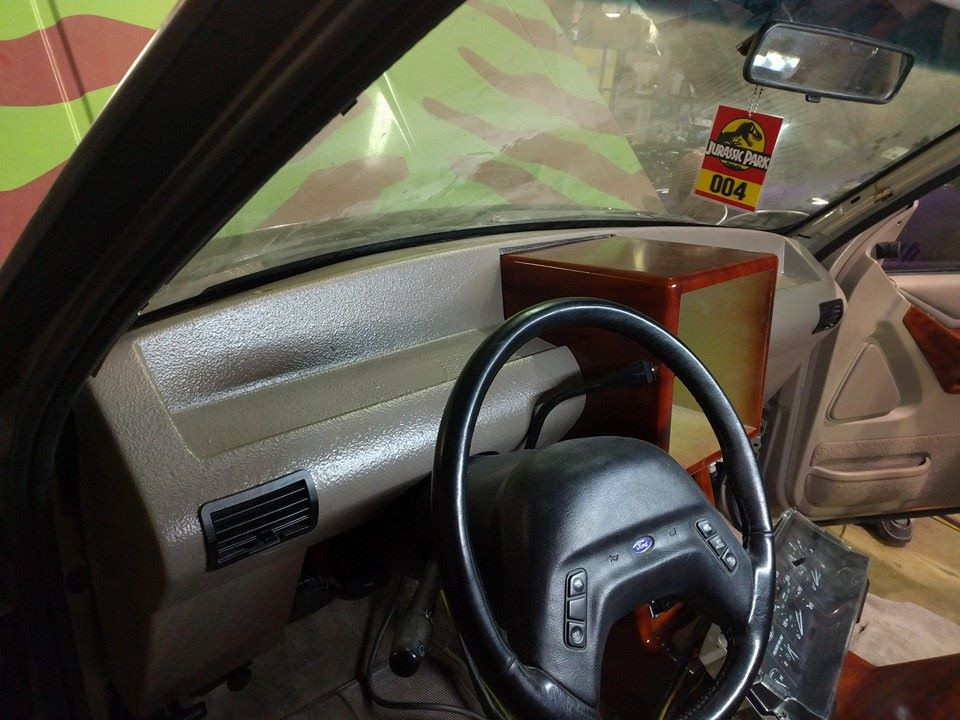
In an epic journey spanning five years, [Brock] has created what he believes is the most accurate Jurassic Park Tour Vehicle ever produced; and looking at the side by side shots he’s done comparing his Explorer to the ones from the movie, it’s hard to disagree. A massive amount of work went into the interior, leaving essentially nothing untouched. While previous builds have tried to modify the stock dashboard to look like the one from the movie, he built a completely new dash from MDF and foam and coated it in fiberglass. The center console featuring the large display was also faithfully reproduced from the movie, and runs screen accurate animations, maps, and tour information. The seats also had to be replaced, multiple times in fact, as he had a considerable amount of trouble getting somebody to upholster them to his standards.

But perhaps the most difficult component of all was the clear acrylic roof bubble. These were critical to filming the movie, as they not only let the viewer see down into the Tour Vehicles but also let the characters see out during the iconic tyrannosaurus attack. But because the roof bubble was created only for the movie and never existed as a real aftermarket product, it usually gets ignored in Tour Vehicle builds. It’s simply too difficult to produce for most people. The omission of the bubble was always considered a case of artistic license; in the same way nobody expects a replica DeLorean from Back to the Future to actually fly or travel through time.

But [Brock] wanted to take his Tour Vehicle all the way, so he partnered up with a local glass shop that let him rent time in their oven so he could heat up acrylic sheets. Once heated to the appropriate temperature, they could be removed and wrapped around a mold to make the bubble. The process took weeks to perfect, but in the end he and a few friends got the hang of it and were able to produce a gorgeous roof bubble that they fitted to the already very impressive Explorer.

While previous Jurassic Park Tour Vehicle replicas were unquestionably awesome, this build really does take it to the next level. Short of equipping the garage with a movie-accurate super computer, it’s hard to see how the bar can get any higher.

Hacking A Cheap Laser Rangefinder

When a new piece of technology comes out, the price is generally so high that it keeps away everyone but the die hard early adopters. But with time the prices inch down enough that more people are willing to buy, which then drives the prices down even more, until eventually the economies of scale really kick in and the thing is so cheap that it’s almost an impulse buy. Linux SBCs, Blu-ray lasers, 3D printers; you name it and the hacker community has probably benefited from the fact that it’s not just the hacker community that’s interested anymore.

Which is exactly what’s started to happen with laser rangefinders. Once almost exclusively a military technology, you can now pick a basic “laser tape measure” for less than $40 USD from the normal overseas suppliers. Unfortunately, as [iliasam] found, they aren’t particularly well suited other tasks. For one there’s no official way of getting the data out of the thing, but the other problem is that the sample rate is less than one per second. Believing the hardware itself was promising enough, he set out to reverse engineer and replace the firmware running on one of these cheap laser rangefinders (Google Translate from Russian).

His blog post is an absolute wealth of information on how these devices operate, and a must read for anyone interested in reverse engineering. But the short version is that he figured out a way to reprogram the STM32F100C8T6 microcontroller used in the device, and develop his own firmware that addresses the usability concerns of this otherwise very promising gadget.

With some minor hoop jumping, the laser tape measure PCB can be hooked up to an ST-Link programmer, and the firmware provided by [iliasam] can be used to enable an easy to use serial interface. Perfect for pairing with an Arduino or Raspberry Pi to get fast and accurate range data without breaking the bank.

It probably won’t surprise you to see this isn’t the first time [iliasam] has gotten down and dirty with a laser rangefinder. This extremely impressive build from last year allowed for incredibly accurate 3D scans of his room, and before that he created his own rangefinder from scratch.

Continue reading “Hacking A Cheap Laser Rangefinder”

Investigating The Tiny Salvaged UPS From A Lightbulb

Recently I had the opportunity to do a teardown of a battery-backed LED bulb, and found some interesting details on how the device operated. Essentially, the bulb contained a low voltage DC uninterruptible power supply that would automatically switch between AC power and internal battery as needed. The implications of this seemed pretty exciting. For around $12 at big box retailers, this little bulb could be a cheap and convenient solution for providing fault tolerant power to microcontrollers and other low-power devices.

The teardown was a runaway success, with quite a bit of discussion of the UPS idea specifically. Some people hated it, others loved it. But as we’ve come to expect from Hackaday readers, the comments from both sides of the aisle contained keen observations and invaluable real-world experience. From the safety of the device to the accuracy of the manufacturer’s claims, it seems like every element of the product was addressed.

I had ended the teardown with a promise that I’d continue experimenting with the tiny salvaged UPS, but even if I hadn’t, with so much feedback it seemed revisiting the subject was all but a necessity. It this little UPS really viable? Is it too dangerous to safely implement in your project? Will the thing just blow up?

So with your comments as a guide, and free of the somewhat restrictive teardown format, I set out to conduct a more thorough investigation of this little circuit that caused so much debate last month. It’s not all good news, but it’s not in the trash either. Not yet, anyway.

Continue reading “Investigating The Tiny Salvaged UPS From A Lightbulb”

Wireless Headphone Hack Dangles Batteries Like Earrings

Koss Porta Pro headphones are something of a rarity in the world of audio gear: they’re widely regarded as sounding great, but don’t cost an exorbitant amount of money. Since the line was introduced in 1984, they’ve been the go-to headphones for those who don’t subscribe to the idea that you should have to take out a loan from the bank just to enjoy your music.

[Jake Bickhard] is a confirmed Porta Pro disciple, owning enough pairs of them that he’s cagey about confirming how many are actually kicking around his home. The only thing he doesn’t like about them is the fact that they’re wired. As it happens, Koss just recently came out with a Bluetooth version of the venerable headphones. But he thought he could do just as well combining a pair of his with a water damaged pair of Bluetooth earbuds he had lying around.

The Porta Pros are easy to take apart, and removing the old wire was no problem. He then cut the “buds” on the Bluetooth earbuds he had, with the intention of just striping the wires and soldering it up to the pads on the Porta speakers. But things didn’t quite go as expected.

What [Jake] hadn’t realized was that the battery for the Bluetooth earbuds wasn’t in the main housing, the power comes from a tiny battery inside each bud. That meant he needed to keep the batteries connected even though the Porta Pro obviously doesn’t have a spot to mount them. In the future he says he’ll address the issue properly, but for now the two batteries hang from the headphones: making it look like he’s wearing the world’s ugliest earrings. But at least he’s happy with the performance of the finished modification, saying they’re even louder now than when they were when wired.

This is a perfect project if you’re cursed with a mobile device that had enough “courage” to take the headphone jack away from you. Though you might first want to study the fine art of soldering headphone wires.

Ditch The Tapes, Put An Android In Your Deck

While we here at Hackaday never question why an individual took on a particular project, it surely doesn’t stop our beloved readers from grabbing their pitchforks and demanding such answers in the comments. Perhaps no posts generate more of this sort of furore than the ones which feature old audio gear infused with modern hardware. In almost every case the answer is the same: the person liked the look and feel of vintage hardware, but didn’t want to be limited to antiquated media.

That sentiment is perhaps perfectly personified by the TapeLess Deck Project, created by [Artur Młynarz]. His creations combine vintage cassette decks with an Android phone small enough to fit behind the tape door. An Android application which mimics the look of a playing tape, complete with “hand written” track info, completes the illusion.

The output from the phone is tied into the deck where the audio signal from the tape head would have been, so the volume controls and VU meters still work as expected. Watching the meters bounce around while the animated “tape” plays on the screen really does look incredibly slick, though the effect is somewhat hindered by the fact the physical playback controls don’t seem to be implemented. Incidentally, the whole experience works better if the plastic window on the tape door is removed; that way you can utilize the touch and swipe interface [Artur] has in the software.

We’ve seen previous attempts to modernize the audio cassette experience, but they’ve tended to be more of a novelty than anything. But these decks are nice enough that you can like them non-ironically. Though if we’re talking about portable tape players, there’s only room for one in our cold mechanical hearts.

[Thanks to Nikolai for the tip]

Continue reading “Ditch The Tapes, Put An Android In Your Deck”

InSight Brings New Tech To Mars

Unless you’ve got your ear on the launch pad so to speak, you might not be aware that humanity just launched a new envoy towards the Red Planet. Estimated to touch down in Elysium Planitia on November 26th, the InSight lander is relatively low-key as far as interplanetary missions go. Part of the NASA’s “Discovery Program”, it operates on a considerably lower budget than Flagship missions such as the Curiosity rover; meaning niceties like a big advertising and social media campaign to get the public excited doesn’t get a line item.

Which is a shame, because not only are there much worse things to do with tax money than increase public awareness of scientific endeavours, but because InSight frankly deserves a bit more respect than that. Featuring a number of firsts, the engineers and scientists behind InSight might have been short on dollars, but ambition was in ample supply.

So in honor of the successful launch, let’s take a look at the InSight mission, the unique technology onboard, and the answers scientists hope it will be able to find out there in the black.

Continue reading “InSight Brings New Tech To Mars”

Arduino Star Tracker Raises The Bar

Proving that astrophotography doesn’t have to break the bank, [Gerald Gattringer] has recently documented his DIY “barn door” style star tracker which is built almost entirely from scratch. Short of the Arduino and stepper motor, all the components were either made by hand or are standard hardware store finds.

The build starts with three aluminum plates which [Gerald] cut by hand with an angle grinder. He then drilled all the necessary screw holes and a rectangular opening for the threaded rod to pass through. He even used epoxy to mount a nut to the bottom plate which would eventually attach it to the tripod.

The plates were then roughed up and spray painted black so they wouldn’t reflect light. The addition of a couple of screws, nuts, and a standard hinge.

Motion is provided by a 28BYJ-48 stepper which is connected to the drive nut by way of a belt. The spinning nut is used to raise and lower the threaded rod which opens and closes the “door”. To control the motor, [Gerald] is using an Arduino Nano coupled with a ULN2003 Darlington array which live on a routed PCB he made with his school’s Qbot MINImill. While some might say the Arduino is unnecessary for this project, it does make the final calibration of the device much easier.

We’ve covered a number of similar star trackers here on Hackaday, including one that you crank by hand. But the professional looking final result really makes this build stand out.