Spoofing Cell Networks With A USB To VGA Adapter

RTL-SDR brought cheap and ubiquitous Software Defined Radio (SDR) to the masses, opening up whole swaths of the RF spectrum which were simply unavailable to the average hacker previously. Because the RTL-SDR supported devices were designed as TV tuners, they had no capability to transmit. For the price they are still an absolutely fantastic deal, and deserve to be in any modern hacker’s toolkit, but sometimes you want to reach out and touch someone.

GSM network broadcast from a VGA adapter

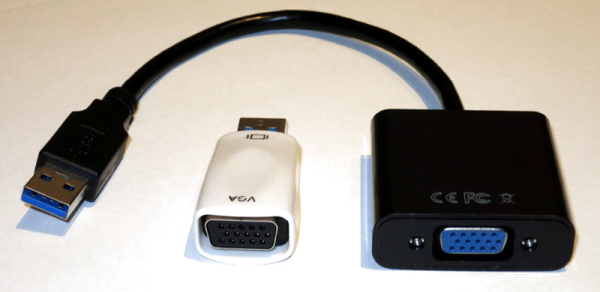
Now you can. At OsmoDevCon [Steve Markgraf] released osmo-fl2k, a tool which allows transmit-only SDR through cheap USB 3.0 to VGA adapters based on the Fresco Logic FL2000 chip. Available through the usual overseas suppliers for as little has $5 USD, these devices can be used unmodified to transmit low-power FM, DAB, DVB-T, GSM, UMTS and GPS signals.

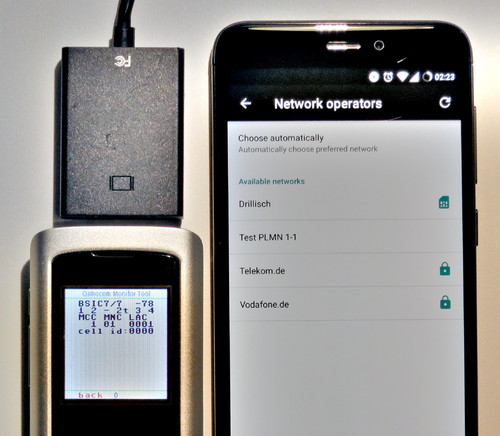
In a demonstration on the project page, one of these USB VGA adapters is used to broadcast a GSM cellular network which is picked up by the adjacent cell phones. Another example shows how it can be used to broadcast FM radio. A GitHub repository has been set up which includes more examples. The signals transmitted from the FL2000 chip are obviously quite weak, but the next step will logically be the hardware modifications necessary to boost transmission to more useful levels.

To say this is a big deal is something of an understatement. For a few bucks, you’ll be able to get a device to spoof cellular networks and GPS signals. This was possible before, of course, but took SDR hardware that was generally outside the budget of the casual experimenter. If you bought a HackRF or an Ettus Research rig, you were probably responsible enough not to get into trouble with it, but that’s not necessarily the case anymore. As exciting as this technology is, we would be wise to approach it with caution. In an increasingly automated world, GPS spoofing can have some pretty bad results.

Real-Time Polarimetric Imager From 1980s Tech

It’s easy to dismiss decades old electronics as effectively e-waste. With the rapid advancements and plummeting prices of modern technology, most old hardware is little more than a historical curiosity at this point. For example, why would anyone purchase something as esoteric as 1980-era video production equipment in 2018? A cheap burner phone could take better images, and if you’re looking to get video in your projects you’d be better off getting a webcam or a Raspberry Pi camera module.

But occasionally the old ways of doing things offer possibilities that modern methods don’t. This fascinating white paper from [David Prutchi] describes in intricate detail how a 1982 JVC KY-1900 professional video camera purchased for $50 on eBay was turned into a polarimetric imager. The end result isn’t perfect, but considering such a device would normally carry a ~$20,000 price tag, it’s good enough that anyone looking to explore the concept of polarized video should probably get ready to open eBay in a new tab.

Likely many readers are not familiar with polarimetric imagers, it’s not exactly the kind of thing they carry at Best Buy. Put simply, it’s a device that allows the user to visualize the polarization of light in a given scene. [David] is interested in the technology as, among other things, it can be used to detect man-made materials against a natural backdrop; offering a potential method for detecting mines and other hidden explosives. He presented a fascinating talk on the subject at the 2015 Hackaday SuperConference, and DOLpi, his attempt at building a low-cost polarimetric imager with the Raspberry Pi, got him a fifth place win in that year’s Hackaday Prize.

While he got good results with his Raspberry Pi solution, it took several seconds to generate a single frame of the image. To be practical, it needed to be much faster. [David] found his solution in an unlikely place, the design of 1980’s portable video cameras. These cameras made use of a dichroic beamsplitter to separate incoming light into red, blue, and green images; and in turn, each color image was fed into a dedicated sensor by way of mirrors. By replacing the beamsplitter assembly with a new 3D printed version that integrates polarization filters, each sensor now receives an image that corresponds to 0, 45, and 90 degrees polarization.

With the modification complete, the camera now generates real-time video that shows the angle of polarization as false color. [David] notes that the color reproduction and resolution is quite poor due to the nature of 30+ year old video technology, but that overall it’s a fair trade-off for running at 30 frames per second.

In another recent project, [David] found a way to hack optics onto a consumer-level thermal imaging camera. It’s becoming abundantly clear that he’s not a big fan of leaving hardware in an unmodified state.

Arduino Revives Junkyard Laser Cutter

Some people have all the luck. [MakerMan] writes in to gloat tell us about a recent trip to the junkyard where he scored a rather serious looking laser cutter. This is no desktop-sized K40 we’re talking about here; it weighs in at just under 800 pounds (350 Kg), and took a crane to deliver the beast to his house. But his luck only took him so far, as closer inspection of the machine revealed it was missing nearly all of its internal components. Still, he had the frame, working motors, and laser optics, which is a lot more than we’ve ever found in the garbage.

After a whirlwind session with his wire cutters, [MakerMan] stripped away most of the existing wiring and the original control board inside the electronics bay. Replacing the original controller is an Arduino Nano running Grbl, likely giving this revived laser cutter better compatibility with popular open source tools than it had originally. Even though the laser cutter was missing a significant amount of hardware, he did luck out that both the motor drivers were still there (and working) as well as the dual power supplies to run everything.

After a successful motion test, [MakerMan] then goes on to install a new 90W laser tube. Supporting the tube is a rigged up water cooling system using a plastic jug and a cheap bilge pump. He also added an air assist system, complete with side mounted compressor. This pushes air over the laser aperture, helping to keep smoke and debris away from the beam. Finally, a blower was installed in the bottom of the machine with flexible ducting leading outside to vent out the smoke and fumes that are produced when the laser is in operation.

This machine is a considerable upgrade from the previous laser [MakerMan] built, and as impressive as this rebuild is so far, we’re interested in seeing where it goes from here. If you ask us, this thing is begging for an embedded LaserWeb server.

Continue reading “Arduino Revives Junkyard Laser Cutter”

Browsing Modern Day BBS On The Epson PX-8 Laptop

As you read this, there are still people chatting away on Bulletin Board Systems all over the world. Running on newly written software and without the need to actually use a dial-up modem, these (slightly) more modern takes on the BBSs of yore can be compelling diversion for those who might want to decompress a bit from contemporary social networks.

[Blake Patterson] is one of these people, and he writes in to tell us about his recent experiments with using a particularly gorgeous example the Epson PX-8 “Geneva” laptop on modernized BBSs. The form factor of the device makes it a fairly convenient client for chatting, despite the somewhat unusual screen. Luckily, modern BBS software is able to cope with the PX-8’s 80 character by 8 line LCD display, it’s just a matter of getting the thing online.

The trick is tethering the PX-8 to a Linux machine as a serial terminal. [Blake] had to build a serial cable for the laptop, and then used a basic USB-to-serial converter to get it connected to a Raspberry Pi. Once you’ve logged in over serial, you can simply fire off a telnet command to connect to the BBS of your choice. In the video after the break, he demonstrates what it’s like browsing and chatting on a BBS using the PX-8. The screen certainly takes a bit of getting used to, but actually works fairly well given the nature of the BBS interface.

[Blake] recently gave us a look at a Wi-Fi “modem” for retro computers based on the ESP8266, if you’d rather cruise your favorite BBS without a dangling Pi.

Continue reading “Browsing Modern Day BBS On The Epson PX-8 Laptop”

Fix Your Insecure Amazon Fire TV Stick

I recently spent a largely sleepless night at a hotel, and out of equal parts curiosity and boredom, decided to kill some time scanning the guest network to see what my fellow travelers might be up to. As you’d probably expect, I saw a veritable sea of Samsung and Apple devices. But buried among the seemingly endless number of smartphones charging next to their sleeping owners, I found something rather interesting. I was as picking up a number of Amazon-made devices, all of which had port 5555 open.

As a habitual Android tinkerer, this struck me as very odd. Port 5555 is used for Android Debug Bridge (ADB), a development tool used to control and perform various administrative tasks on an Android device over the network or (more commonly) locally over USB. The number of users who would have legitimately needed to enable network ADB on their devices is surely rather low, so to see a half dozen of them on the network at the same time seemed improbable to say the least.

Why would so many devices manufactured by Amazon all have network ADB enabled? I realized there must be a connection, and it didn’t take long to figure it out.

Continue reading “Fix Your Insecure Amazon Fire TV Stick”

Keeping Streets Ice-Free With The Raspberry Pi

[Revanth Kailashnath] writes in to tell us about an interesting project he and his team have been working on for their “Real Time Embedded Programming” class at the University of Glasgow. Intended to combat the harsh and dangerous winters in Glasgow, their system uses a Raspberry Pi and a suite of sensors to automatically deploy a brine solution to streets and sidewalks. While the project is still only a proof of concept and hasn’t been deployed, the work the team has done so far runs the gamut from developing their own PCBs to creating a web-based user interface.

The core idea is simple. If the conditions are right for ice to form, spray salt water. Using salt water is a cheap and safe way of clearing and preventing ice as it simply drops the temperature at which water freezes. The end result is that the ice won’t form until it gets down to 10F (-12C) or so. Not a perfect solution, but it can definitely help. Of course, you don’t want to spray people with salt water as they pass by, so there’s a bit more to it than that.

Using the venerable DHT22 sensor the team can get the current temperature and humidity, which allows them to determine when it’s time to start spraying. But to prevent any wet and angry pedestrians, a HC-SR501 PIR motion sensor is used. If the system sees motion it will stop for a while to let the activity quiet down.

Monitoring the sensors and controlling the pump is done by a daemon written in C++, which also logs data to an SQL database, which in turn feeds their PHP web interface. In the video after the break, [Revanth] demonstrates how the system is constantly making decisions based on the input of the various sensors. Environmental data and motion is analysed every few seconds to provide a real-time solution.

We’ve covered a few projects aimed at melting ice and snow by heating concrete, but it’s interesting to see a “smart” approach to this common winter annoyance.

Continue reading “Keeping Streets Ice-Free With The Raspberry Pi”

Polaroid Gets Thermal Printer And Raspberry Pi

Despite what you may have read in the comments, we here at Hackaday are not unaware that there’s something of a “Pi Fatigue” brewing. Similar to how “Arduino” was once a dirty word around these parts, projects that are built around the world’s most popular Linux SBC are occasionally getting dismissed as lazy. Hacker crams Raspberry Pi into an old electronic device, applies hot glue liberally, posts a gallery on Imgur, and boom! Lather, rinse, repeat.

We only mention this because the following project, despite featuring the Raspberry Pi Zero grafted into a vintage Polaroid camera, is anything but lazy. In the impeccably detailed and photographed write-up, [mitxela] explains how the Pi Zero and a thermal camera recreated the classic Polaroid experience of going from shutter button to physical picture in seconds. The workmanship and attention to detail on this build is simply phenomenal, and should quell any doubts our Dear Readers may have about Raspberry Pi projects. For now, anyway.

The video after the break will show you the modded camera in operation and goes over a few highlights of the build, but for this one you really should take the time to read the entire process start to finish. [mitxela] starts off by disassembling the Polaroid camera, complete with plenty of fantastic pictures that show how this legendary piece of consumer electronics was put together. If you’ve never seen the inside of one of these cameras, you might be surprised to see what kind of interesting hardware is lurking underneath that rather unassuming exterior. From the screw-less construction to the circuits with paper substrate, a lot of fascinating engineering went into getting this camera to a mass-market price. Frankly, the teardown alone is worth checking out.

But once the camera has been stripped down to the bare frame, the real fun begins. At the conceptual level, [mitxela] replaces the camera optics with a cheap webcam, the “brains” with a Raspberry Pi Zero, and the film mechanism with the type of thermal printer used for receipts. But how he got it all connected is why this project is so impressive. Nearly every decision made during the design and construction of this camera was for the purposes of reducing boot-time. Nobody wants a camera that takes 30, 15, or even 10 seconds to boot. It has to be available as soon as you need it.

Getting this Linux-powered camera boot up in as little as 2 seconds took a lot of clever software hacks that you’ll absolutely want to check out if you’ve ever considered building an embedded Linux device. You can’t just throw a stock Raspbian image on an SD card and hope for the best. [mitxela] used buildroot to craft a custom Linux image containing only what was needed for the camera to operate, plus a bunch of esoteric tweaks that the Junior Penguin Wrangler would likely never consider. Like shaving a full second off of the boot time by disabling dumping kernel messages to the serial port during startup.

[mitxela] brought his camera to show off at the recent Hackaday London meetup, but it was far from the first time we’ve come across his handiwork. From his servo-powered music box earlier this year to his penchant for tiny MIDI devices, he’s consistently impressed our cold robot hearts.

Continue reading “Polaroid Gets Thermal Printer And Raspberry Pi”