Large Format Lego Camera Is A Bit Near-Sighted

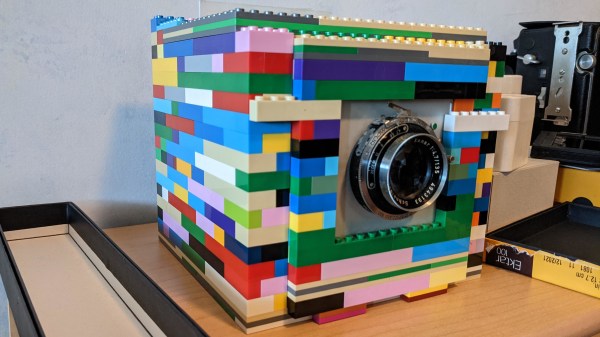
Photography doesn’t have to be expensive, something that’s especially true in the realm of film photography, where the imperfections of the medium can be half the appeal. There are many DIY plans and kits available for analog cameras, but [bhiga143] had couple spare components and a pile of small, colorful bricks lying around, so he decided to build a functional 4×5″ film camera out of Lego.

Details are light for this build, but with a little knowledge about camera structure we can guess at what’s going on inside. Simplicity makes for robust design, and what we have here is in effect a box with a lens on one side and photographic film on the other. The center section of the front, which actually supports the lens, is capable of sliding in and out to adjust focus. On the far side (not pictured) is a slot just wide enough to insert a standard film holder.

The camera really is a hack. [bhiga143] stayed true to the “Lego” part of Lego camera, so there is no glue, no black paper lining, and no frills. The tripod is whatever stack of books lay underneath it. The lens is, quote, “barely functional”. There are light leaks galore, and it can’t focus beyond about 3 feet (1 meter). But every one of those points just makes us love it more. Every nugget of imperfection is a few words added to the story each picture tells. And we honestly can’t wait to see more pictures.

Other Lego cameras we’ve seen have been smaller and less colorful, but using a simple pinhole lens can reduce the overall cost. Of course, you’re not limited to Lego if you want to build your own pinhole camera. Although, the ubiquitous plastic bricks can also be useful in later stages of the film photography process.

NASA’s Lucy Stretches Its Wings Ahead Of Trojan Trek

The good news about using solar power to explore space is there are no clouds to block your sunlight. Some dust and debris, yes, but nowhere near what we have to deal with on planets. The bad news is, as you wander further and further out in the solar system, your panels capture less and less of the sunlight you need for power. NASA’s Lucy spacecraft will be dependent on every square inch, so we’re happy to hear technicians have successfully tested its solar panel deployment in preparation for an October 2021 launch.

An animation of Trojan asteroids and inner planets in orbit around the Sun.
Trojan asteroids (in green) orbit the Sun ahead of and behind Jupiter.

Lucy’s 12-year mission is to examine one Main Belt asteroid and seven so-called Trojans, which are asteroids shepherded around the Sun in two clusters at Lagrange points just ahead and behind Jupiter in its orbit. The convoluted orbital path required for all those visits will sling the spacecraft farther from the sun than any solar-powered space mission has gone before. To make up for the subsequent loss of watts per area, the designers have done their best to maximize the area. Though the panels fold up to a package only 4 inches (10 centimeters) thick, they open up to an enormous diameter of almost 24 feet (7.3 meters); which is enough to provide the roughly 500 watts required at literally astronomical distances from their power source.

Near-Earth asteroids are exciting targets for exploration partly because of the hazards they pose to our planet. Trojan asteroids, thought to be primordial remnants of the same material that formed the outer planets, pose no such danger to us but may hold insights about the early formation of our solar system. We’re already eagerly anticipating the return of OSIRIS-REx’s sample, and Hayabusa2 continues its mission after so many firsts. An extended tour of these farther-off objects will keep us watching for years to come. Check out the video embedded below for Lucy’s mission overview.

Continue reading “NASA’s Lucy Stretches Its Wings Ahead Of Trojan Trek”

Flight Of The Pterothopter: A Jurassic-Inspired Ornithopter

Ornithopters look silly. They look like something that shouldn’t work. An airplane with no propeller and wings that go flappy-flappy? No way that thing is going to fly. There are, however, a multitude of hobbyists, researchers, and birds who would heartily disagree with that sentiment, because ornithopters do fly. And they are almost mesmerizing to watch when they do it, which is just one reason we love [Hobi Cerdas]’s build of the Pterothopter, a rubber band-powered ornithopter modeled after a pterodactyl.

All joking aside, the science and research behind ornithopters and, relatedly, how living organisms fly is fascinating in itself — which is why [Lewin Day] wrote that article about how bees manage to become airborne. We can lose hours reading about this stuff and watching videos of prototypes. While most models we can currently build are not as efficient as their propeller-powered counterparts, the potential of evolutionarily-perfected flying mechanisms is endlessly intriguing. That alone is enough to fuel builds like this for years to come.

As you can see in the video below, [Hobi Cerdas] went through his own research and development process as he got his Pterothopter to soar. The model proved too nose-heavy in its maiden flight, but that’s nothing a little raising of the tail section and a quick field decapitation couldn’t resolve. After a more successful second flight, he swapped in a thinner rubber band and modified the wing’s leading edge for more thrust. This allowed the tiny balsa dinosaur to really take off, flying long enough to have some very close encounters with buildings and trees.

For those of you already itching to build your own Pterothopter, the plans come from the Summer 2017 issue of Flapping Wings, the official newsletter of the Ornithopter Society (an organization we’re so happy to learn about today). You can also find more in-depth ornithopter build logs to help you get started. And, honestly, there’s no reason to limit yourself to uncontrolled flight; we’ve come across some very impressive RC ornithopters in the past.

Continue reading “Flight Of The Pterothopter: A Jurassic-Inspired Ornithopter”

Giant Nintendo Switch Is Actually Playable

The Nintendo Switch has been a hugely successful console for the century-old former playing card manufacturer. At least part of that success has come from its portability, of which [Michael Pick] has probably lost a bit with his 65-pound giant Nintendo Switch built for St. Jude’s Children’s Hospital. (Video, embedded below.) What he’s lost in portability has been more than made up in coolness-factor, though, and we’re sure the kids will appreciate that they can still play the monster gaming machine.

From its plywood body to the 3D-printed buttons, the supersized build looks solid. Docked inside the left Joy-Con is the actual console powering its big brother. Perhaps the biggest surprise, however, is that tiny (well, normal-sized) Joy-Cons are also hidden inside. These are manipulated via servos for the buttons and a direct pass-through setup for the joysticks to control games on the Switch.

While the Joy-Cons are unmodified and completely removable, [Michael] does recognize this isn’t necessarily the ideal solution. But he was certain it was a hack he could make work in the time he had, so he went for it. He’s looked into the controller emulation possible with Teensys and would probably use that solution for any giant Switch projects in the future. Of course, with this build, players can still pair regular Joy-Cons and pro controllers for more practical gaming.

Most Nintendo mods we see attempt to make the console smaller, not larger, so this is an eye-catching change of pace. Unfortunately, we don’t get to see the colossal console in action after it was installed, only some stills of hospital staff wheeling it in the front doors. But we can imagine that the children’s smiles are at least as big as ours were when we saw it.

Continue reading “Giant Nintendo Switch Is Actually Playable”

The Word Clock You Can Feel

By this point, pretty much everyone has come across a word clock project, if not built one themselves. There’s just an appeal to looking at a clock and seeing the time in a more human form than mere digits on a face. But there are senses beyond sight. Have you ever heard a word clock? Have you ever felt a word clock? These are questions to which Hackaday’s own [Moritz Sivers] can now answer yes, because he’s gone through the extreme learning process involved in designing and building a haptic word clock driven with the power of magnets.

Individual letters of the display are actuated by a matrix of magnetic coils on custom PCBs. These work in a vaguely similar fashion to LED matrices, except they generate magnetic fields that can push or pull on a magnet instead of generating light. As such, there are a variety of different challenges to be tackled: from coil design, to driving the increased power consumption, to even considering how coils interact with their neighbors. Inspired by research on other haptic displays, [Moritz] used ferrous foil to make the magnets latch into place. This way, each letter will stay in its forward or back position without powering the coil to hold it there. Plus the letter remains more stable while nearby coils are activated.

Part of the fun of “ubiquitous” projects like word clocks is seeing how creative hackers can get to make their own creations stand out. Whether it’s a miniaturized version of classic designs or something simple and clean, we  love to see them all. Unsurprisingly, [Moritz] himself has impressed us with his unique take on word clocks in the past. (Editor’s note: that’s nothing compared to his cloud chambers!)

Check out the video below to see this display’s actuation in action. We’re absolutely in love with the satisfying *click* the magnets make as they latch into place.

Continue reading “The Word Clock You Can Feel”

Building The Dolphin Emulator In Ubuntu On A Nintendo Switch

[LOE TECH] has made a habit of trying out various emulation methods on his Nintendo Switch and recording the results for our benefit. Of that testing, some of the best performance he’s seen makes use of the Dolphin emulator running in Ubuntu Linux, and he has made a tutorial video documenting how to build the project, as well as how to make some performance tweaks to get the most out of the mod.

We love seeing Linux run on basically anything with a processor. It’s a classic hack at this point. Nintendo has traditionally kept its consoles fairly locked down, though, even in the face of some truly impressive efforts; so it’s always a treat to see the open-source OS run relatively smoothly on the console. This Ubuntu install is based on NVIDIA’s Linux for Tegra (L4T) package, which affords some performance gains over Android installations on the same hardware. As we’ve seen with those Android hacks, however, this software mod also makes use of the Switchroot project and, of course, it only works with specific, unpatched hardware. But if you’ve won the serial number lottery and you’re willing to risk your beloved console, [LOE TECH] also has a video detailing the process he used to get Ubuntu up and running.

Check out the video below for a medley of Gamecube game test runs. Some appear to run great, and others, well… not so much. But we truly appreciate how he doesn’t edit out the games that stutter and lag. This way, we get a more realistic, more comprehensive overview of unofficial emulation performance on the Switch. Plus, it’s almost fun to watch racing games go by in slow motion; almost, that is, if we couldn’t empathize with how frustrating it must have been to play.

Continue reading “Building The Dolphin Emulator In Ubuntu On A Nintendo Switch”

30-Year-Old Macintosh SE/30 Gets A Brand New Logic Board

Some time ago, [Bolle] got the idea to redraw the Macintosh SE/30 schematics in Eagle. Progress was initially slow, but over the past month (and with some prodding and assistance from fellow forum frequenter [GeekDot]), he’s taken things a step further by creating a fully functional replacement Macintosh SE/30 logic board PCB.

By using the available schematics, the project didn’t even require much reverse engineering. Though he plans for more modernization in later iterations, this design is largely faithful to the original components and layout, ensuring that it is at least basically functional. He did update the real time clock battery to a CR2032 and, as a benefit of redrawing all the traces, he was able to use a 4-layer PCB in place of the costly 6-layer from Apple’s design.

The board came back from fabrication looking beautiful in blue; and, once he had it soldered up and plugged in, the old Mac booted on the very first try! A copy-paste mistake with the SCSI footprints led to some jumper wire bodging in order to get the hard drive working, but that problem has already been fixed in the next revision. And, otherwise, he’s seen no differences from the original after a few hours of runtime.

Recreating old Macintosh logic boards almost seems like its own hobby these days. With the design and fabrication capabilities now accessible to hobbyists, even projects that were once considered professional work are in reach. If you’re interested in making your own PCB designs, there are many resources available to help you get started. Alternatively, we have seen other ways to modernize your classic Macs.

[Thanks to techknight for the tip!]