Building A Lego Paper Shredder

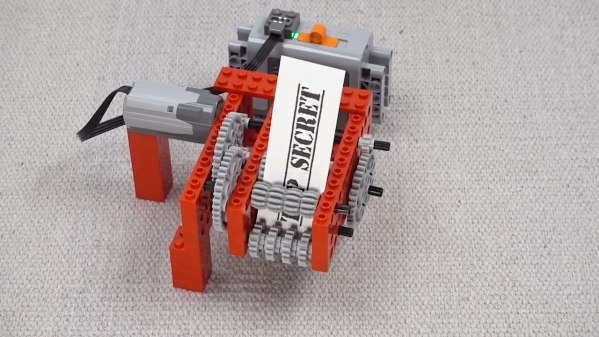
Sometimes we need to destroy documents before throwing them away for security reasons, and shredders are a primary way of achieving that. If you don’t have your own, you might consider building your own, like [Brick Experiment Channel] did using Lego.

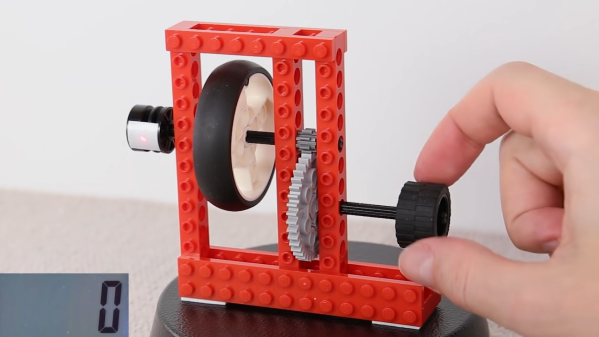
First attempts at shredding a small slip of paper with interlocking gears were a failure, merely crumpling the paper in an attractive rippled manner. As the “Top Secret” piece of paper says, “If you can read this, the shredder didn’t work.” Adding more gears managed to gouge a couple holes in the paper, but it was still far from effective. Continuing down this path further only stalled the Lego motor.

A redesign with different sized gears did eventually manage to tear the paper into large chunks. One set of gears would hold on to the paper while a following set would tear away a section. A further modification combined this method with using bevel gears as a sort of blade, and improved shredding performance further, to the point where the paper was torn into satisfyingly tiny fragments.

It’s a fun little build, even if it won’t come close to taking on a full page of A4. It’s a great example of what can be achieved when you set a simple goal with readily measurable outcomes, in this case, the legibility of the original message on the paper.

We’ve seen a few shredders around here before too. Video after the break.
Continue reading “Building A Lego Paper Shredder”

Making A Locket From A Coin

Some countries have strict laws around the destruction or alteration of issued currency, but then again, some countries don’t. Citizens of those in the latter category may enjoy undertaking a build similar to this locket created by [Elier Olivos], crafted from a large coin.

A compass is first used to mark out a line on the coin’s perimeter, before it is cut in half with a fret saw. Once the two halves of the coin are smoothed out, it’s then time to heat them and quench them so they’re more malleable for pounding into a slightly domed shape. Metal rings are then fabricated and added to each half to give the locket some depth.

A hinge is then carefully made and fixed into the edges of the coin halves, giving the closed coin an almost seamless outside appearance. A small latch installed on the inside helps hold the locket closed. The final touches are to attach a loop for affixing the locket to a chain for the wearer, and to polish the inside of the locket up to a mirror shine.

[Elier] makes the build look easy through a combination of his amazing skills with his hands and the help of a some esoteric tooling. It can be very relaxing to take in a video of a master at work, and we’ve seen some great examples recently. Video after the break.

Continue reading “Making A Locket From A Coin”

You Can Build Your Own Sushi Train

According to [Garage Avenger], in Norwegian culture it’s considered impolite to ask for things to be passed across a dinner table, so much standing and reaching is the course of the day. To assist in reducing the effort required, he set about building his own sushi train device to solve the problem, giving equal condiment access to all!

The system is capable of taking plenty of weight from heavy dinner bowls, altogether quite different than relatively-light sushi dishes on plastic plates.

The system is actually relatively simple, relying on a Wemos D1 Mini controlled by a Blynk app to run the show. Mechanically, a large drive gears is turned by a stepper motor to drive the wooden conveyor chain that actually makes up the “sushi train.” The chain links ride on a bed of Norwegian one krone coins acting as rollers.

The result is a working table-sized sushi train that really does carry plates around well. It didn’t stop people leaning over [Garage Avenger] at the dinner table, but it makes a great centerpiece on the dinner table for sharing dishes like tacos.

We’ve seen similar table technology, the Lazy Susan, around these parts before. Video after the break.
Continue reading “You Can Build Your Own Sushi Train”

Very Fancy Nail Is Actually A Secret Jewlery Stash

Typically, nails are purpose-built things made to hold bits of wood together, with their entire design focused on that purpose. However, [W&M Levsha] went in much the other direction, crafting one very fancy expensive nail in what we can only explain as a masterful demonstration of their skills.

The build starts with a piece of brass tube, which is engraved with a delicate pattern on an automated lathe. After clean up, the spiralling lines are attractive on the polished brass.A plug is then made for the end of the tube, which gets filed into a point to resemble a nail, hiding the seam between the plug and the tube.

The tube is then threaded to accept a nail head that screws into the top, allowing the “nail” to act as a fancy little stash, which [W&M Levsha] shows off by placing a bracelet inside. The project is finished by crafting a stunning wooden box to hold the fancy nail.

We’ve seen [W&M Levsha]’s handywork before; the cap-gun cigarette lighter was a similarly impressive feat of machining and craftsmanship. Video after the break.

Continue reading “Very Fancy Nail Is Actually A Secret Jewlery Stash”

Introducing The Universal Atari Keyboard Case

[10p6] wondered what it would be like if Atari had used a standardized keyboard across its 16-bit and 32-bit computer lines in 1985. Imagination is fun, but building things is even better, and thus they set out to create such a thing. Enter the Universal Atari Keyboard Case.

The case design is flexible, and can accept a keyboard from models including the Atari ST and Falcon. The keyboard can then be used with an Atari Mega, TT, or desktop-style Atari computers without mods. It also brings modern peripherals to bear on these old Atari platforms, enabling the use of modern USB mice while also using the two onboard joystick ports. Power and floppy LEDs are present, but subtly hidden beneath the case, only becoming visible when illuminated. It also includes 5-watt stereo speakers for getting the best out of the Atari’s sound hardware.

The final part, a full 473mm long, was 3D printed in resin for a high-quality surface finish. The results are so good it almost looks like a genuine factory keyboard.

If you’re regularly playing with your vintage Atari machines and you want a great keyboard to use with them, this could be the design for you. [10p6] has promised to soon upload the design files to Thingiverse for those eager to replicate the work.

We’ve also seen retro Atari keyboard converted to work with modern machines. Video after the break. Continue reading “Introducing The Universal Atari Keyboard Case”

How Fast Can You Spin A LEGO Wheel By Hand?

It’s not a question you ask yourself every day, but it’s one that the [Brick Experiment Channel] set out to answer: how fast can you spin a LEGO wheel by hand? In their typical way, they set about building an increasingly complex contraption to optimize for the very specific case of maximum RPM.

The build starts with a LEGO wheel fitted to an axle, supported in two LEGO Technic beams. A white flash mark is also attached onto a part of the axle for measuring the rotational speed with a photo-tachometer. A first attempt gets as fast as 1,700 RPM. Upgrades come thick and fast , and with a three-stage compound geartrain, the handcranked wheel reaches 6,300 RPM.  Adding a further stage introduces the problem that the plastic Technic axle begins to twist under the torque input by the hand.

Taking a new approach of pulling on a string to turn the wheel, the first attempt nets 8,300 RPM. Gearing pushes this further to 12,900 revs, but adding more gears again leads to the problem of axles bending under the strain. A bidirectional rope pull design helps, though, and the system reaches 13,100 RPM.

Some of the parts have been damaged thus far, but a rebuild with fresh parts that are nicely lubricated provides a huge boost. The now-slippery shafts run smoother and the wheel hits a blistering 19,300 RPM as the mechanism disassembles itself.

It’s a less complex pursuit than some earlier works from [Brick Experiment Channel], like the impressive pole climbing designs we’ve seen previously. However, it’s a video that shows the power of iterative design and the gains possible from that process.
Continue reading “How Fast Can You Spin A LEGO Wheel By Hand?”

VFD Character Display Turned Into Audio VU Meter

Humans love visualising music, whether it’s in the form of an inscrutable equation drawing squiggles in Winamp, or a simple VU meter pulsing with the beat. This build from [mircemk] is of the latter variety, repurposing a VFD display to do the job.

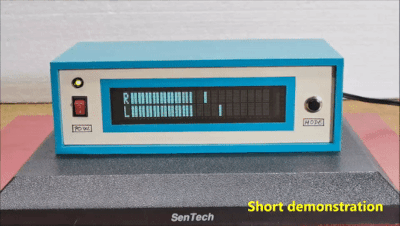
The project is built around a VFM202MDA vacuum fluorescent display, which provides that lovely green-blue glow we all know and love, driven by a PT6314 driver chip. This has the benefit that it can be readily driven by a microcontroller in much the same way as the familiar HD44780 character LCD driver chip. With some minor tweaks, the character set can be modified to allow the display to become a surprisingly-responsive VU meter.

An Arduino Nano runs the show, with an envelope follower circuit feeding a signal for the left and right channels into the analog inputs of the microcontroller. The Arduino then measures the voltage on those inputs and feeds the necessary commands to the PT6314 driver to update the display.

The resulting VU meter has 38 bars per channel, and is highly responsive. The fast flickering of the meter bars in response to the music make it compelling to watch, and the era-appropriate enclosure the project is built in adds plenty to the aesthetic.

We’ve seen other VU meter builds before too, like this one that uses a little physics knowledge to create a more realistic analog-like needle meter. Video after the break.
Continue reading “VFD Character Display Turned Into Audio VU Meter”