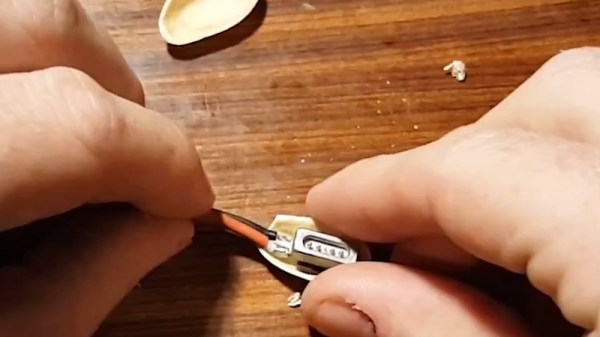
Repairing A Macbook Charger… With A Pistachio Nut

Laptop chargers face a hard life. They’re repeatedly plugged and unplugged, coiled up, stuffed into bags, thrown around, and just generally treated fairly poorly. Combine this with fairly lightweight design and it’s not uncommon for a laptop charger to fail after a few years. It’s usually the connector that goes first. Such was the case when I found myself face to face with a failed Macbook charger, and figured it’d be a simple fix. Alas, I was wrong.

Unlike most PC manufacturers, who rely on the humble barrel jack and its readily available variants, Apple liked to use the Magsafe connector on its Macbook line. This connector has many benefits, such as quick release in the event someone trips over the cable, and the fact that it can be plugged in without regard to orientation. However, it’s not the easiest to fix. When the charger began failing, I noticed two symptoms. The first was that the charger would only function if the cable was held just so, in exactly the right orientation. The other, was that even when it would charge, the connector would become very hot. This led me to suspect an intermittent connection was the culprit, and it was quite a poor one at that; the high resistance leading to the heat issue.


It’s at this point with any other charger that you get out your trusty sidecutters, lop the end off, and tap away at Digikey to get a replacement part on the way. With Magsafe? No dice. Replacement parts simply aren’t available — a common problem with proprietary connectors. I endeavoured to fix the problem anyway. I began to strip away the metal shell around the back of the connector with my sidecutters, and eventually an angle grinder. A Dremel would have been the perfect tool for the job, actually, but I persevered regardless. After much consternation, I had the connector peeled back and was able to identify the problem.

Continue reading “Repairing A Macbook Charger… With A Pistachio Nut” →

Vectrex, Finally In Color

The Vectrex is everybody’s favourite vector-based console from the early 1980s. Vector graphics really didn’t catch on in the videogame market, but the Vectrex has, nonetheless held on to a diehard contingent of fans that continue to tinker with the platform to this day. [Arcade Jason] just so happens to be leading the pack right now.

The Vectrex has always been a monochrome machine, capable of only displaying white lines on its vector monitor. Color was provided by plastic overlays that were stuck to the screen, however this was never considered a particularly mindblowing addition to the console. [Jason] decided he could do better, and dug deep into his collection of vector monitors.

With a 36″ color vector monitor to hand, the Vectrex was laid out on the bench, ready for hacking. The bus heading to one of the DACs was hijacked, and fed through a series of OR and AND logic to generate color signals, since the original Vectrex hardware had no way of doing so. This is then fed to the color monitor, with amazing results.

[Jason]’s setup is capable of generating 8 colors on the screen, and it’s almost by some weird coincidence that this really does make the classic Vectrex games pop in a way they never have before. It’s also a testament to a simpler time that it’s possible to hack this console’s video signals on a breadboard; modern hardware runs much too fast to get away with such hijinx.

It’s an epic hack that through experimentation and some serendipity, has turned out some exciting results. [Jason] is now in the process of taking this to the next level, experimenting with adding color intensity control and other features to the mix.

It’s not [Jason]’s first time around these parts, either – we saw his big-screen Vectrex just a month ago!

[Thanks to Morris for the tip!]

Continue reading “Vectrex, Finally In Color” →

Rescue An Old Washing Machine With Modern Controls

The humble washing machine is an appliance that few of us are truly passionate about. They’re expected to come into our lives and serve faithfully, with a minimum of fuss. In the good old days, it was common for a washing machine to last for well over 20 years, and in doing so ingratiate itself with its masters. Sadly now while the simple mechanical parts may still be serviceable, the electronics behind the scenes can tend to fail. This is a Russian story (Google Translate link) about giving a new brain to an old friend.

The machine in question is known as an Oriole, and had served long and hard. Logic chips and entire controllers had been replaced, but were continuing to fail. Instead, a replacement was designed to keep the machine operational for some time yet. Rather than relying on recreating the full feature set of the machine it was decided to eliminate certain things for simplicity. Settings for different fabric types or wash modes were eliminated, which is an easy choice if like most people all your washes are done in the same mode anyway. A water level sensor was found to be no longer functioning properly and was simpler to eliminate than repair.

The brain is a PIC microcontroller, with an ESP12 acting as a webserver for monitoring and control. Additionally, a glass lens was taken from some former medical equipment and neatly installed in the control panel of the machine before an OLED display, giving the machine far more feedback than before. Control is still done with the machine’s original buttons. Temperature sensors were added as well to allow the machine to shut itself down in the event of an overheating problem. It’s all tied together on what looks to be a classic single-sided homebrew PCB.

It’s a great project that shows it’s easy to bring modern electronic might to bear on vintage mechanical hardware, with great results. A washing machine lives to see another day, another load – and the landfill remains just that much lighter, to boot.

We’ve seen controller builds for old washing machines before, too – like replacing mechanical control with an Arduino.

[Thanks to Tirotron for sending this in!]

Hexbright Repair Keeps Torch Out Of Landfill

The Hexbright was a Kickstarter project from a few years ago, to create an open source, rechargeable LED light. [Nick] quite likes them, and has learned a thing or two about keeping them operational.

The torches have a few key issues which [Nick] lists for us, before outlining the necessary repairs. These problems highlight certain design flaws, something one might expect for a hardware product from a new startup. Components inside are easily damaged if the device is dropped, and there is no reverse polarity protection on the battery.

It’s always disappointing to see a product in the marketplace fail to take into account such rudimentary things, but in the meantime, repair is always possible. The guide highlights the basic parts and tools required, which is important, but also goes the extra mile and gives important hints and tips on how to effectively execute the repair in a quick and easy fashion.

Overall, it may not be a hack, but what [Nick] has done both educated on us the mistakes made by a crowdfunded hardware startup and also taught us how to write a useful and thorough repair guide. It’s not just about the parts that need to be replaced, it’s about the best method to replace them. The details and the order of operations always helps – anyone that’s ever attempted a serious automotive repair knows this, for example.

We see a lot of great repair hacks here – like this excellent use of a 3D printer to reproduce belts for old hardware.

Reusing Motors From Washing Machines

Big ol’ motors are great when you need to get a big job done, but they can be expensive or hard to source new. However, there’s a source of big, fat, juicy motors right at home for most people – the garden variety washing machine. These motors would usually require a special controller, however [Jerry] is here to show us how to hack the controller that comes with the machine.

The hack begins as [Jerry] decides to gut a Maytag MAH7500 Neptune front loader. Many projects exist that borrow the motor but rely on a seperately sourced variable frequency drive, so the goal was to see if the machine’s original controller was usable. The machine was first troubleshooted using a factory service mode, which spins the drum at a set speed if everything is working correctly.

From there, it was a relatively simple job to source the machine schematics to identify the pinouts of the various connectors.  After some experimentation with a scope and a function generator, [Jerry] was able to get the motor spinning with the original controller doing the hard work.

It’s a simple hack, and one that relies on the availability of documentation to get the job done, but it’s a great inspiration for anyone else looking to drive similar motors in their own projects. The benefit is that by using the original motor controller, you can be confident that it’s properly rated for the motor on hand.

Perhaps instead of an induction motor, you’d rather drive a high powered brushless DC motor? This project can help.

Taking A Guitar Pedal From Concept Into Production

Starting a new project is fun, and often involves great times spent playing with breadboards and protoboards, and doing whatever it takes to get things working. It can often seem like a huge time investment just getting a project to that functional point. But what if you want to take it to the next level, and take your project from a prototype to a production-ready form? This is the story of how I achieved just that with the Grav-A distortion pedal.

Why build a pedal, anyway?

The author, shown here with bandmates.

A long time ago, I found myself faced with a choice. With graduation looming on the horizon, I needed to decide what I was going to do with my life once my engineering degree was squared away. At the time, the idea of walking straight into a 9-5 wasn’t particularly attractive, and I felt like getting back into a band and playing shows again. However, I worried about the impact an extended break would have on my potential career. It was then that I came up with a solution. I would start my own electronics company, making products for musicians. Continue reading “Taking A Guitar Pedal From Concept Into Production” →

Cryptanalyse Your Air Con

Infrared remote controls are simple and ubiquitous. Emulating them with the aid of a microcontroller is a common project that hackers use to control equipment as diverse as televisions, cable boxes, and home stereos. Some air conditioners can be a little more complicated, however, but [Ken]’s here to help.

The root of the problem is that the air conditioner remote was using a non-obvious checksum to verify if commands received were valid. To determine the function generating the checksum, [Ken] decided to bust out the tools of differential cryptanalysis. This involves carefully varying the input to a cryptographic function and comparing it to the differences in the output.

With 35 signals collected from the remote, a program was written to find input data that varied by just one bit. The checksum outputs were then compared to eventually put together the checksum function.

[Ken] notes that the function may not be 100% accurate, as they’re only using a limited sample of data in which not all the bytes change significantly. However, it shows that a methodical approach is valuable when approaching such projects.

Thirsty for more checksum-busting action? Check out this hacked weather station.