Fooling Speech Recognition With Hidden Voice Commands

It’s 2018, and while true hoverboards still elude humanity, some future predictions have come true. It’s now possible to talk to computers, and most of the time they might even understand you. Speech recognition is usually achieved through the use of neural networks to process audio, in a way that some suggest mimics the operation of the human brain. However, as it turns out, they can be easily fooled.

The attack begins with an audio sample, generally of a simple spoken phrase, though music can also be used. The desired text that the computer should hear instead is then fed into an algorithm along with the audio sample. This function returns a low value when the output of the speech recognition system matches the desired attack phrase. The input audio file is gradually modified using the mathematics of gradient descent, creating a result that to a human sounds like one thing, and to a machine, something else entirely.

The audio files are available on the site for your own experimental purposes. In a noisy environment with poor audio coupling between speakers and a Google Pixel, results were poor – OK Google only heard the human phrase, not the encoded attack phrase. Given that the sound quality was poor, and the files were generated with a different speech model, this is not entirely surprising. We’d love to hear the results of your experiments in the comments.

It’s all a part of [Nicholas]’s PhD studies around the strengths and pitfalls of neural networks. It highlights the fact that neural networks don’t always work in the way we think they do. Google’s Inception is susceptible to similar attacks with images, as we’ve seen recently.

[Thanks to Wolfgang for the tip!]
Reverse Engineering A Pirate Nintendo Arcade Board

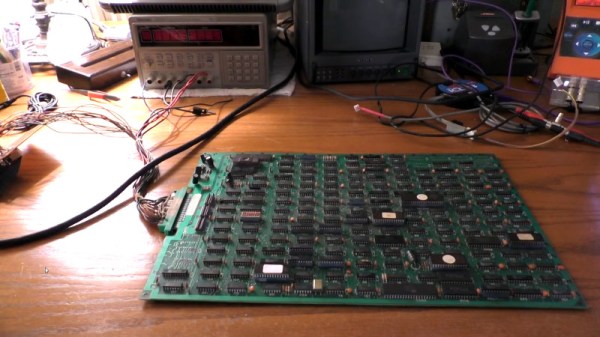
The Nintendo VS. System was a coin-op arcade system based on the Nintendo Entertainment System (NES) hardware. By being so closely related to the home console, it made it easy to port games back and forth between the two. Being an arcade system, there was significant financial incentive to pirate the boards and games, and many years later such a pirate board landed on the desk of [kevtris], who decided to reverse engineer it for our viewing pleasure.

The board in question runs Super Mario Brothers, and rather than using actual Nintendo hardware it instead relies on a standard MOS 6502 to recreate all the functions of the of the original CPU. A Z80 is pressed into service to emulate the original audio hardware, too. With much of the functionality recreated in TTL logic chips, the board is power hungry, drawing a ridiculous 3 amps when powered up. We wonder as to the fire safety of such machines all crammed into a hot, sweaty arcade of yesteryear.

[kevtris] does a great job of reverse engineering the system, even providing a full PDF schematic for the bootleg board. An old SEGA controller is hand-wired into the board to provide both game controls and act as a coin switch to allow the game to be played.

We’d love to hear the story of how these machines actually came to be, and the design process involved, but for now that may remain one for the ages. Arcade piracy was something the big companies fought against for years, with varying success – and we’ve seen arcade DRM hacked before.

[Thanks to Jero32 for the tip!]

Continue reading “Reverse Engineering A Pirate Nintendo Arcade Board” →

Eight SEGAs Singing

Way back in the dark ages, before the average computer could play back high quality recorded audio, things were done differently. Music and sounds were stored as instructions to be played back on audio synthesis chips, built into the computers and consoles of the 80s and 90s. These chips and their unique voices hold a special nostalgia that’s key to this era, making them popular to experiment with today. To that end, [little-scale] decided to wire up eight chips from the SEGA Master System to please your ears.

The chips, laid out on a breadboard with a Teensy LC running the show.

The chip in question is the SN76489, which we’ve also noted is used in the Sega Genesis as well. It packs 3 square wave tone generators, and a noise channel as well. With eight of these to play with, that’s 32 total channels. To drive these, [little-scale] decided to go the MIDI route. To get around the MIDI limit of 16 channels, he decided to split the frequency range in half. Each MIDI channel addresses two SN76489 channels, the top pitches being used for one, the lower pitches being used for the other. All this MIDI data is passed to a Teensy LC, which handles transposition of the note data to get everything back in tune, and addresses the eight chips to create a beautiful square wave symphony.

It’s a great way to create a cacophony of sound in a delightful vintage way, and code is available if you’d like to recreate the feat. What we’d like to know is this – what’s your favourite sound chip from yesteryear, and how badly do you want eight of them to sing in glorious harmony? Continue reading “Eight SEGAs Singing” →

AI Prosthesis Is Music To Our Ears

Prostheses are a great help to those who have lost limbs, or who never had them in the first place. Over the past few decades there has been a great deal of research done to make these essential devices more useful, creating prostheses that are capable of movement and more accurately recreating the functions of human body parts. At Georgia Tech, they’re working on just that, with the help of AI.

[Jason Barnes] lost his arm in a work accident, which prevented him from playing the piano the way he used to. The researchers at Georgia Tech worked with him, eventually producing a prosthetic arm that, unlike most, actually has individual finger control. This is achieved through the use of an ultrasound probe, which is used to detect muscle movements elsewhere on his body, with enough detail to allow the control of individual fingers. This is done through a TensorFlow-based neural network which analyses the ultrasound data to determine which finger the user is trying to move. The use of ultrasound was the major breakthrough which made this possible; previous projects have often relied on electromyogram sensors to read muscle impulses but these lack the resolution required.

The prosthesis is nicknamed the “Skywalker arm”, after its similarities to the prostheses seen in the Star Wars films. It’s not [Jason]’s first advanced prosthetic, either – Georgia Tech has also equipped him with an advanced drumming prosthesis. This allows him to use two sticks with a single arm, the second stick using advanced AI routines to drum along with the music in the room.

It’s great to see music being used as a driver to create high-performance prosthetics and push the state of the art forward. We’re sure [Jason] enjoys performing with the new hardware, too. But perhaps you’d like to try something similar, even though you’ve got two hands already? Try this on for size.

Continue reading “AI Prosthesis Is Music To Our Ears” →

Extracting A Vector Font From A Vintage Plotter

There is a huge variety of hardware out there with a font of some form or other baked into the ROM. If it’s got a display it needs a font, and invariably that font is stored as a raster. Finding these fonts is trivial – dump the ROM, render it as a bitmap, and voilà – there’s your font. However, what if you’re trying to dump the font from a vintage Apple 410 Color Plotter? It’s stored in a vector format, and your job just got a whole lot harder.

The problem with a vector font is that the letters aren’t stored as individual images, but as a series of instructions that, when parsed correctly, draw the character. This has many benefits for generating characters in all manner of different sizes, but makes the font itself much harder to find in a ROM dump. You’re looking for both the instructions that generate the characters, as well as the code used to draw them, if you want a full representation of the font.

The project begins by looking at what’s known about the plotter. The first part of any such job is always knowing where to look, of course. It’s quickly determined that the font is definitely stored in the main ROM, and that there is no other special vector drawing chip or ROMs on board. The article then steps through the search process, beginning with plaintext searches of the binary dump, before progressing to a full disassembly of the plotter firmware. After testing out various assumptions and working methodically, the vector data is found and eventually converted into a modern TrueType font.

In the end, the project is successful, and it’s a great guide on how to approach similar projects. The key is to lay out everything you know at the start, and use that to guide your search step by step, testing and discarding assumptions until you hit paydirt. We’ve seen similar works before, like this project to dump the voice from an ancient Chrysler Electronic Voice Alert.

3D Printed Propellers Take To The Skies

In the world of drones, propeller choice is key to performance. Selecting the right props can have a major effect on things like flight time, vibration, and a whole host of other factors. Thinking it might be fun to experiment, [RCLifeOn] decided to 3D print some props and head out for a flight.

The props are a fairly simple 3-bladed design, which were printed in both PETG and PLA. No major difference is noted between the two materials, and the quadcopter under test is able to fly with either. It was noted that the props perform particularly poorly in a crash, with all props failing even in the softest of crashes. We would recommend some eye (and body) protection when spinning these props up for the first time.

If you’re keen to try them out yourself, the STL file can be had here. The video notes that when printing 4 props, 2 must be reversed in the Y-axis to print a counter-rotating set of 4. The instructions used for creating propellers in Fusion3D are available here.

It’s a worthy experiment, and something we’d like to see more of. With a 3D printer, it’s possible to experiment with all manner of propeller designs, and we’d love to see the best and worst designs that are still capable of flight. We’ve also seen 3D printed props before, like this effort from [Anton].

Power Your Guitar Pedals With Drill Batteries

Guitar pedals are a great way to experiment with the sound of your instrument. However, they require electricity, and when you’re using more than a couple, it can get messy. Some will run on batteries, while others are thirstier for more current and will only work with a plugback. There are a great many solutions out there, but most people with more than a few pedals to power will end up going to some kind of mains powered solution. [Don] is here to show us that it’s not the only way.

Mains power is great for some things, but where pedals are concerned, it’s not always perfect. There are issues with noise, both from cheap power supplies and poorly designed pedals, and it means you’re always hunting for a power socket, which is limiting for buskers.

[Don] realised that the common drill battery is a compact source of clean, DC power, and decided to use that to power his rig. By slapping together a drill battery with a pre-assembled buck converter and a 3D printed adapter, he was able to build a portable power supply for his pedals. Thanks to the fact that the vast majority of pedals use 9V DC with the same input jack design, it’s a cinch to wire up. With an appropriately sized buck converter, a drill battery could supply even a hefty pedalboard for a significant period of time.

Overall, it’s a great hack that solves a problem faced by many performing musicians. We’ve seen our fair share of guitar pedals around Hackaday – perhaps you’d like to see how one makes it from concept to production?

Continue reading “Power Your Guitar Pedals With Drill Batteries” →