We’ve all been there. You’ve cooked up some little microcontroller project, but you need to unhook it from your dev PC and go mobile. There’s just one problem — you haven’t worked up a battery solution yet. “No problem!” you exclaim. “I’ll just use a USB battery pack!” But the current draw is too low, and the pack won’t stay on. “Blast!” you exclaim, because you’ve been watching too much Family Guy or something.
[PatH] had this very problem recently, when trying to work with Meshtastic running on a RAKwireless WisBlock Base Board. You’re supposed to hook up your own rechargeable LiPo battery, but [PatH] was in a hurry. Instead, a USB battery pack was pressed into service, but it kept shutting down. The simple trick was to just add a 100-ohm resistor across the device’s battery terminals. That took the current draw from just 15 mA up to 53 mA, which was enough to keep portable USB power banks interested in staying switched on.
It’s an easy hack for an oddball problem, and it just might get you out of a bind one day. If you’ve got any nifty tricks like this up your sleeve, don’t hesitate to let us know!
I found myself in Milton Keynes, UK, a little while ago, with a few hours to spare. What could I do but rock over to the National Museum of Computing and make a nuisance of myself? I have visited many times, but this time, I was armed with a voice recorder and a mission to talk to everybody who didn’t run away fast enough. There is so much to see and do, that what follows is a somewhat truncated whistle-stop tour to give you, the dear readers, a flavour of what other exhibits you can find once you’ve taken in the usual sights of the Colossus and the other famous early machines.
Click this image to play in your browser.
We expect you’ve heard of the classic text adventure game Zork. Well before that, there was the ingeniously titled “Adventure”, which is reported to be the first ‘interactive fiction’ text adventure game. Created initially by [Will Crowther], who at the time was a keen cave explorer and D & D player, and also the guy responsible for the firmware of the original Arpanet routers, the game contains details of the cave systems of Mammoth and Flint Ridge in Kentucky.
The first version was a text-based simulation of moving around the cave system, and after a while of its release onto the fledgling internet, it was picked up and extended by [Don Woods], and the rest is history. If you want to read more, the excellent site by [Rick Adams] is a great resource that lets you play along in your browser. Just watch out for the dwarfs. (Editor’s note: “plugh“.) During my visit, I believe the software was running on the room-sized ICL2966 via a VT01 terminal, but feel free to correct me, as I can’t find any information to the contrary.
A little further around the same room as the ICL system, there is a real rarity: a Marconi TAC or Transistorised Automatic Computer. This four-cabinet minicomputer was designed in the late 1950s as a ‘fast real-time computer’, is one of only five made, and this example was initially installed at Wylfa nuclear power station in Anglesey, intended as a monitoring and alarm system controller. These two machines were spare units for the three built for the Swedish air defence system, which were no longer required. Commissioned in 1968, this TAC ran continuously until 2004, which could make it one the longest continuously running computers in the world. The TAC has 4 kwords of 20-bit core memory, a paper tape reader for program loading and a magnetic drum storage memory. Unusually, for this period, the TAC has a micro-coded CISC architecture, utilising a whole cabinet worth of diode-matrix ROM boards to code the instruction set. This enabled the TAC to have a customizable instruction set. As standard, the TAC shipped with trigonometric and other transcendental functions as individual instructions. This strategy minimized the program size and allowed more complex programs to fit in the memory.
Following on the heels of a fortunately not real DDoS botnet composed of electric toothbrushes, [Aaron Christophel] got his hands on a sort-of-electric toothbrush which could totally be exploited for this purpose.
Evowera Planck Mini will never gonna give you up, never let you down. (Credit: Aaron Christophel)
The Evowera Planck Mini which he got is the smaller, children-oriented version of the Planck O1 (a more regular electric toothbrush). Both have a 0.96″ color LC display, but the O1 only has Bluetooth and requires a smartphone app. Meanwhile the Mini uses a pressure sensor for the brush along with motion sensors to keep track of the child’s teeth brushing efforts and to provide incentives.
The WiFi feature of the Mini appears to be for both firmware updates as well as to allow parents to monitor the brushing reports of their offspring in the associated smartphone app. With this feature provided by the ESP32-C3 SoC inside the device, the question was how secure it is.
As it turns out not very secure, with [Aaron] covering the exploit in a Twitter thread. As exploits go, it’s pretty straightforward: the toothbrush tries to connect to a default WiFi network (SSID evowera, pass 12345678), tries to acquire new firmware, and flashes this when found without any fuss. [Aaron] made sure to figure out the pin-out on the PCB inside the device as well, opening up new avenues for future hacking.
We’re great fans of [Aaron] and his efforts to breathe new life into gadgets through firmware hacking. His replacement firmware for the Xiaomi LYWSD03MMC Bluetooth thermometer is one of the best we’ve seen.
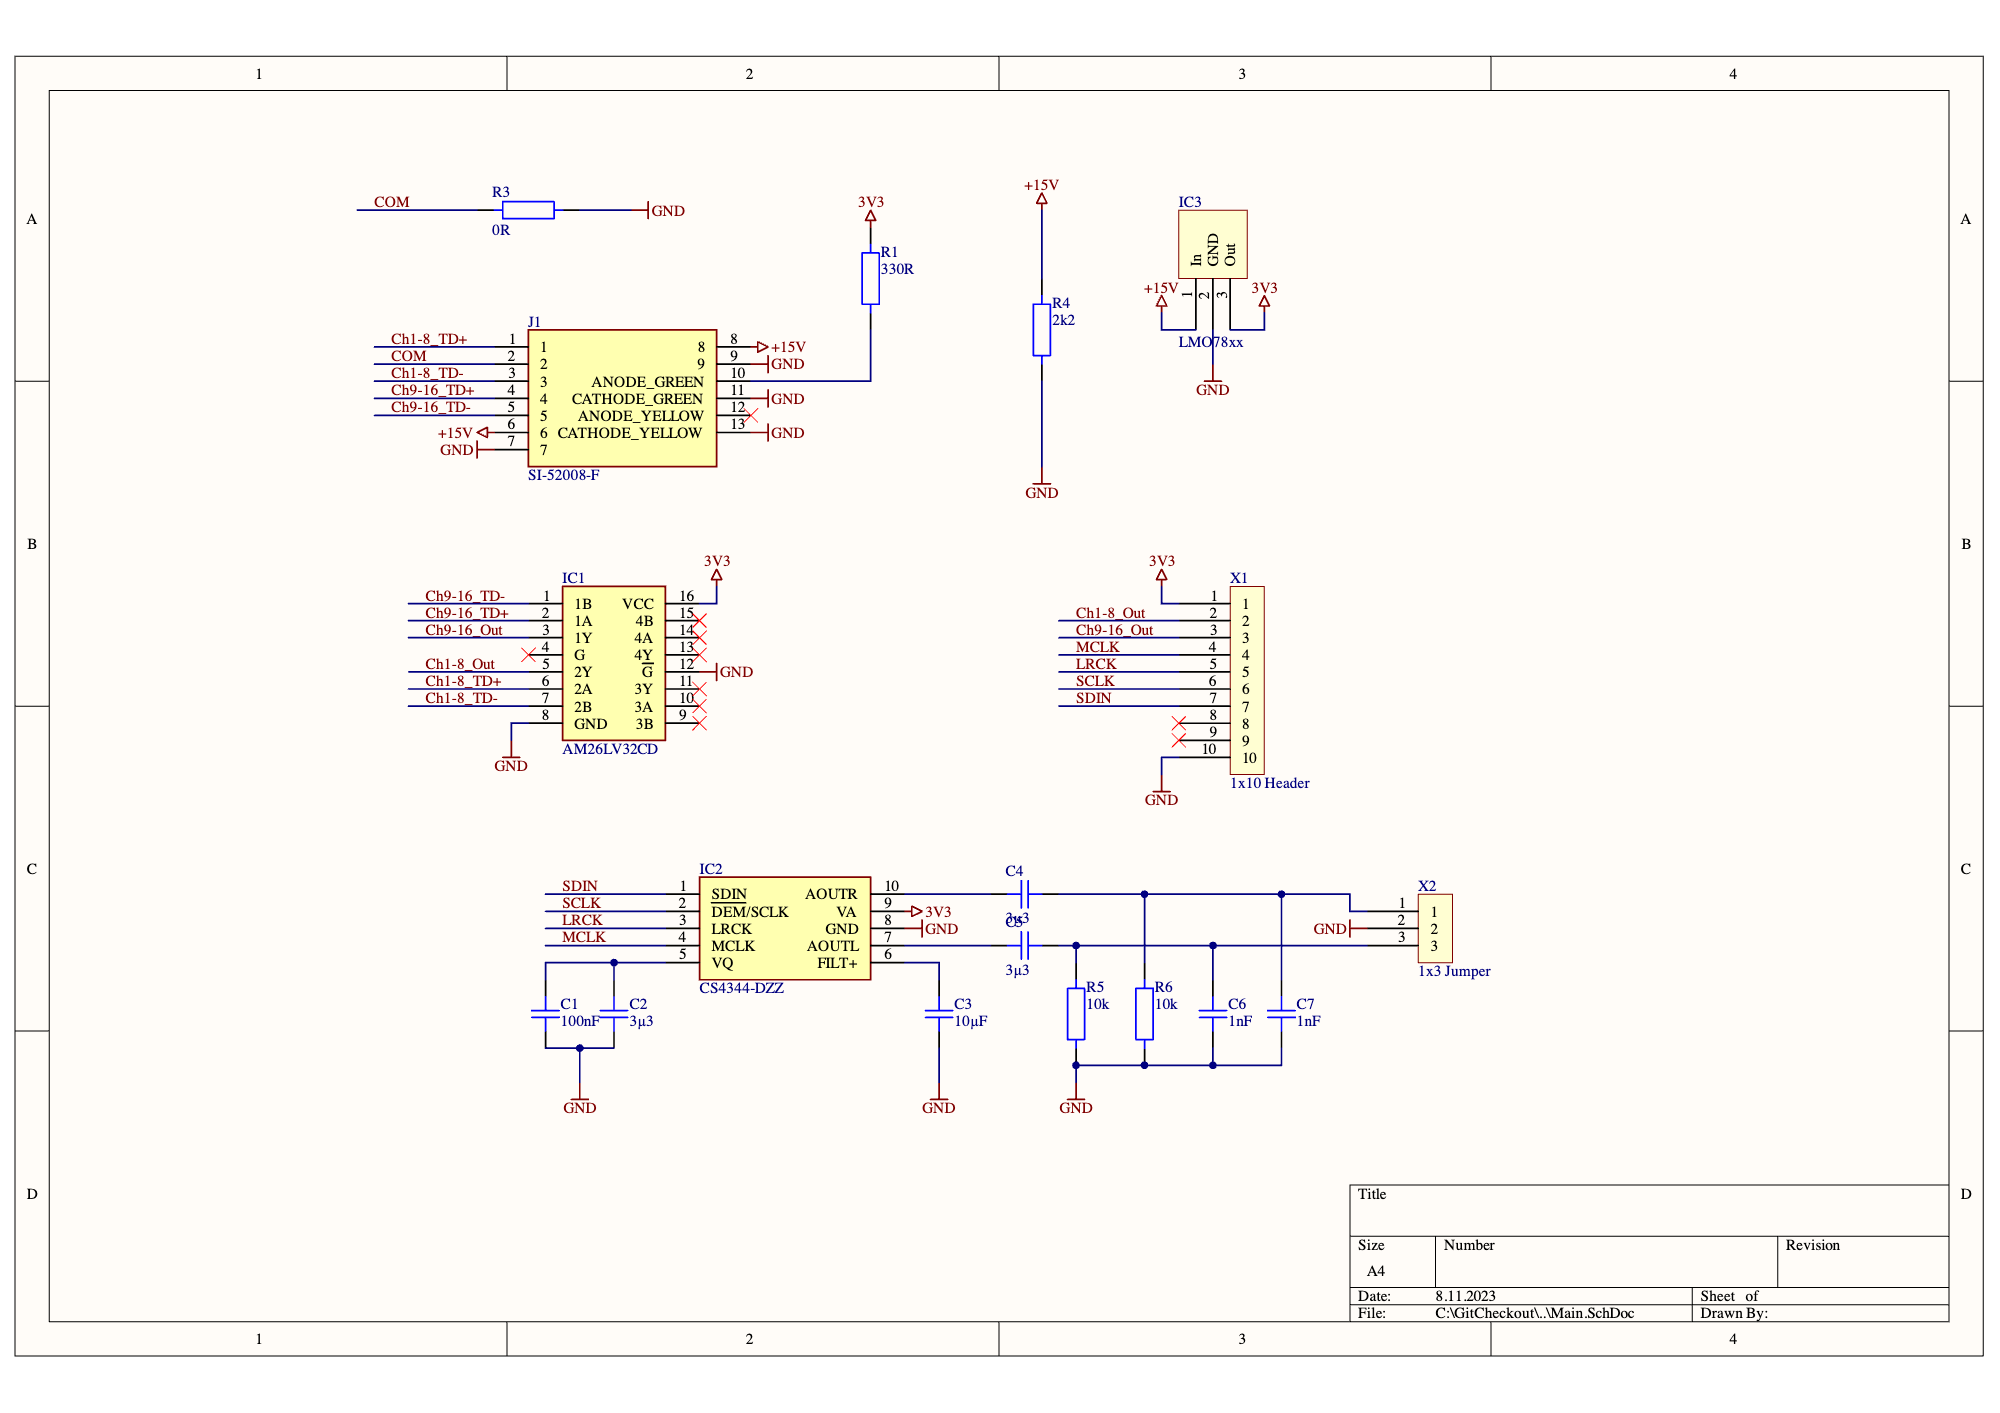
Ultranet is a protocol created by audio manufacturer Behringer to transmit up to 16 channels of 24-bit sound over a Cat-5 cable. It’s not an open standard, though: Behringer doesn’t offer an API or protocol description to build your own Ultranet devices. But that didn’t stop [Christian Nödig], thanks to a defective mixer, he poked into the signals and built his own Ultranet receiver.
Ultranet runs over Cat-5 ethernet cables but isn’t an ethernet-based protocol. The electrical protocols of Ultranet are identical to Ethernet, but the signaling is different, making it a Level 1 protocol. So, you can use any Cat-5 cable for Ultranet, but you can’t just plug an Ultranet device into an Ethernet one. Or rather, you can (and neither device should explode), but you won’t get anything out of it.
Instead, [Christian]’s exploration revealed that Ultranet is based on another standard: AES/EBU, the bigger professional brother of the SPD/IF socket on HiFi systems. This was designed to carry digital audio over an XLR cable, and Behringer has taken AES/EBU and tweaked it to run over a single twisted pair. With two twisted pairs in the cable carrying a 192 kbps signal, you get sixteen channels of 24-bit audio in total over two twisted pairs inside the Cat-5 cable.
That’s a bit fast for a microcontroller to decode reliably, so [Christian] uses the FPGA in an Arduino Vidor 4000 MKR in his receiver with an open-source AES decoder core to receive and decode the Ultranet signal into individual channels, which are passed to an ADC and analog output.
In effect, [Christian] has built a 16-channel mixer, although the mixing aspect is too primitive for actual use. It would be great for monitoring, though, and it’s a beautiful description of how to dig into protocols like Ultranet that look locked up but are based on other, more open standards.
Some hacks are pure acts of whimsy, and [Simone Giertz] is back to her roots with this Goatee Pasta Maker.
If violence to mannequin heads is upsetting, the video may be a bit NSFW (to warn you now that you already clicked on it). What started out as a pasta-making version of those Play-Doh hair people quickly morphed into a more scaled-back endeavor with simply extruding pasta through the mannequin’s chin to create pasta hair.
Initial attempts at using a basketball to extrude clay (used as a pasta stand-in) through holes in a mannequin’s head were unsuccessful, so [Giertz] turned to a more conventional pasta gun to handle the pasta extrusion. Since the gun didn’t have the volume necessary to produce a full head of hair, or even a respectable mustache, the next mannequin’s chin was subjected to multiple drill holes for pasta to escape in a hairy tangle.
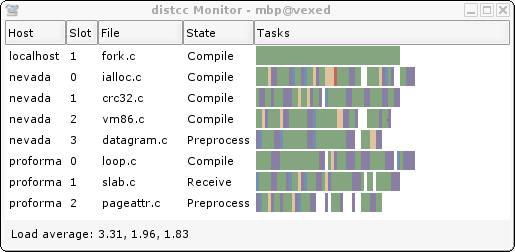
The motto of Sun Microsystems back in the day was “The Network Is The Computer” which might be kind of relevant when CPUs were slower and single-core affairs, but lately to get a faster compile, you’d simply throw more cores and memory at the problem. The thing is, most of us don’t do huge compilations all that often, we can’t remember the last time we even attempted a Linux kernel build. However if you do find yourself with a sudden need to do so, and have access to a pile of machines hooked to a network, then why not check out distcc: the fast distributed C/C++ Compiler? We’ve seen a few mentions in comments and a HaD links article referencing it, but never explicitly covered the tool. So here we go.
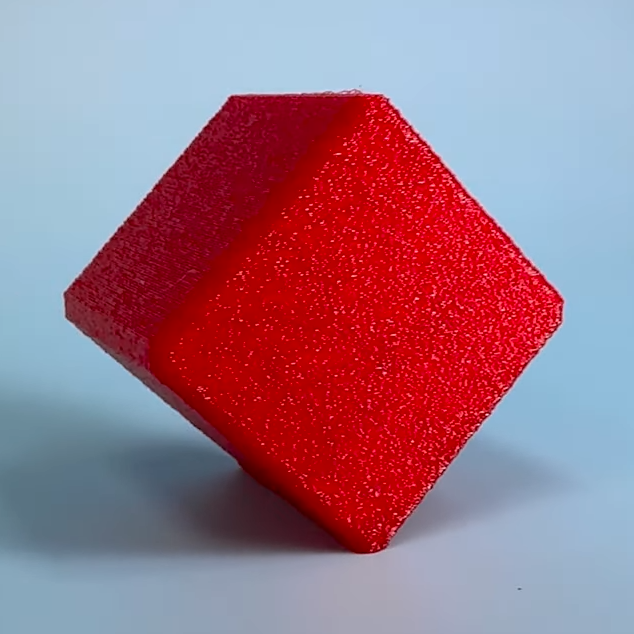
[Slant 3D] knows a lot about optimizing 3D prints so that they can be cranked out reliably with minimal need for post-processing, and in this short video he uses a cube as a simple example of how a few design changes can not only optimize for production, but can even hide layer lines pretty effectively.
Just to be perfectly clear, layer lines cannot be eliminated entirely without some kind of post-processing. But [Slant 3D]’s tips sure goes a long way toward making a part lose that obvious 3D-printed “look”. They also dovetail nicely with advice on how to optimize cranking out high numbers of parts in a print farm.
Adding texture to the outer layer is especially effective when combined with non-traditional part orientations.
One simple way to avoid visible layer lines is to put some kind of texture onto the part. This can be modeled into the part’s surface, or the slicer software can be used to modify the exterior of the print to add a texture such as a geometric pattern or by applying a fuzzy skin modifier.
Printing a texture onto the exterior is great, but the outcome can be even further improved by also printing the object in a non-traditional orientation.
Using a cube as an example, printing the cube on a corner has the advantage of putting the layer lines in a different orientation as well as minimizing the contact area on the print bed. This applies the texture across more of the part, and looks less obviously 3D printed in the process. Minimizing bed adhesion also makes parts much easier to remove, which has obvious benefits for production. [Slant 3D] points out that performing these operations on a 3D-printed part is essentially free.
A few other optimizations for production involve rounding sharp corners to optimize tool travel paths, and putting a slight chamfer on the bottom of parts to avoid any elephant foot distortion (Elephant’s foot can be compensated for, but simply putting a slight chamfer on a part is a design change that helps avoid accounting for machine-to-machine variance.)
Even if one has no need to optimize for high production volume, the tips on hiding layer lines with design changes is great advice. Watch it all in action in the short video, embedded below.