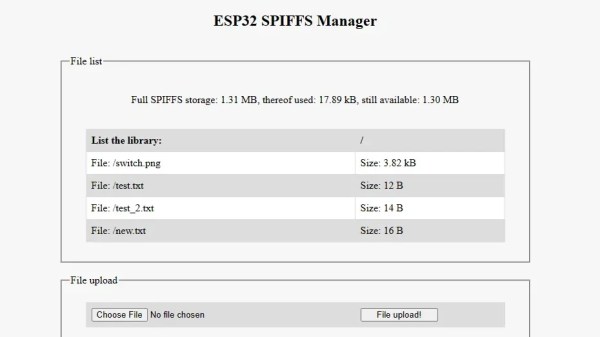
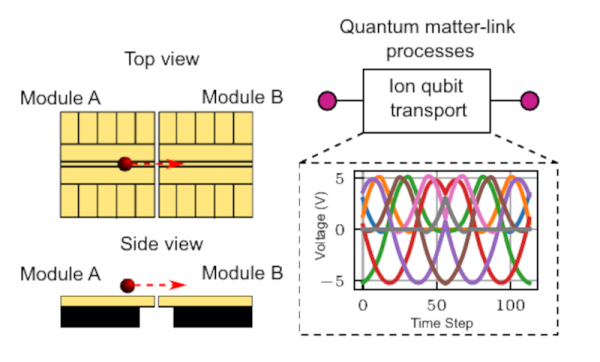
A modified Ghostbusters Proton Pack

Track Down Ghosts In Your WiFi With The Pwnton Pack

If there’s something weird in your Network Neighborhood, who you gonna call? If you want your WiFi troubles diagnosed in style, try calling [Travis Kaun] — he might just show up wearing the amazing Pwnton Pack. Built from a replica Proton Pack similar to those used in the 1984 classic Ghostbusters, it’s a portable wireless security diagnostics kit that should be able to pinpoint any weaknesses in your wireless network.

Inside, it’s got a Mark VII WiFi Pineapple, which is a portable device designed for security testing purposes, as well as a Raspberry Pi running Pwnagotchi: a deep learning-based WiFi sniffer that aims to capture those network packets that help maximize your chances of brute-forcing the WPA key. These two devices are connected to an array of antennas, including a cool rotating 5 GHz panel antenna to scan the surrounding area.

Naturally, the Pwnton Pack also includes a Neutrona Wand, which in this case contains a 2.4 GHz Yagi antenna hooked up to an ESP32 programmed to perform deauthentication attacks. An Arduino Nano drives an LED matrix that shows scrolling Pac-Man ghosts, while a dedicated sound board provides movie sound effects. The whole system is powered by three LiPo battery packs, and can even be remotely operated if desired.

Sadly, it doesn’t come with one of those ghost traps to suck up wayward WiFi networks, but the range of tools available should help to catch any kind of weird phantoms hiding in your system. We’ve spotted a few Proton Packs before, but never one with such advanced functionality. Security testing systems tend to be a bit less conspicuous, after all. Continue reading “Track Down Ghosts In Your WiFi With The Pwnton Pack”

Linux And C In The Browser

There was a time when trying to learn to write low-level driver or kernel code was hard. You really needed two machines: one to work with, and one to screw up over and over again until you got it right. These days you can just spin up a virtual machine and roll it back every time you totally screw up. Much easier! We don’t think it is all that practical, but [nsommer] has an interesting post about loading up a C compiler and compiling Linux for a virtual machine. What’s different? Oh, the virtual machine is in your browser.

The v86 CPU emulator runs in the browser and looks like a Pentium III computer with the usual hardware. You might think it is slow and it certainly isn’t going to be fast as a rocket, but it does translate machine code into WebAssembly, so performance isn’t as bad as you might think.

The post goes into detail about how to build and create a simple machine web page that hosts v86. Once you cross-compile the kernel you can boot the machine up virtually. The other interesting part is the addition of tcc which is a pretty capable C compiler and much smaller and faster than the very traditional gcc.

The tcc build is tricky because the normal build process compiles the compiler and then uses the same compiler to build the default libraries. When cross-compiling, this doesn’t work well because the library you want for the host compile is different from the library you want to target for the second pass. You’ll see how to work around that in the post. The post continues to show how to do remote debugging and even gets QEMU into the mix. Debugging inside v86 doesn’t seem to work so far. There are more posts on this topic promised.

Honestly, this is one of those things like teaching a chicken to play checkers. It can be done, there’s little practical value, but it is still something to see. On the other hand, if you spend the weekend working through this, your next Linux porting project ought to seem easy by comparison.

Amazing what you can pull off with WebAssembly. If you need a quick introduction, check this one out from [Ben James].

Electronic Dice Is Introduction To Microcontroller Programming

By now most of us are familiar with the Arduino platform. It’s an inexpensive and fairly easy way into the world of microcontrollers. For plenty of projects, there’s no need to go beyond that unless you have a desire to learn more of the inner workings of microcontrollers in general. [Cristiano] was interested in expanding some of his knowledge, so he decided to build this electronic dice using a PIC microcontroller instead of the Arduino platform he was more familiar with.

As a result, this project is set up as a how-to for others looking to dive further into the world of microcontrollers that don’t have the same hand-holding setup as the Arduino. To take care of the need for a random number for the dice, the PIC’s random number generator is used but with the added randomness of a seed from an internal timer. The timer is started when a mercury tilt switch signals the device that it has been rolled over, and after some computation a single digit number is displayed on a seven-segment display.

While it might seem simple on the surface, the project comes with an in-depth guide on programming the PIC family of microcontrollers, and has a polish not normally seen on beginner projects, including the use of the mercury tilt switch which gives it a retro vibe. For some other tips on how to build projects like this, take a look at this guide on how to build power supplies for your projects as well.

Continue reading “Electronic Dice Is Introduction To Microcontroller Programming”

3D Print A Colour TV

The oldest form of television used a spinning disk with a progression of holes — a Nipkow disk — to slice the image into lines for display. They’re surprisingly simple machines and capable of unexpectedly high-quality images despite their relatively low resolution. Even better, in an age of microcontrollers and bright LEDs, making one that works is not the chore it might once have been. [Markus Mierse] has created one that uses an Arduino Mega and a set of 3D printed parts, so there’s no excuse for not having a spinning disk TV on your shelf.

The Arduino Mega is chosen because it has enough lines to drive three six-bit DACs for each of red, green, and blue. The disk is driven by a PWM motor controller, and synchronization is taken care of by a piece of reflective tape and an IR proximity sensor. Images and video are read from an SD card and displayed on the screen in glorious 32-line colour. The full build process can be seen in the video below the break.

A surprise when viewing mechanical TV is that its quality is much better than the meager resolution would have you believe, and this one with its colour display is much better than the usual monochrome devices. It’s hardly HDTV, but it acquits itself well and would provide an excellent talking point.

If you’re curious about Nipkow disks, they’re a subject we’ve examined in the past.

Continue reading “3D Print A Colour TV”

Cityscape Multi-Level Keyboard Really Stacks Up

Keyboards with wells like the Maltron, the Kinesis Advantage family, and everything dactyl-esque out there are great. Trust us, we know this firsthand. But if you want to build your own curvy girl, how the heck can you implement that shape without 3D printing, clever woodworking, or access to tooling and plastic molding equipment? Well, there is another way. Over on twitter (translated) (Threadreader: Japanese, English), [tsukasa_metam] has achieved the key well effect by stacking up PCBs to create a skyline of vertically-staggered keys.

The boards of Cityscape are all screwed together for mechanical integrity, but those screws are working overtime, providing electrical connections between the layers as well. We particularly like that there is an impetus for this build other than ‘I thought of it, so let’s do it’ — [tsukasa_metam] tends to typo in the double key press sense, hitting Q for instance at the same time when A was the intended target. Between the 3.2 mm of key travel, the 2.8 mm step height, and those flat F10 keycaps, that is no longer an issue.

Instead of the popular low-profile Kailh choc switches, [tsukasa_metam] went with TTC KS32s, a new switch introduced in 2020. Unlike chocs, they’ll take Cherry MX-style keycaps, as long as they’re wearing short skirts. Cityscape isn’t totally open source, but the idea is now out there nonetheless, and we happen to have an Odd Inputs and Peculiar Peripherals contest running now through July 4th.

Do stacked PCBs seem kinda familiar? Hey, it’s easier than winding transformer coils.

Via KBD #79

Electronic Catan Game Board Is Modular

Plenty of gamers around these parts require an expensive PC to play games, often spending thousands of dollars for a gaming machine. Believe it or not, though, there are entire classes of games that don’t require any electronics at all, but that doesn’t mean that they don’t benefit from the addition of some neat gadgets. This Settlers of Catan game uses custom LCD tiles with a built-in custom mesh network.

The tiles for the game board themselves are hexagonal and snap together using magnetic pogo pins in order to form a board of any size or shape. The pogo pins also allow communication for a pseudo-mesh network to operate with each tile’s built-in PCB to allow the game board to know exactly which tiles are placed where and to display the correct image on each one. Each tile contains it own RP2040 microcontroller, keeping the overall cost of each tile to a minimum.

For those regularly hosting game night, a project like this could really change the traditionally analog game’s dynamic for the better. It was mostly a project that [Colin Iuliano] built just for fun, and if he ever builds a second one he does plan on some improvements, but we’d say that it looks like a success already. For other Catan-based electronic design inspiration, take a look at this complete and non-modular electronic game board.

The new PewPew with an LCD showing some patterns, being held in someone's hand.

Hackaday Prize 2022: PewPew LCD Plays With Python

[deshipu] aka [Radomir Dopieralski] has been building educational handhelds for a good part of a decade now, and knows how to design hardware that makes for effective teaching. Today, we are graced with the PewPew LCD project, latest in the PewPew student-friendly handheld series, powered by CircuitPython.

The PewPew LCD from the other side, showing the simple PCB-built-in CR2032 battery holderThe goal for all of these devices has been consistent — making game programming accessible and fun. This time, as an entry in the Reuse, Recycle, Revamp round of Hackaday Prize, the new PewPew receives an upgrade – from an 8×8 LED matrix to an LCD display. This might not sound like much, but the change of display technology itself isn’t the main point. [deshipu] is working on ways to bring down the price and assembly complexity of PewPew handhelds, and he’s found there’s plenty of old stock RH-112 displays, previously used on cellphones like Nokia 1202, which these days go for as little as $1.30 a piece.

It’s exceptionally simple to get into writing games for the PewPew – one of the reasons why it’s a strong platform for workshops and individual learning. There’s already a slew of games and tutorials, and we can’t wait to see all the cool games people can build when given all the extra pixels! And, of course, we appreciate setting an example for giving new life to old displays – displays that’d otherwise inevitably end up in a trash container behind a warehouse in China.

The Reuse, Recycle, Revamp Hackaday Prize 2022 round is going on for two more weeks. If you’re making good use of something that would otherwise be discarded, please do share it with us, so that we can all learn and draw inspiration from your projects!