Reverse Engineering An Ultrasonic Car Parking Sensor

It has become a common sight, a must-have feature on modern cars, a row of ultrasonic sensors embedded in the rear bumper. They are part of a parking sensor, an aid to drivers for whom depth perception is something of a lottery.

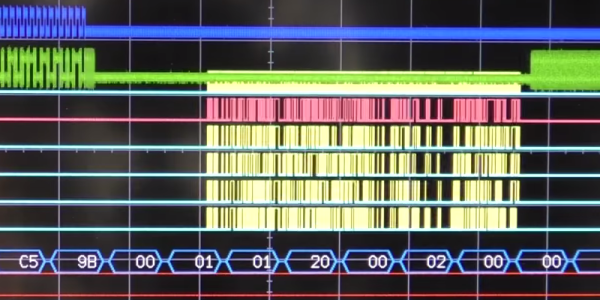
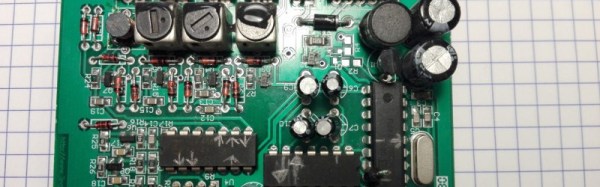
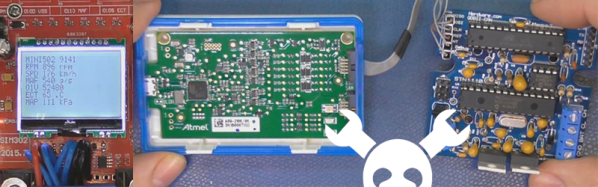
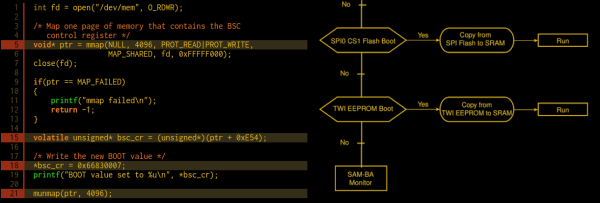
[Haris Andrianakis] replaced the sensor system on hs car, and was intrigued enough by the one he removed to reverse engineer it and probe its workings. He found a surprisingly straightforward set of components, an Atmel processor with a selection of CMOS logic chips and an op-amp. The piezoelectric sensors double as both speaker and microphone, with a CMOS analogue switch alternating between passing a burst of ultrasound and then receiving a response. There is a watchdog circuit that is sent a tone by the processor, and triggers a reset in the event that the processor crashes and the tone stops. Unfortunately he doesn’t delve into the receiver front-end circuitry, but we can see from the pictures that it involves an LC filter with a set of variable inductors.

If you have ever been intrigued by these systems, this write-up makes for an interesting read. If you’d like more ultrasonic radar goodness, have a look at this sweeping display project, or this ultrasonic virtual touch screen.

OBDII to Speed Pulse: Atmel ICE

Building An OBD Speed Pulse: Behold The ICE

I am a crappy software coder when it comes down to it. I didn’t pay attention when everything went object oriented and my roots were always assembly language and Real Time Operating Systems (RTOS) anyways.

So it only natural that I would reach for a true In-Circuit-Emulator (ICE) to finish of my little OBDII bus to speed pulse generator widget. ICE is a hardware device used to debug embedded systems. It communicates with the microcontroller on your board, allowing you to view what is going on by pausing execution and inspecting or changing values in the hardware registers. If you want to be great at embedded development you need to be great at using in-circuit emulation.

Not only do I get to watch my mistakes in near real time, I get to make a video about it.

Getting Data Out of a Vehicle

I’ve been working on a small board which will plug into my car and give direct access to speed reported on the Controller Area Network (CAN bus).

To back up a bit, my last video post was about my inane desire to make a small assembly that could plug into the OBDII port on my truck and create a series of pulses representing the speed of the vehicle for my GPS to function much more accurately. While there was a wire buried deep in the multiple bundles of wires connected to the vehicle’s Engine Control Module, I have decided for numerous reasons to create my own signal source.

At the heart of my project is the need to convert the OBDII port and the underlying CAN protocol to a simple variable representing the speed, and to then covert that value to a pulse stream where the frequency varied based on speed. The OBDII/CAN Protocol is handled by the STN1110 chip and converted to ASCII, and I am using an ATmega328 like found on a multitude of Arduino’ish boards for the ASCII to pulse conversion. I’m using hardware interrupts to control the signal output for rock-solid, jitter-free timing.

Walk through the process of using an In-Circuit Emulator in the video below, and join me after the break for a few more details on the process.

Continue reading “Building An OBD Speed Pulse: Behold The ICE”

Flashing An ARM With No Soldering

[Sami Pietikäinen] was working on an embedded Linux device based on an Atmel SAMA5D3x ARM-A5 processor. Normally, embedded Linux boxes will boot up off of flash memory or an SD card. But if you’re messing around, or just want to sidestep normal operation for any reason, you could conceivably want to bypass the normal boot procedure. Digging around in the chip’s datasheet, there’s a way to enter boot mode by soldering a wire to pull the BMS pin. As [Sami] demonstrates, there’s also a software way in, and it makes use of mmap, a ridiculously powerful Linux function that you should know about.

Continue reading “Flashing An ARM With No Soldering”

Starfish Cat, Bowling Ball Bot, And Stargate All Claim Prizes

We saw a huge outpouring of builds for the the Hackaday Sci-Fi Contest and it’s now time to reveal the winners. With 84 great themed projects submitted, the judges had a tough task to pull out the most impressive both in terms of creativity and execution.

Here are our four winners. Two come from the Stargate universe. One is a cuddly yet horrifying character of unknown origin but unarguably Sci-Fi. The other is the best use of a bowling ball we’ve seen so far.

Grand Prize

The grand prize goes to [Jerome Kelty] with Animatronic Stargate Helmet. [Jerome] has built a replica prop that looks like it just came out of a Hollywood shop. It’s almost a shame that this helmet won’t be worn on film – though it certainly could be. If you remember the film and the television show, these helmets have quite a bit of articulation. The head can pan and tilt. The eyes glow, as well as have irises which expand and contract. The “wings” also open and close in a particular way.

[Jerome] built the mechanics for this helmet. He used radio control servos to move the head, with the help of some hardware from ServoCity. Most of the metalwork was built in his own shop. Everything is controlled from a standard R/C transmitter, much like the original show. [Jerome] is taking home a Rigol DS1054Z 4 Channel 50 MHz scope.

First Prize

First prize goes to [Christine] with
Starfish Cat: Your Lovecraftian Furby-like Friend. Starfish Cat is one of those odd projects that finds itself right on the edge of the uncanny valley. We are equal parts intrigued and creeped out by this… thing. The bottom is all starfish, with a rubber base poured into a 3D printed mold. The top though, is more cat-like, with soft fur and ears. 5 claws hide under the fur, ready to grab you.

Starfish Cat detects body heat with 5 bottom mounted PIR sensors. The sensors are read by the particle photon which acts as its brain. When heat is detected, Starfish Cat activates its claws, and also blows or sucks air through its… uh… mouth hole.  [Christine] is taking home a Monoprice Maker Select Mini 3D printer.

Click past the break to see the rest of the winners

Continue reading “Starfish Cat, Bowling Ball Bot, And Stargate All Claim Prizes”

Flappy Bird Is The New “Does It Run Doom?”

Back in 2014 [Johan] decided to celebrate BASIC’s 30 50 year anniversary by writing his own BASIC interpreter. Now, a few years later, he says he feels he has hit a certain milestone: he can play Flappy Bird, written in his own version of BASIC, running on his own home-built computer, the BASIC-1.

Inside the BASIC-1 is an Atmel XMega128A4, a keyboard from a broken Commodore 64, a joystick port, a serial to TV out adapter, and an SD card adapter for program storage. An attractively laser-cut enclosure with kerf bends houses the keyboard and hardware. The BASIC-1 boots into BASIC just like many of its home computer counterparts from the 80s.

Continue reading “Flappy Bird Is The New “Does It Run Doom?””

Understanding DMA

In the world of computers, the central processing unit (CPU) is–well–central. Your first computer course probably explained it like the brain of the computer. However, sometimes you can overload that brain and CPU designers are always trying to improve both speed and throughput using a variety of techniques. One of those methods is DMA or direct memory access.

As the name implies, DMA is the ability for an I/O device to transfer data directly to or from memory. In some cases, it might actually transfer data to another device, but not all DMA systems support that. Sounds simple, but the devil is in the details. There’s a lot of information in this introduction to DMA by [Andrei Chichak]. It covers different types of DMA and the tradeoffs involved in each one.

Continue reading “Understanding DMA”

Touch Sensitive Cement With Just A Dash Of Neon

For quite some time now we’ve seen people casting their own countertops and other surfaces out of cement. It’s a combination of mold-making and surface finishing that produces a smooth and durable surface at quite a low cost, if you don’t factor in damage done to your back when lifting the thing for installation.

This offering is a little bit different. [Elliott Spelman] built his own touch sensitive cement table top. When you place your grubby hands on the polished surface, a loop of neon lighting is switched on. This is thanks to a 4:1 mix of quick setting cement and iron oxide powder. Bare copper wire was laid around the edges of the surface to be encased by the cement for making connections later.

There were some sad moments when [Elliott] was removing the cast surface from the mold. He ended up cracking it and suggests others be liberal with their use of both wax on the mold before casting, and patience in removing the cement afterward. We might also suggest a strengthening agent like fiber reinforcement. The edges and surface can be sanded to the finish desired and in this case, attaching table legs was easy since the wooden underside of the mold remains on the bottom of the cement.

The neon lighting adds a retro touch to this build. It’s sad to see this technology dying away, so a resurgence of artisanal neon is great in our book. [Elliott] found a Bay Area arts collective called the Crucible which does a lot of art glass education to help him make two hoops of glass tube and fill them with the appropriate gasses. A capacitive touch sensor (once Atmel, now Microchip part) AT42QT2120 (datasheet) monitors the wire coming from the slab and switches the power supply for the tubes using a combination of relay board and Arduino Uno.

We find the prospect of positional sensing in doped cement fascinating. Anyone have ideas for adapting this technique so that a more long and narrow slab could have positional awareness within, say, a few inches? Let us know in the comments.

Continue reading “Touch Sensitive Cement With Just A Dash Of Neon”