Rural Hacker De-Crufts And Rebuilds Hydroelectric Generator

YouTuber [Linguoer] has a knack, and it’s one that we don’t often see on the pages of Hackaday: rewinding and rebuilding dilapidated motors and generators. In the video below, you’ll see [Lin] take a hydroelectric turbine and generator that looks like it’s been sitting at the bottom of a lake, and turn it into a working unit, all while wearing her trademark blue and yellow denim jumpsuit.

Where as most makers would have used a MIG or TIG welder, [Linguoer] uses a simple (probably A/C) stick welder. Generator windings are calculated and wound by hand, and the carcass of what used to be the generator is sandblasted out in the open. Missing parts are fabricated from scratch using nothing more than an angle grinder. “Simple” is the order of the day.

[Linguoer] often refers to herself as “Village Girl”. Whatever specialty tools she uses, they are elementary. And whatever methods she uses, they are manual. You will get the idea very quickly that [Linguoer] isn’t just a person with a skill, but a person with a passion for getting things done no matter the circumstances. [Linguoer] is a hacker if there ever was one!

If hydroelectric hacks spin your pelton wheel, give this Impressive Off-Grid Hydroelectric Plant a whirl.

Continue reading “Rural Hacker De-Crufts And Rebuilds Hydroelectric Generator”

Circuit VR: The Wheatstone Bridge Analog Computer

We are always impressed with something so simple can actually be so complex. For example, what would you think goes into an analog computer? Of course, a “real” analog computer has opamps that can do logarithms, square roots, multiply, and divide. But would it surprise you that you can make an analog device like a slide rule using a Wheatstone bridge — essentially two voltage dividers. You don’t even need any active devices at all. It is an old idea and one that used to show up in electronic magazines now and again. I’ll show you how they work and simulate the device so you don’t have to build it unless you just want to.

A voltage divider is one of the easiest circuits in the world to analyze. Consider two resistors Ra and Rb in series. Voltage comes in at the top of Ra and the bottom of Rb is grounded. The node connecting Ra and Rb — let’s call it Z — is what we’ll consider the output.

Let’s say we have a 10 V battery feeding A and a perfect voltmeter that doesn’t load the circuit connected to Z. By Kirchoff’s current law we know the current through Ra and Rb must be the same. After all, there’s nowhere else for it to go. We also know the voltage drop across Ra plus the voltage drop across Rb must equal to 10 V. Kirchoff, conservation of energy, whatever you want to call it.  Let’s call these quantities I, Va, and Vb. Continue reading “Circuit VR: The Wheatstone Bridge Analog Computer”

ayan-sensor2notion-dashboard+raspberryPi

Know Which Way The Wind Blows, Whether Weather Boosts Your Mood

As a quantified-self experiment, [Ayan] has tracked several daily habits and moods for a couple of years and discovered some insights. Too much coffee is followed by anxiety while listening to music leads to feelings of motivation and happiness. There was a strong correlation in the data, but [Ayan] wondered if external factors like the weather and air quality also played a role.

To find out, [Ayan] extended the custom dashboard built in Notion.so with weather data and some local sensors. Working at Balena.io (yes, the makers of the ubiquitous Raspberry Pi SD card flashing tool, Etcher), [Ayan] turned to balenaCloud to translate the data from (you guessed it) a Raspberry Pi into the dashboard via Notion’s API beta. We think Notion holds a lot of promise for all sorts of web-based dashboards as a research notebook and organizational tool. Who knows where the API will lead any interested readers?

Check out the full tutorial where [Ayan] walks you through the hardware used and each step to connect the APIs that bring it all together. [Ayan] plans to add a coffee-maker integration to automate that data entry and would welcome help getting a manual trigger set up for the data integrations.

REMOTICON 2021 // Hal Rodriguez And Sahrye Cohen Combine Couture And Circuitry

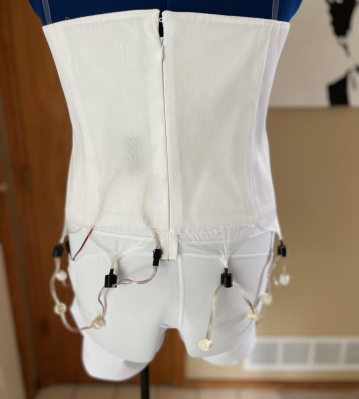
[Hal Rodriguez] and [Sahrye Cohen] of Amped Atelier focus on creating interactive wearable garments with some fairly high standards. Every garment must be pretty, and has to either be controllable by the wearer, through a set of sensors, or even by the audience via Bluetooth. Among their past creations are a dress with color sensors and 3D-printed scales on the front that change color, and a flowing pantsuit designed for a dancer using an accelerometer to make light patterns based on her movements.

Conductive Melody — a wearable musical instrument that is the focus of [Sahrye] and [Hal]’s Remoticon 2021 talk — was created for a presentation at Beakerhead Festival, a multi-day STEAM-based gathering in Calgary. [Sahrye] and [Hal] truly joined forces for this one, because [Sahrye] is all about electronics and costuming, and [Hal] is into synths and electronic music. You can see the demo in the video after the break.

The dress’s form is inspired by classical instruments and the types of clothing that they in turn inspired, such as long, generous sleeves for harp players and pianists. So [Hal] and [Sahrye] dreamed up a dress with a single large playable sleeve that hangs down from the mid- and upper arm. The sleeve is covered with laser-cut conductive fabric curlicues that look like a baroque interpretation of harp strings. Play a note by touching one of these traces, and the lights on the front of the dress will move in sync with the music.

[Sahrye] started the dress portion of Conductive Melody with a sketch of the garment’s broad strokes, then painted a more final drawing with lots of detail. Then she made a muslin, which is kind of the breadboard version of a project in garment-making where thin cotton fabric is used to help visualize the end result. Once satisfied with the fit, [Sahrye] then made the final dress out of good fabric. And we mean really good fabric — silk, in this case. Because as [Sahrye] says, if you’re going to make a one-off, why not make as nicely as possible? We can totally get behind that.

[Sahrye] says she is always thinking about how a wearable will be worn, and how it will be washed or otherwise cared for. That sequined and semi-sheer section of the bodice hides the LEDs and their wiring quite well, while still being comfortable for the wearer.

Inside the sleeve is an MPRP121 capacitive touch sensor and an Arduino that controls the LEDs and sends the signals to a Raspberry Pi hidden among the ruffles in the back of the dress.

The Pi is running Piano Genie, which can turn eight inputs into an 88-key piano in real time. When no one is playing the sleeve, the lights have a standby mode of mellow yellows and whites that fade in and out slowly compared to the more upbeat rainbow of musical mode.

We love to see wearable projects — especially such fancy creations! — but we know how finicky they can be. Among the lessons learned by [Sahrye] and [Hal]: don’t make your conductive fabric traces too thin, and silver conductive materials may tarnish irreparably. We just hope they didn’t have to waste too much conductive fabric or that nice blue silk to find this out.

Continue reading “REMOTICON 2021 // Hal Rodriguez And Sahrye Cohen Combine Couture And Circuitry”

Tricking A Smart Meter Into Working On The Bench

When the widget you’re working on is powered by a battery or a USB charger, running it on the bench is probably pretty safe. But when the object of your reverse-engineering desire is a residential electrical meter, things can get a little dicey.

Not that this elevated danger level has kept [Hash] from exploring the mysteries presented by smart meters. Still, with a desire to make things a little safer, he came up with a neat trick for safely powering electrical meters on the bench. [Hash] found that the internal switch-mode power supply on the meter backplane was easy enough to back-feed with a 12-volt bench supply, rather than supplying the meter with the full 240-volt AC supply it normally gets when plugged into a meter base (these are meters for the North American market, where split-phase 240-volt is the norm for residential connections.) But that wasn’t enough for the meter — it powered up, but stayed in a reset state without fully booting. Something more was needed to bring the meter fully to life.

That something proved to be a small AC signal. Normally, a resistor network divides the 240-volt supply down to about 3 volts, which is used by the sensing circuit in the meter. [Hash] found that injecting a 60-Hz, 600-mV sine wave signal with about a 3-volt DC bias into the sensing circuit was enough to spoof the meter into thinking it’s plugged into the meter base. The video below has a walkthrough of the hack, and some nice shots of the insides of the meters he’s been working with.

[Hash] has been working with these meters for a while now, and some of the stuff he’s learned is pure gold. Be sure to check out his 2021 Remoticon talk on meter hacking for all the fascinating details.

Continue reading “Tricking A Smart Meter Into Working On The Bench”

CNC Toolpath Visualisation With OpenCV

[Tony Liechty] has been having a few issues getting into CNC machining — starting with a simple router, he’s tripped over the usual beginners’ problems, you know, things like alignment of the design to the workpiece shape, axis clipping and workpiece/clamp collisions. He did the decent hacker thing, and turned to some other technologies to help out, and came up with a rather neat way of using machine vision with OpenCV to help preview the toolpath against an image of the workpiece in-situ (video, embedded below.)

ChArUco (a combined chessboard and ArUco marker pattern) boards taped to the machine rails were used to give OpenCV a reference of where points in space are with respect to the pattern field, enabling identification of pixel locations within the image of the rails. A homography transformation is then used to link the two side references to an image of the workpiece. This transformation allows the system to determine the physical location of any pixel from the workpiece image, which can then be overlaid with an image of the desired toolpath. Feedback from the user would then enable adjustment of the path, such as shifts, or rotates to be effected in order to counter any issue that can be seen. The reduction of ‘silly’ clamping, positioning and other such issues, means less time wasted and fewer materials in scrap bin, and that can only be a good thing.

[Tony] says this code and setup is just a demo of the concept, but such ‘rough’ code could well be the start of something great, we shall see. Checkout the realWorldGcodeSender GitHub if you want to play along at home!

We’ve seen a few uses of OpenCV for assisting with CNC applications, like this cool you draw it, i’ll cut it hack, and this method for using machine vision to zero-in a CNC mill onto the centre of a large hole.

Continue reading “CNC Toolpath Visualisation With OpenCV”

Version 1.8 of the 80386 ISA SBC in its assembled glory. (Credit: Alexandru Groza)

Building Your Own 80386DX ISA Single Board Microcomputer

Having grown up with 386-level systems during the early 90s like so many of us, [Alexandru Groza] experienced an intense longing to experience the nostalgia of these computer systems from an interesting angle: by building his own 80386DX-based single board computer. Courtesy of the 16-bit ISA form factor, the entire system fits into a 16-bit ISA backplane which then provides power and expansion slots for further functionality beyond what is integrated on the SBMC card.

Having started the project in 2019, it is now in the home stretch towards completion. Featuring an 80386DX and 80387DX FPU alongside 128 kB of cache and a grand total of 32 MB of RAM, an OPTi chipset was used to connect with the rest of the system alongside the standard 8042-class PS/2 keyboard and mouse controller. A large part of the fun of assembling such a system is that while the parts themselves are easy enough to obtain, finding datasheets is hard to impossible for some components.

Undeterred, some reverse-engineering of signaling on functional mainboards was sufficient to fill in the missing details. Helpfully, [Alexandru] provides the full schematics and BOM of the resulting board and takes us along with bootstrapping the system after obtaining the PCBs and components. After an initial facepalm moment due to an incorrectly inserted (and subsequently very dead) CPU and boot issues, ultimately [Alexandru] gave up on the v1.6 revision of the board

Fortunately the v1.8 revision with a logic analyzer led to a number of discoveries that has led to the system mostly working, minus what appears to be DMA-related issues. Even so, it is a remarkable achievement that demonstrates the complexity of these old systems.