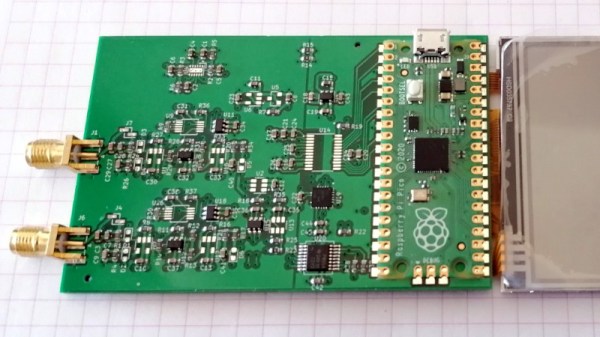
DIY Arduino Based EV Charger Saves Money, Looks Pro

Electric vehicles (EVs) are something of a hot topic, and most of the hacks we’ve featured regarding them center on conversions from Internal Combustion to Electric. These are all fine, and we hope to see plenty more of them in the future. There’s another aspect that doesn’t get covered as often: How to charge electric vehicles- especially commercially produced EV’s rather than the DIY kind. This is the kind of project that [fotherby] has taken on: A 7.2 kW EV charger for his Kia.

Faced with spending £900 (about $1100 USD) for a commercial unit installed by a qualified electrician, [fotherby] decided to do some research. The project wasn’t outside his scope, and he gave himself a head start by finding a commercial enclosure and cable that was originally just a showroom unit with no innards.

An Arduino Pro Mini provides the brains for the charger, and the source code and all the needed information to build your own like charger is on GitHub. What’s outstanding about the guide though is the deep dive into how these chargers work, and how straightforward they really are without being simplistic.

Dealing with mains power and the installation of such a serious piece of kit means that there are inherent risks for the DIYer, and [fotherby] addresses these admirably by including a ground fault detection circuit. The result is that if there is a ground fault of any kind, it will shut down the entire circuit at speeds and levels that are below the threshold that can harm humans. [fotherby] backs this up by testing the circuit thoroughly and documenting the results, showing that the charger meets commercial standards. Still, this isn’t a first-time project for the EV enthusiast, so we feel compelled to say “Don’t Try This At Home” even though that’s exactly what’s on display.

In the end, several hundred quid were saved, and the DIY charger does the job just as well as the commercial unit. A great hack indeed! And while these aren’t common, we did cover another Open Source EV charger about a year ago that you might like to check out as well.

Continue reading “DIY Arduino Based EV Charger Saves Money, Looks Pro”

90s Apple Computer Finally Runs Unsigned Code

Back in the 90s, the console wars were in full swing. Nintendo vs Sega was an epic showdown at first, but when Nintendo seemed sure to clench the victory Sony came out of nowhere with the PlayStation. While these were the most popular consoles at the time, there were a few others around that are largely forgotten by history even if they were revolutionary in some ways. An example is the Pippin, a console made by Apple, which until now has been unable to run any software not signed by Apple.

The Pippin was Apple’s only foray into gaming consoles, but it did much more than that and included a primitive social networking system as well as the ability to run Apple’s Macintosh operating system. The idea was to be a full media center of sorts, and the software that it would run would be loaded from the CD-ROM at each boot. [Blitter] has finally cracked this computer, allowing it to run custom software, by creating an authentication file which is placed on the CD to tell the Pippin that it is “approved” by Apple.

The build log goes into incredible detail on the way these machines operated, and if you have a Pippin still sitting around it might be time to grab it out of the box and start customizing it in the way you probably always wanted to. For those interested in other obscure Apple products, take a look at this build which brings modern WiFi to the Apple Newton, their early PDA.

Continue reading “90s Apple Computer Finally Runs Unsigned Code”

Drone Filming Chile’s Urban Bike Race Takes Some Fancy Radio Gear

Drones have revolutionized the world of videography in perhaps the biggest way since the advent of digital hardware. They’re used to get shots that are impractical or entirely impossible to get by any other means. The [Dutch Drone Gods] specialize in such work. When it came to filming an urban mountain bike race in a dense Chilean city, they had to bust out some serious tricks.

The FPV video feed was grainy, but good enough to keep the pilot on track. The drone carried a separate second camera for capturing high-quality footage of the run.

Typically, running a drone chase cam behind a biker would require some good first-person flying skills and a quick drone. However, for the Red Bull Valparaiso Cerro Abajo urban downhill event, this alone would not be enough. The tight course winds down staircases between thick concrete walls and even through houses, presenting huge challenges to maintaining signal integrity. Without a clear video signal, the pilot can’t fly the drone without crashing.

To make this all possible, the team used a variety of techniques to help combat the uncooperative radio environment. Directional antennas were used to target different sections of the course. Additionally, a second drone was flown high above the course carrying a radio repeater, helping provide a better line-of-sight contact to the camera drone following the riders when the buildings would otherwise block the signal to the pilot.

Even with all this work, the signal was still scratchy and would cut out at some points. However, with a bit of blind faith when cutting through the worst areas, the [Dutch Drone Gods] and the [Red Bull] team were able to put together an amazing FPV drone shot shadowing [Tomas Slavik] on his run down the extremely difficult urban course.

Details on the precise hardware are scarce. However, it’s something that any experienced drone builder could probably whip up without too much trouble. The idea of using a drone-based repeater is particularly exciting, and something we’re sure could help out many pilots who find themselves operating in difficult urban environments.

We’ve seen plenty of great FPV stories over the years, from early experiments in the 1980s to fun DIY cockpit builds of today. Video after the break.

Continue reading “Drone Filming Chile’s Urban Bike Race Takes Some Fancy Radio Gear”

Blender screen with CAD drawing

CAD Sketcher, It’s Parametric CAD For Blender

It’s very early days for CAD Sketcher, a new parametric CAD add-on for Blender by [hlorus], but it looks very promising.

We do a lot of 3D work and like Blender as an environment. It’s always annoying that Blender doesn’t do parametric modeling, so we’re forced into a dedicated CAD package. Blending the two for that robot ocelot is always particularly annoying.

CAD Sketcher lets the user make a ‘sketch’, a 2D drawing. They then  constrain it, saying “this line is vertical, that line is parallel to this one”, until the sketch is fully defined. It’s a normal part of parametric modelling. This is powerful when your model needs refined over and over.

There’s an old adage, “Better a tool that does 90% of the job well than one that does 100% poorly”. For CAD systems, (and much other software), we’d suggest “Better a tool that does 90% of the job well and works with whatever does the other 10%”.

3D render of gaurd
Guard Drawn In CAD Sketcher And Blender

We tried a test part, and being in Blender’s universe showed its value. CAD Sketcher doesn’t do bevels and rounds yet, and probably won’t for a while. But Blender’s perfectly happy doing them.

It’s not going to put SolidWorks out of business any time soon, but it’s a very promising new development. We hope it gathers some community and encourage contributions.

We cover CAD frequently, like the recent advances with CadQuery  and the port of OpenSCAD to WASM.

[thanks paulvdh]

Continue reading “CAD Sketcher, It’s Parametric CAD For Blender”

Digital To Analog In The Darkroom

As the world becomes more and more digital, there are still a few holdouts from the analog world we’ve left behind. Vinyl records are making quite the comeback, and film photography is still hanging on as well. While records and a turntable have a low barrier for entry, photography is a little more involved, especially when developing the film. But with the right kind of equipment you can bridge the gap from digital to analog with a darkroom setup that takes digital photographs and converts them to analog prints.

The project’s creator, [Muth], has been working on this project since he found a 4K monochrome display. These displays are often used in resin 3D printers, but he thought he could put them to use developing photographs. This is much different from traditional darkroom methods, though. The monochrome display is put into contact with photo-sensitive paper, and then exposed to light. Black pixels will block the light while white pixels allow it through, creating a digital-to-analog negative of sorts. With some calibration done to know exactly how long to expose each “pixel” of the paper, the device can create black-and-white analog images from a digital photograph.

[Muth] notes that this method isn’t quite as good as professional print, but we wouldn’t expect it to be. It creates excellent black-and-white prints with a unique method that we think generates striking results. The 4K displays needed to reproduce this method aren’t too hard to find, either, so it’s fairly accessible to those willing to build a small darkroom to experiment. For those willing to go further, take a look at some other darkroom builds we’ve seen in the past.

Continue reading “Digital To Analog In The Darkroom”

DIY Bench PSU Looks Like A Million Bucks But Is Easy On The Budget

As one becomes more and more involved in hobbies that involve electronics of almost any kind, it becomes necessary to graduate from wall warts and USB power breakout boards and move up to something more substantial. One great way to do this is to repurpose an old computer PSU, and that’s exactly what the excellent writeup by [Mukesh Sankhla] shows us how to do.

Starting with an ATX power supply from a derelict computer that was otherwise heading to to the bin, [Mukesh] walks us through the teardown of the power supply as well as how we can rebuild it in a snazzy 3d printed case complete with a voltage readout.

Now it’s easy to say “Sure, this is just another ATX PSU project” but the care that went into making a nice case adds a lot to build. There’s another element that is extremely important: The power resistor across the 5 Volt power bus. There are cheap kits online that will break out an ATX PSU into banana plugs, but they omit this vital piece. Depending on the ATX power supply being used, they may be unstable without the load.

The project also leaves a lot of room for adding your own hacks such as variable voltage and current limiting. We think this PSU would be a great (and great looking) addition to any hacker’s workbench. If ATX Power Supply get your electrons flowing, check out this entire computer built into a gutted ATX PSU.

Hackaday Prize 2022: Glass Tube Solar Thermionic Converters

Typically, if you want to convert solar energy into electrical energy, you use either photovoltaic (PV) cells, or you use the sunlight to create steam to turn a turbine. Both of these methods are well-established and used regularly in both small- and grid-scale applications. However, [Nick Poole] wanted to investigate an alternative method, using thermionic converters for solar power generation.

[Nick] has been gearing up to produce various styles of vacuum tubes, and noted that the thermionic effect that makes them work could also be used to generate electricity. They are highly inefficient and produce far less power than a photovoltaic solar cell, meaning they’re not in common use. However, as [Nick] notes, unlike PV cells etched in silicon, a thermionic converter can be built with basic glassworking tools, requiring little more than a torch, a vacuum pump, and a spot welder.

Experiments with a large lens to focus sunlight onto a 6V3A diode tube showed promise. [Nick] was able to generate half a volt, albeit at a tiny current, with the design not being optimized for thermionic conversion. Further experiments involved electrically heating a pair of diode tubes, which was able to just barely light an LED at 1.7 V and a current of 7.5 uA. The conversion efficiency was a lowly 0.00012%, around 5 orders of magnitude worse than a typical PV cell.

[Nick]’s hope is that he can produce a tube designed specifically to maximize thermionic conversion for energy generation purposes. It’s likely there is some low-hanging fruit in terms of gains to be made simply by optimizing the design for this purpose, even if the technique can’t compete with other solar generation methods.

In any case, we’re eager to see what [Nick] comes up with! We love to see makers building tubes in their own home workshops.

Continue reading “Hackaday Prize 2022: Glass Tube Solar Thermionic Converters”