How much would you pay for a 3D printer? Granted, when we started a decent printer might run over $1,000 but the cost has come way down. Unless of course, you go pro. We were disappointed that this [All3DP] post didn’t include prices, but we noticed a trend: if your 3D printer has stairs, it is probably a big purchase. According to the tag line on the post, the printers are all north of $500,000.
Expensive printers usually have unique technology, higher degrees of automation, large capacity or some combination of that, and a few other factors. At least two of the printers mentioned had stairs to reach the top parts of the machine. And the Black Buffalo — a cement printer — uses a gantry that looks like it is part of a light show at a concert. It is scalable, but apparently can go up to three stories tall!
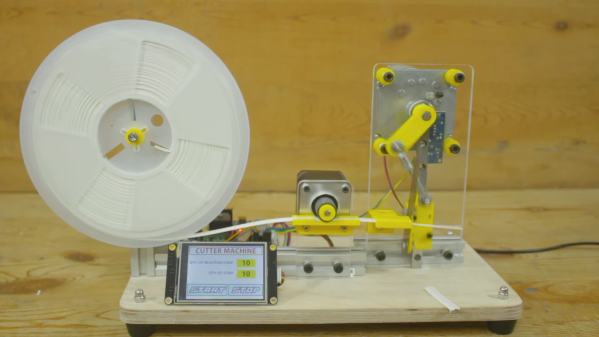
Nobody likes a tedious manual job prone to repetitive stress injury, and such tasks rightly inspire an automated solution. This automatic SMD tape cutter is a good example of automating such a chore, while leaving plenty of room for further development.
We’re used to seeing such tactical automation projects from [Mr Innovative], each of which centers on an oddly specific task. In this case, the task involves cutting a strip containing a specific number of SMD resistors from a reel, perhaps for assembling kits of parts. The mechanism is simple: a stepper motor with a rubber friction wheel to drive the tape, and a nasty-looking guillotine to cut the tape. The cutter is particularly interesting, using as it does a short length of linear bearing to carry a holder for a razor blade that’s mounted perpendicular to the SMD tape. The holder is mounted to a small motor via a crank, and when the proper number of parts have been fed out, the motor rotates one revolution, driving the angled blade quickly down and then back up. This results in a shearing cut rather than the clipping action seen in this automated wire cutter, also by [Mr Innovative].
Curiously, there seems to be no feedback mechanism to actually measure how many resistors have been dispensed. We assume [Mr Innovative] is just counting steps, but it seems easy enough to integrate a photosensor to count the number of drive sprocket holes in the tape. It also seems like a few simple changes would allow this machine to accommodate SMD tapes of different sizes, making it generally useful for SMD kitting. It’s still pretty cool as a tactical project, though, and does a great job inspiring future improvements.
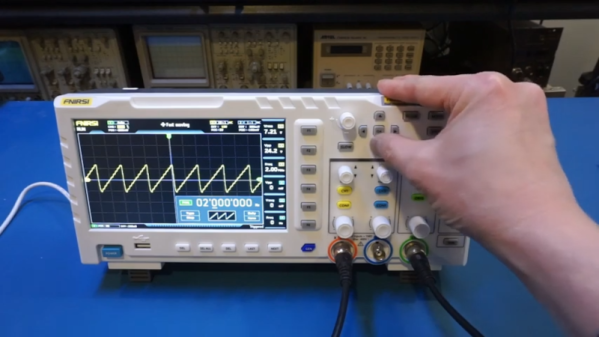
We always enjoy watching [Kerry Wong] put an oscilloscope through its paces. His recent video is looking at a very inexpensive FNIRSI 1014D ‘scope that you can also find rebranded. You can usually find these for well under $200 at the usual places. Can you get a reasonable scope for that cost? [Kerry] has a list of issues with the scope ranging from short memory depth to low sensitivity. He did, however, like that it is USB powered so it can be operated from a common battery pack, which would make it truly floating.
The ‘scope looks like a lot of other inexpensive ‘scopes, but you can see some concessions to price. For example, the encoder knobs don’t have a push button function, making the scope more difficult to operate. While the specs are relatively modest, [Kerry] wasn’t sure the instrument was even living up to them.
Generally when we consider the many plants around us, we imagine them efficiently using the electromagnetic radiation from the Sun via photosynthesis in their leaves — pulling carbon-dioxide from the air, as well as water from the soil via their roots, and grow as quickly as they reasonably can. In reality, the efficiency of this process is less than 10% of the input energy, and the different types of plant metabolisms that have formed over the course of evolution aren’t all the same.
Among the plant metabolisms in use today, some use significantly more efficient carbon fixation pathways, while others end up wasting a lot of the energy they obtained from photosynthesis with unnecessarily complicated processes, especially to deal with waste. How fast plants can grow if they had all evolved the most efficient carbon fixation pathway has been the subject of a number of studies these past decades, involving everything from crop plants to trees.
As these studies are showing us, more than a scientific and evolutionary biological curiosity, these genetically engineered plants offer real opportunities in everything from food production to reforestation.
Where has the year gone? It’s already summer in the Northern Hemisphere, and the second Challenge of the 2022 Hackaday Prize ends this weekend, along with your chance at one of ten $500 prizes. If you thrive on last-minute challenges, consider the eleventh hour upon you. But don’t panic; there’s still a decent amount of time left to start a new project over on Hackaday.io and get it entered into the contest.
The second Challenge focuses on creating new ways of recycling materials. What does this look like? That’s a pretty broad topic, but it could be anything from a better method of chip harvesting to an inexpensive and/or low-energy process for shredding used plastic and forming it into millable blocks.
Don’t just think big on a commercial scale — imagine what people can do at home with the stuff in their recycle bin or their neighbor’s trash. If everyone had access to one of [Jerzeek]’s plastic scanners for identifying the type of plastic that mystery bucket or old watering can was made of, just think what could be done. As long as your project focuses on reusing, recycling, or revamping, we want to see it!
[jude_pullen] is vacu-forming plastic milk jugs ’til the cows come home.
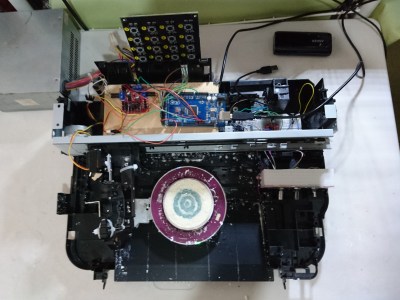
[Guillermo Perez Guillen]’s cornstarch mini pottery machine spins us right round.
So basically, we have a bunch of awesome entries right now, but we don’t have yours! Remember: it doesn’t have to be a new project, just a new project page. Did you revolutionize recycling during lockdown? Make a new project and tell us about it! Just don’t forget to actually enter the thing by using the drop-down on the left before 7AM PDT on Sunday, June 12th. Need a time converting countdown thingy? We’ve got you.
After the recycle bin is empty, we’ll be moving on immediately to the Hack It Back challenge. This time, we’ll be asking you to teach old tech new tricks, or to bring a piece of gear back from the dead. Turn a blender into a Dremel-like tool, or give an old ‘scope a screen upgrade. You know what to do!
We see lots of great hardware projects here at Hackaday: some are extremely clever, some are beautifully made, and some show off their maker’s extraordinary skills. Others are just plain weird, but still manage to include some or even all of the above categories. Case in point: [kgsws]’s Wireframe Game Boy project. It’s probably the weirdest Game Boy mod we’ve seen so far, but also extremely impressive from a technical point of view.
The basic idea was to take a Game Boy Pocket and remove its outer shell, replacing it with a cage-like structure made from thick copper wire. That sounds kind of reasonable; think of those transparent Game Boys, only without the transparent plastic. [kgsws]’s video (embedded below) shows him bending a few pieces of copper wire to match the Game Boy’s overall shape, then adding mounts for the cartridge socket, the display, the D-pad and the four buttons. After that you’d simply slide in the PCB, insert some batteries and off you go, right?
Well, this wouldn’t do for [kgsws]. What he did instead, was use a hot air desoldering station to remove all chips from the motherboard and proceed to mount them directly inside the wireframe without a PCB. He then used dozens of thin copper wires to hook up the cartridge slot, the CPU, RAM, buttons, and everything else to reconstruct the motherboard’s functionality. We cringed a bit when we saw him brutally cut the display’s flat cable with scissors, and that too was connected to the rest of the system through flying wires, soldered directly onto the screen’s contacts.
Recently, I stumbled upon a cool write-up by [DHowett], about reprogramming a Framework laptop’s Embedded Controller (EC). He shows us how to reuse the Caps Lock LED, instead making it indicate the F1-F12 key layer state – also known as “Fn lock”, AKA, “Does your F1 key currently work as F1, or does it regulate volume”. He walks us through adding custom code to your laptop’s EC firmware and integrate it properly into the various routines the EC runs.
The EC that the Framework uses is a MEC1521 chip from Microchip, and earlier this year, they open-sourced the firmware for it. Now, there’s a repository of microcontroller code that you can compile yourself, and flash your Framework laptop’s motherboard with. In a comment section of HackerNews, a Framework representative has speculated that you could add GPIOs to a Framework motherboard through EC firmware hacking.
Wait… Microcontroller code? GPIOs? This brings us to the question – what is the EC, really? To start with, it’s just a microcontroller. You can find an EC in every x86 computer, including laptops, managing your computer’s lower-level functions like power management, keyboard, touchpad, battery and a slew of other things. In Apple land, you might know them as SMC, but their function is the same.
Why have we not been reprogramming our ECs all this time? That’s a warranted question, too, and I will tell you all about it.