You Need A Self-Righting Thrust-Vector Balloon Copter

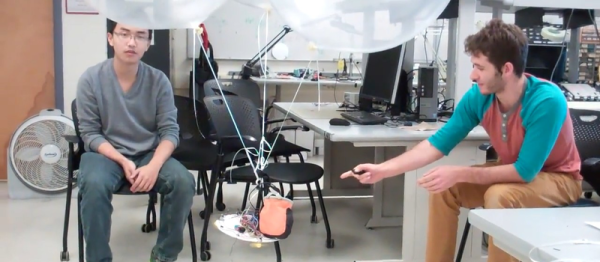
Cornell University’s microcontroller class looks like a tremendous amount of fun. Not only do the students learn the nitty-gritty details of microcontroller programming, but the course culminates in a cool project. [Brian Ritchken] and [Jim Liu] made a thrust-vector controlled balloon blimp. They call this working?!?!

Three balloons provide just enough lift so that the blimp can climb or descend on motor power. Since the machine is symmetric, there’s no intrinsic idea of “forward” or “backward”. Instead, a ring of eight LEDs around the edge let you know which way the blimp thinks it’s pointing. Two controls on the remote rotate the pointing direction clockwise and counter-clockwise. The blimp does the math to figure out which motors to run faster or slower when you tell it to go forward or back.

The platform is stabilized by a feedback loop with an accelerometer on board, and seems capable of handling a fairly asymmetric weight distribution, as evidenced by their ballast dangling off the side — a climbing bag filled with ketchup packets that presumably weren’t just lifted from the dining halls.

It looks like [Brian] and [Jim] had a ton of fun building and flying this contraption. We’d love to see a distance-to-the-floor sensor added so that they could command it to hover at a given height, but that adds an extra level of complexity. They got this done in time and under budget, so kudos to them both. And in a world full of over-qualified quadcopters, it’s nice to see the humble blimp getting its time in the sun.

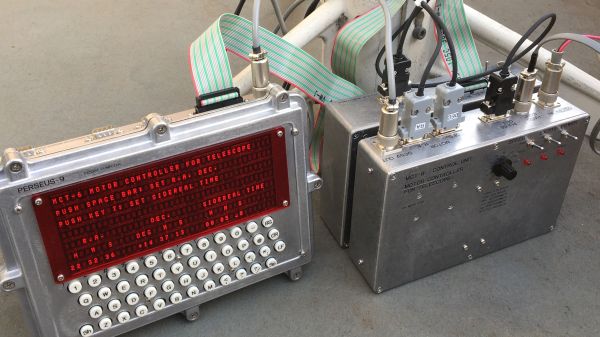
Yep, you heard right… this is yet another final project for a University course. Yesterday we saw a spinning POV globe, and the day before a voice-activated eye test. We want to see your final project too so please send in a link!

Ball Bearing Motor Rolls For Reasons Unknown

[RimstarOrg] has brought us an oldie but goodie this week. He’s built a ball bearing motor, a design which has been causing engineers and scientists to squabble for decades. [RimstarOrg] used a microwave oven transformer with a 70 turn primary coil and a single turn secondary coil to create a low voltage, high current AC power supply. Needless to say, there’s a real risk of fire or electrocution with a setup like this, so be careful if you try this one at home. [RimstarOrg] then built the motor itself. He de-greased two ball bearings then installed them on a metal shaft along with a wooden flywheel. The entire assembly was then mounted on a board so the wheel could spin freely. Two copper straps hold the bearings to the board. Finally, the transformer is wired into the copper straps. In this configuration, the current will flow through the outer race of one bearing, through the balls, and into the inner race. The current then passes down the axle and passes through the other bearing. There is very little resistance in this circuit, so it can only be powered on for a few seconds at a time before things start to melt down.

Continue reading “Ball Bearing Motor Rolls For Reasons Unknown”

A Spinning Beachball Of Doom That You Can Carry In Your Pocket

175353_115989

Need a way to tell the world that you’re mentally ‘out to lunch’? Or what about a subtle hint to others that your current thought process is more important than whatever they are saying? [Caleb Kraft] — who earlier this year bid farewell to Hackaday for a position with EETimes — is heading to the World Maker Faire in New York this weekend, and he decided to build just that device. If you’re heading to Maker Faire too, keep an eye out for his eye-catching Spinning Beachball of Doom. He was inspired by iCufflinks from Adafruit, and ended up with a great little device that is small enough to be worn, or just thrown around for fun.

A couple of weeks ago, we linked you to the Adafruit announcement of their new Trinket product line. [Caleb] wasted no time in finding a use for the tiny microcontroller board. He paired it with the Neopixel LED ring, and had it working with just a tiny tweak to the test code. He then used DesignSpark Mechanical to design a 3D-printed case… the most complicated part of the project. It’s too bad his original plan to power the whole thing with button cells didn’t work out, because it could have been a neat (albeit expensive) upgrade to LED throwies. That said, [Caleb] mentions that a small LiPo battery would be a good alternative.

This is a fun little project that most anyone could throw together in an afternoon. Don’t be surprised if we start seeing these show up more and more.

To see what it looks like in action, check out the video after the break.

Continue reading “A Spinning Beachball Of Doom That You Can Carry In Your Pocket”

Tweets Send Your Balls Flying (on TV)

Members from the London Hackerspace recently got a little on-air time with a ping pong ball launcher. They were invited to build something for the Click show on BBC. The launcher that they built responds to hash tags on Twitter by barraging the audience with balls.

The hardware was built in two parts. The first is a dispenser that responds to incoming Tweets by releasing one ball onto a set of staging ramps. The other portion is the launcher itself. Building it like this makes it a rapid fire device, as the spinning wheels of the launcher make quick work of several dozen balls just waiting to be let loose. Check out some footage from the show after the jump.

We like this one just as much as that remote controlled launcher. We’re glad to have seen these both because we happen to have a surplus of the balls lying around since we built that clock and we’re not about to undertake some of the more dangerous ping pong based projects we’ve seen. Continue reading “Tweets Send Your Balls Flying (on TV)”

Mining And Refining: Uranium And Plutonium

When I was a kid we used to go to a place we just called “The Book Barn.” It was pretty descriptive, as it was just a barn filled with old books. It smelled pretty much like you’d expect a barn filled with old books to smell, and it was a fantastic place to browse — all of the charm of an old library with none of the organization. On one visit I found a stack of old magazines, including a couple of Popular Mechanics from the late 1940s. The cover art always looked like pulp science fiction, with a pipe-smoking father coming home from work to his suburban home in a flying car.

But the issue that caught my eye had a cover showing a couple of rugged men in a Jeep, bouncing around the desert with a Geiger counter. “Build your own uranium detector,” the caption implored, suggesting that the next gold rush was underway and that anyone could get in on the action. The world was a much more optimistic place back then, looking forward as it was to a nuclear-powered future with electricity “too cheap to meter.” The fact that sudden death in an expanding ball of radioactive plasma was potentially the other side of that coin never seemed to matter that much; one tends to abstract away realities that are too big to comprehend.

Things are more complicated now, but uranium remains important. Not only is it needed to build new nuclear weapons and maintain the existing stockpile, it’s also an important part of the mix of non-fossil-fuel electricity options we’re going to need going forward. And getting it out of the ground and turned into useful materials, including its radioactive offspring plutonium, is anything but easy.

Continue reading “Mining And Refining: Uranium And Plutonium”

Lamp Becomes Rotating, Illuminated Sign For Festival Table

Two things we love are economical solutions to problems, and clever ways to use things for other than their intended purpose. [CelGenStudios] hits both bases with a simple illuminated and spinning sign made from a lamp and a couple economical pieces of hardware: an LED bulb, and a solar-powered product spinner. Both are readily and cheaply available from your favorite overseas source.

The first step in making a cheap illuminated sign is to not buy one, but instead make do with a standing lamp. Plug a bright LED bulb into the socket, decorate the lampshade with whatever logos or signs one wishes to display, and one has an economical illuminated sign suitable for jazzing up a table at an event. But what really kicks it up a notch is making it rotate, and to do that is where the clever bit comes in.

Mounting the lampshade to the solar turntable body yields a simple, rotating, illuminated sign.

The first attempt used a BBQ rotisserie motor to turn the whole lamp, but it was too loud and not especially stable. The second attempt used a “disco ball effect” LED bulb with a motorized top; it worked but turned too quickly and projected light upward instead of into the lampshade.

The winning combination is LED bulb plus a little solar-powered turntable onto which the lampshade mounts. As a result, the lampshade spins slowly when the lamp is turned on. It might not be the most durable thing to ever come out of a workshop, but as [CelGenStudios] says, it only needs to last for a weekend.

The basic concept is far more simple than it might sound, so check it out in the video (embedded below) to see it in action. Curious about what’s inside those little solar spinners? Skip to 5:55 in the video to see how they work. And if you’re intrigued by the idea of using solar power for motive force but want to get more hands-on with the electrical part, we have just the resource for turning tiny motors with tiny solar cells.

Thanks to [Bike Forever] for the tip!

Continue reading “Lamp Becomes Rotating, Illuminated Sign For Festival Table”

Keeping Track Of The Night Sky With Discrete Logic Chips

As hobbies go, stargazing has a pretty low barrier to entry. All you really need is a pair of Mark 1 eyeballs and maybe a little caffeine to help you stay up late enough. Astronomy, on the other hand, takes quite a bit more equipment, not least of which is a telescope and a way to get it pointed in the right direction at the right time, and to make up for the pesky fact that we’re on a moving, spinning ball of rock.

Yes, most of the equipment needed for real astronomy is commercially available, but [Mitsuru Yamada] decided to go his own way with this homebrew retro-style telescope motor controller. Dubbed MCT-6, the controller teams up with his dual-6502 PERSEUS-9 computer to keep his scope on target. There are a lot of literally moving parts to this build, including the equatorial mount which is made from machined aluminum and powered by a pair of off-the-shelf stepper-powered rotary stages for declination and right ascension. The controller that runs the motors is built completely from discrete 74HCxx logic chips that divide down a 7.0097-MHz crystal oscillator signal to drive the steppers precisely at one revolution per diurnal day. The pulse stream can also be sped up for rapid slewing, to aim the telescope at new targets using a hand controller.

As impressive as all this is, the real star (sorry) of the show here is the fit and finish. In typical [Yamada-san] fashion, the impeccably wire-wrapped mainboard fits in a robust die-cast aluminum case that fits the retro aesthetic of the whole project. The PERSEUS-9 is used mainly as a display and control terminal, running custom software to show where the telescope is pointed and calculate the coordinates of various heavenly bodies. As a bonus, the 40×7 alphanumeric red LED display should be easy on dark-adapted eyes.

Hats off to [Mitsuru Yamada] on another fabulous build. If you haven’t had enough of his build style yet, be sure to check out his PERSEUS-8 or even his foray into the analog world.

Continue reading “Keeping Track Of The Night Sky With Discrete Logic Chips”