Bare-Metal STM32: From Power-Up To Hello World

Some may ask why you’d want to program a Cortex-M microcontroller like the STM32 series using nothing but the ARM toolchain and the ST Microelectronics-provided datasheet and reference manual. If your first response to that question wasn’t a panicked dive towards the nearest emergency exit, then it might be that that question has piqued your interest. Why, indeed?

Definitely, one could use any of the existing frameworks to program an STM32 MCU, whether the ST HAL framework, plain CMSIS, or even something more Arduino-flavored. Yet where is the fun in that, when at the end of the day one is still fully dependent on that framework’s documentation and its developers? More succinctly, if the contents of the STM32 reference manuals still look like so much gibberish, does one really understand the platform?

Let’s take a look at how bare-metal STM32 programming works, and make the most basic example run, shall we? Continue reading “Bare-Metal STM32: From Power-Up To Hello World”

Illuminated 3D Printed Guitar Is Ready To Rock

When we think of 3D printed parts for our projects, most of us imagine little bits like brackets and mounting plates. Perhaps the occasional printed project enclosure. But if you’ve got a big custom printer as [Joshendy] does, plus plenty of time, it opens up a whole new world of large scale projects. Take for example the gorgeous RGB LED guitar body he recently completed.

Despite the considerable 300 x 300 mm build area of his custom 3D printer, [Joshendy] still had to design the guitar body in sections that could be bolted together after being printed in ABS. It took around 60 hours to run off all the parts, with the large central section taking the longest to print at 28 hours. With the generous application of heat-set inserts, the assembled guitar should be plenty strong.

The white ABS of the guitar body helps diffuse the LEDs.

While the skeletal plastic body of the guitar is certainly visually interesting in itself, it only makes up for half of the final look. Inside the central cavity, [Joshendy] has embedded two strips of RGB LEDs, a 128×64 OLED screen, and a custom PCB that plays host to a STM32L4 microcontroller the appropriate voltage regulators necessary to run it all on a battery pack.

The board taps into the audio being produced by the guitar and uses a fast Fourier transform (FFT) to get the LEDs reacting to the beat. As demonstrated in the video after the break, you can use the screen to navigate through the different lighting modes in real-time right on the instrument itself.

We covered the equally impressive large-format 3D printer that [Joshendy] used to produce this guitar earlier in the month, and it’s quite exciting to see the sort of things he’s printing on it already. This project has already set the bar very high, and we can’t wait to see what he comes up with next.

Continue reading “Illuminated 3D Printed Guitar Is Ready To Rock”

A STM32 Tonewheel Organ Without A Single Tonewheel

The one thing you might be surprised not to find in [Laurent]’s beautiful tonewheel organ build is any tonewheels at all.

Tonewheels were an early way to produce electronic organ sounds: by spinning a toothed wheel at different frequencies and transcending the signal one way or another it was possible to synthesize quite an array of sounds. We like to imagine that they’re all still there in [Laruent]’s organ, albeit very tiny, but the truth is that they’re being synthesized entirely on an STM32 micro controller.

The build itself is beautiful and extremely professional looking. We were unaware that it was possible to buy keybeds for a custom synthesizer, but a model from FATAR sits at the center of the show. There’s a MIDI encoder board and a Nucleo development board inside, tied together with a custom PCB. The UI is an momentary encoder wheel and a display from Mikroelektronika.

You can see and hear this beautiful instrument in the video after the break.

Continue reading “A STM32 Tonewheel Organ Without A Single Tonewheel”

Prusa Unveils New Mini 3D Printer, Shakes Up The Competition

For the last couple of years, consumer desktop 3D printer choices in the under $1,000 USD range have fallen into two broad categories: everything bellow $500 USD, and the latest Prusa i3. There are plenty of respectable printers made by companies such as Monoprice and Creality to choose from on that lower end of the scale. It wasn’t a luxury everyone could justify, but if you had the budget to swing the $749 for Prusa’s i3 kit, the choice became obvious.

Of course, that was before the Prusa Mini. Available as a kit for just $349, it’s far and away the cheapest printer that Prusa Research has ever offered. But this isn’t just some rebranded hardware, and it doesn’t compromise on the ideals that have made the company’s flagship machine the de facto open source FDM printer. For less than half the cost of the i3 MK3S, you’re not only getting most of the larger printer’s best features and Prusa’s renowned customer support, but even capabilities that presumably won’t make it to the i3 line until the MK4 is released.

Josef Průša was on hand to officially unveil his latest printer at the 2019 East Coast Reprap Festival, where I got the chance to get up close and personal with the diminutive machine. While it might be awhile before we can do a full review on the Mini, it’s safe to say that this small printer is going to have a big impact on the entry-level market.

Continue reading “Prusa Unveils New Mini 3D Printer, Shakes Up The Competition”

The March Toward A DIY Metal 3D Printer

[Hyna] has spent seven years working with electron microscopes and five years with 3D printers. Now the goal is to combine expertise from both realms into a metal 3D printer based on electron-beam melting (EBM). The concept is something of an all-in-one device that combines traits of an electron beam welder, an FDM 3D printer, and an electron microscope. While under high vacuum, an electron beam will be used to fuse metal (either a wire or a powder) to build up objects layer by layer. That end goal is still in the future, but [Hyna] has made significant progress on the vacuum chamber and the high voltage system.

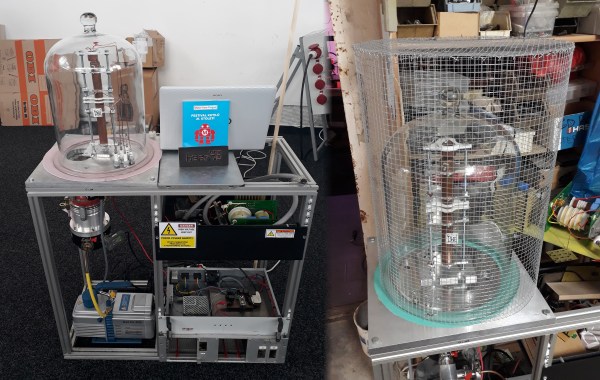
The device is built around a structure made of 80/20 extruded aluminum framing. The main platform showcases an electron gun, encased within a glass jar that is further encased within a metal mesh to prevent the glass from spreading too far in the event of an implosion.

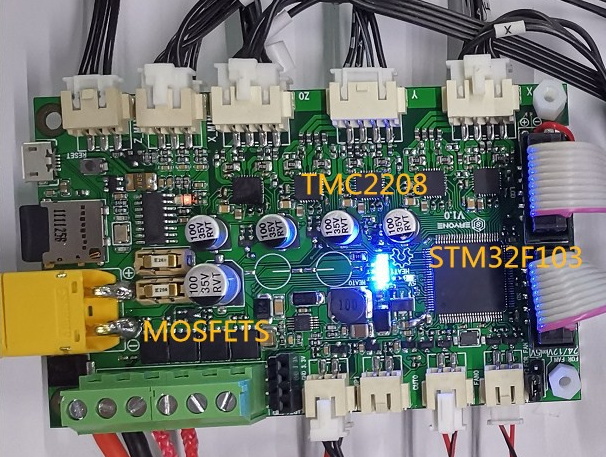
The design of the home-brewed high-voltage power supply involves an isolation transformer (designed to 60kV), using a half-bridge topology to prevent high leakage inductance. The transformer is connected to a buck converter for filament heating and a step up. The mains of the system are also connected to a voltage converter, which can be current-fed or voltage-fed to operate as either an electron beam welder or scanning electron microscope (SEM). During operation, the power supply connects to a 24V input and delivers the beam through a Wehnelt cylinder, an electrode opposite an anode that focuses and controls the electron beam. The entire system is currently being driven by an FPGA and STM32.

The vacuum enclosure itself is quite far along. [Hyna] milled a board with two outputs for a solid state relay (SSR) to a 230V pre-vacuum pump and a 230V pre-vacuum pump valve, two outputs for vent valves, and inputs from a Piranni gauge and a Cold Cathode Gauge, as well as a port for a TMP controller. After demoing the project at Maker Faire Prague, [Hyna] went back and milled a mold for a silicone gasket, a better vacuum seal for the electron beam.

While we’ve heard a lot about different metal 3D printing methods, this is the first time we’ve seen an EBM project outside of industry. And this may be the first to attempt to combine three separate uses for an HV electron beam into the same build.

Hackaday Podcast 028: Brain Skepticism Turned Up To 11, Web Browsing In ’69, Verilog For 7400 Logic, 3D Printing In Particle Board

Hackaday Editors Mike Szczys and Elliot Williams cover the most interesting hacks over the past week. So much talk of putting computers in touch with our brains has us skeptical on both tech and timeline. We celebrated the 40th Anniversary of the Walkman, but the headphones are the real star. Plus, Verilog isn’t just for FPGAs, you can synthesize 7400 circuits too! Elliot is enamored of an additive/subtractive printing process that uses particle board, and we discuss a couple of takes on hybrid-powered drones.

Take a look at the links below if you want to follow along, and as always tell us what you think about this episode in the comments!

Take a look at the links below if you want to follow along, and as always, tell us what you think about this episode in the comments!

Direct download (60 MB or so.)

Continue reading “Hackaday Podcast 028: Brain Skepticism Turned Up To 11, Web Browsing In ’69, Verilog For 7400 Logic, 3D Printing In Particle Board”

A 32-bit Boost For Your 3D Printer

It might not be the kind of thing you’ve given much thought to, but if you’ve ever used a desktop 3D printer, it was almost certainly being controlled by an 8-bit CPU. In fact, the common RAMPS controller is essentially just a motor driver shield for the Arduino Mega. Surely we can do a bit better than that in 2019?

For his entry into this year’s Hackaday Prize, [Robert] is working on a 32-bit drop-in replacement board which would allow 3D printer owners to easily upgrade the “brain” of their machines. Of course, there are already a few 32-bit control boards available on the market, but these are almost exclusively high-end boards which can be tricky to retrofit into an older machine. It should also go without saying that they aren’t cheap.

With this board, [Robert] is hoping to create a simpler upgrade path for 8-bit printer owners. Being small and cheap is already a pretty big deal, but perhaps equally importantly, his board is running the open source Marlin firmware. Marlin powers the majority of 8-bit desktop 3D printers (even if their owners don’t necessarily realize it) so sticking with it means that users shouldn’t have to change their software configuration or workflow just because they’ve upgraded their controller.

The board is powered by a 72 MHz STM32F103 chip, and uses state-of-the-art Trinamic TMC2208 stepper drivers to achieve near silent operation. The board has an automatic cooling fan to help keep itself cool, and with an XT60 connector for power, it should even be relatively easy to take your printer on the go with suitably beefy RC batteries.