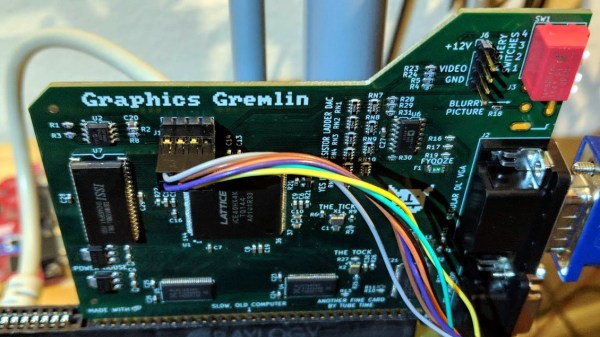
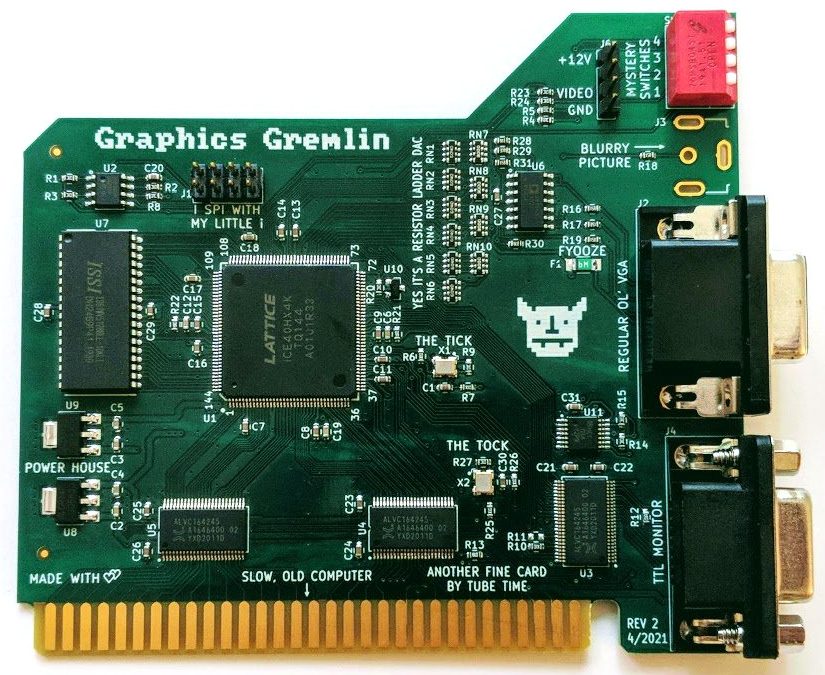
Haptics Hack Chat With Nanoport Technology

Join us on Wednesday, April 7 at noon Pacific for the Haptics Hack Chat with Tim Szeto and Kyle Skippon!

Of all our senses, the sense of touch is perhaps the most underappreciated. We understand and accept the tragedy that attends loss of vision or hearing, and the impact on the quality of life resulting from olfactory and gustatory sensations can be severe. But for some reason, we don’t give a second thought to our sense of touch, which is indeed strange given that we are literally covered with touch sensors. That’s a bit of a shame, since touch can reveal so much about the world around us, and our emotional well-being is so tightly tied to the tactile senses that those deprived of it in infancy can be scarred for life.

Haptics is the technology of tactile feedback, which seeks to leverage the human need for tactile experiences to enrich the experience of dealing with the technological world. Haptic feedback devices are everywhere now, and have gone far beyond the simple off-balance motor used since the days when a pager was a status symbol. To help us sort out what’s new in the haptics world, Tim and Kyle from Nanoport Technology will stop by the Hack Chat. Nanoport is a company on the cutting edge of haptics, so they’ll have a wealth of details about what haptics are, where the field is going, and how you can start thinking about making touch a part of your projects.

join-hack-chatOur Hack Chats are live community events in the Hackaday.io Hack Chat group messaging. This week we’ll be sitting down on Wednesday, April 7 at 12:00 PM Pacific time. If time zones have you tied up, we have a handy time zone converter.

Click that speech bubble to the right, and you’ll be taken directly to the Hack Chat group on Hackaday.io. You don’t have to wait until Wednesday; join whenever you want and you can see what the community is talking about.
Continue reading “Haptics Hack Chat With Nanoport Technology”

Solid Tips For Casting Colored Silicone Tires

For people who work with wheeled robots or RC vehicles, sooner or later one gets interested in making custom tires instead of dealing with whatever is available off the shelf. [concreted0g]’s preferred method is to design and 3D print wheel hubs, then cast some custom silicone tires to fit over them. Of course, the devil is in the details and this process can be a bit messy, so he’s shared useful tips on how to get reliable results with simple materials.

The casting material is cheap silicone caulking from a hardware store, and color can be added with a small amount of cheap acrylic paint. A few drops of glycerin added to the silicone thins it out slightly and helps it flow into a mold better. Mix well (the paint will also serve as a visual indicator of how well it is mixed), then scoop the mixture into the mold while trying to avoid creating air pockets. If your mold is in two pieces, assemble the mold and remove any overflow, then let it sit undisturbed for at least several hours while it cures.

Mounting the resulting tire to a wheel hub can be done with a thin film of super glue, which seems to work perfectly well for small tires and is easy to apply.

The rules are going to be a bit different for big objects. We know that silicone caulking can have difficulty fully curing when it’s applied thickly, especially when sealed into a mold with little to no airflow. In such cases, adding cornstarch (in about a 5:1 ratio of silicone to cornstarch by volume) is all that it takes to cure even thick wads of goop in less than an hour. Stirring cornstarch in tends to introduce more air bubbles into the mixture, but for larger pieces that can be an acceptable tradeoff. Cheap silicone caulking is versatile stuff, one just needs to know what to expect, and take a few steps to deal with the messiness.

Need something tougher? Maybe check out using slices of automotive silicone hose for robot wheels to get something that works just as well, but is a lot more durable.

AI Upscaling And The Future Of Content Delivery

The rumor mill has recently been buzzing about Nintendo’s plans to introduce a new version of their extremely popular Switch console in time for the holidays. A faster CPU, more RAM, and an improved OLED display are all pretty much a given, as you’d expect for a mid-generation refresh. Those upgraded specifications will almost certainly come with an inflated price tag as well, but given the incredible demand for the current Switch, a $50 or even $100 bump is unlikely to dissuade many prospective buyers.

But according to a report from Bloomberg, the new Switch might have a bit more going on under the hood than you’d expect from the technologically conservative Nintendo. Their sources claim the new system will utilize an NVIDIA chipset capable of Deep Learning Super Sampling (DLSS), a feature which is currently only available on high-end GeForce RTX 20 and GeForce RTX 30 series GPUs. The technology, which has already been employed by several notable PC games over the last few years, uses machine learning to upscale rendered images in real-time. So rather than tasking the GPU with producing a native 4K image, the engine can render the game at a lower resolution and have DLSS make up the difference.

The current model Nintendo Switch

The implications of this technology, especially on computationally limited devices, is immense. For the Switch, which doubles as a battery powered handheld when removed from its dock, the use of DLSS could allow it to produce visuals similar to the far larger and more expensive Xbox and PlayStation systems it’s in competition with. If Nintendo and NVIDIA can prove DLSS to be viable on something as small as the Switch, we’ll likely see the technology come to future smartphones and tablets to make up for their relatively limited GPUs.

But why stop there? If artificial intelligence systems like DLSS can scale up a video game, it stands to reason the same techniques could be applied to other forms of content. Rather than saturating your Internet connection with a 16K video stream, will TVs of the future simply make the best of what they have using a machine learning algorithm trained on popular shows and movies?

Continue reading “AI Upscaling And The Future Of Content Delivery”

Giant Nintendo Switch Is Actually Playable

The Nintendo Switch has been a hugely successful console for the century-old former playing card manufacturer. At least part of that success has come from its portability, of which [Michael Pick] has probably lost a bit with his 65-pound giant Nintendo Switch built for St. Jude’s Children’s Hospital. (Video, embedded below.) What he’s lost in portability has been more than made up in coolness-factor, though, and we’re sure the kids will appreciate that they can still play the monster gaming machine.

From its plywood body to the 3D-printed buttons, the supersized build looks solid. Docked inside the left Joy-Con is the actual console powering its big brother. Perhaps the biggest surprise, however, is that tiny (well, normal-sized) Joy-Cons are also hidden inside. These are manipulated via servos for the buttons and a direct pass-through setup for the joysticks to control games on the Switch.

While the Joy-Cons are unmodified and completely removable, [Michael] does recognize this isn’t necessarily the ideal solution. But he was certain it was a hack he could make work in the time he had, so he went for it. He’s looked into the controller emulation possible with Teensys and would probably use that solution for any giant Switch projects in the future. Of course, with this build, players can still pair regular Joy-Cons and pro controllers for more practical gaming.

Most Nintendo mods we see attempt to make the console smaller, not larger, so this is an eye-catching change of pace. Unfortunately, we don’t get to see the colossal console in action after it was installed, only some stills of hospital staff wheeling it in the front doors. But we can imagine that the children’s smiles are at least as big as ours were when we saw it.

Continue reading “Giant Nintendo Switch Is Actually Playable”

Honey, I Shrunk The Arduino Core

High-level programming languages do a great job of making a programmer’s job easier, but these languages often leave a lot of efficiency on the table as a compromise. While a common thought is to move into a lower-level language like assembly to improve on a program’s speed or memory use, there’s often a lot that can be done at the high level before resorting to such extremes. This, of course, is true of the Arduino platform as well, as [NerdRalph] demonstrates by shrinking the size of the Arduino core itself.

[NerdRalph] had noticed that the “blink” example program actually includes over 1 kB of extraneous code, and that more complicated programs include even more cruft. To combat this issue, he created ArduinoShrink, which seeks to make included libraries more modular and self-contained. It modifies some of the default registers and counters to use less memory and improve speed, and is also designed to improve interrupt latency as well by changing when the Arduino would otherwise disable interrupts.

While there are some limits to ArduinoShrink, such as needing to know specifics about the pins at compile time, for anyone writing programs for Arduinos that are memory-intensive or need improvements in timing, this could be a powerful new tool. If you’d prefer to go in the opposite direction to avoid ever having to learn C or assembly, though, you can always stick with running Python on your embedded devices.

Decoding S/PDIF With A Microcontroller Brings A Few Headaches

The average punter shunts audio around with analog 3.5 mm cables, RCA jacks, or Bluetooth on a regular basis. A useful standard that hasn’t really bothered most of us is S/PDIF, standing for Sony/Phillips Digital Interface. It’s a useful way to pump digital audio around over copper cables or optic fiber. [Andrew Jeddeloh] got curious about the standard after contemplating some long cable runs in his home, and decided to try decoding it.

The target for [Andrew]’s development efforts was the STM32L476 Discovery, which had no SPDIF decoding hardware on board. Instead, [Andrew] tinkered with the peripherals he had to see what would work. In the end, a cavalcade of internal timers were daisy chained to allow the microcontroller to recover a clock from the self-clocked S/PDIF signal. This was then used to generate a clock to sync up the onboard SPI hardware to actually read in the 16-bit PCM data from the S/PDIF signal.

[Andrew]’s original broader plan was to pipe the S/PDIF data to the onboard I2S DAC, though he struggled manipulating the remaining resources on the STM chip to do so successfully. Anyone wishing to have a crack can take a look at [Andrew]’s code over on GitHub. If completed, the STM32L476 would become a useful analog endpoint for S/PDIF streams, allowing you to pump tunes digitally over long distances without signal degradation. If you know the key to getting it done, sound off in the comments! Alternatively, if you need to get up and running more quickly, the Teensy platform has you covered!

A Magnetic Field Strength Meter Using An Arduino

We’re used to Hall effect devices as proximity sensors in mechanical systems, used to provide detection of something that has a magnet attached to it. However it’s easy to forget that the devices that provide a magnet-or-not digital output are only part of the story, and linear Hall effect devices provide a handy way to measure a static magnetic field. It’s something [mircemk] demonstrates, with an Arduino-powered magnetic field strength meter that uses a UGN 3503U Hall effect device.

The circuit is extremely simple, comprising the sensor, an Arduino Nano, and an OLED display. This device is handy because its voltage output has a known relationship to the gauss level the sensor is experiencing, so while the accuracy of its calibration isn’t verified it can at least give a believable reading derived from the Arduino’s ADC.

The whole is wrapped up in an attractive case that looks as though it has been made from PCB material, with the sensor protruding on what seems to be the shell of a plastic ballpoint pen. It makes a handy instrument that provides a useful function for not a lot of money, so what’s not to like! Take a look at the video below the break for the full story.

Surprisingly such projects are few and far between here at Hackaday, however it’s not the first magnetic field measurement we’ve seen.

Continue reading “A Magnetic Field Strength Meter Using An Arduino”