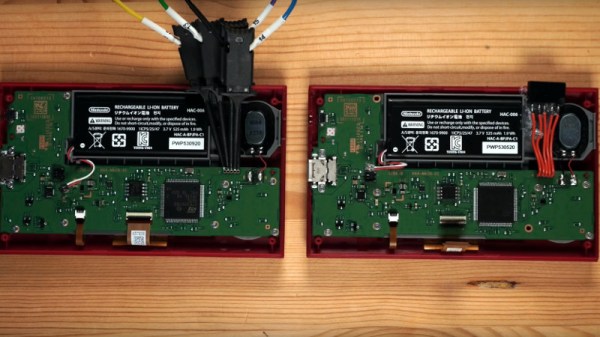
Classical Poultry Conditioning Is A Bird-Brained Scheme

A while back, [Kutluhan Aktar] was trying to hack their chickens, quails, and ducks for higher egg production and faster hatching times by using a bit of classical conditioning. That is, feeding them at the same time every day while simultaneously exposing them to sound and light. Once [Kutluhan] slipped enough times, they hatched a plan to build an automatic feeder.

This fun rooster-shaped bird feeder runs on an Arduino Nano and gets its time, date, and temperature info from a DS3231 RTC. All [Kutluhan] has to do is set the daily feeding time. When it comes, a pair of servos and a pan-tilt kit work together to invert a Pringles can filled with food pellets. A piezo buzzer and a green LED provide the sound and light to help with conditioning. Scratch your way past the break to see it in action.

If [Kutluhan] gets tired of watching the birds eat at the same time every day, perhaps a trash-for-treats training program could be next on the list.

Continue reading “Classical Poultry Conditioning Is A Bird-Brained Scheme”

Put That New Resin Printer To Work Making PCBs

With all the cool and useful parts you can whip up (relatively) quickly on a 3D printer, it’s a shame you can’t just print a PCB. Sure, ordering a PCB is quick, easy, and cheap, but being able to print one-offs would peg the needle on the instant gratification meter.

[Peter Liwyj] may just have come up with a method to do exactly that. His Instructables post goes into great detail about his method, which uses an Elegoo Mars resin printer and a couple of neat tricks. First, a properly cleaned board is placed copper-side down onto a blob of SLA resin sitting on the print bed. He tricks the printer into thinking the platform is all the way down for the first layer by interrupting the photosensor used to detect home. He lets the printer go through one layer of an STL file that contains his design, which polymerizes a thin layer of plastic onto the copper. The excess resin is wiped gently away and the board goes straight into a ferric chloride etching bath. The video below shows the whole process.

As simple as it sounds, it looks like it works really well. And [Peter] didn’t just stumble onto this method; he approached it systematically and found what works best. His tips incude using electrical tape as a spacer to lift the copper off the print surface slightly, cleaning the board with Scotchbrite rather than sandpaper, and not curing the resin after printing. His toolchain is a bit uncoventional — he used SketchUp to create the traces and exported the STL. But there are ways to convert Gerbers to STLs, so your favorite EDA package can probably fit in to the process too.

Don’t have a resin printer? Don’t worry — FDM printers can work too.

Continue reading “Put That New Resin Printer To Work Making PCBs”

UVA Aims To Be More Than Just One Tool

Sometimes, a project is more than it seems on just the surface. The UVA project from [Said Alvarado Marin] is one such example. What started as an attempt to build a single useful tool became the beginning of a broader utility ecosystem.

In and of itself, UVA is a project to build a powerful UV flashlight for curing UV-reactive glues. After some serious research, [Said] was able to find the right LEDs, outputting the right wavelengths, and begin the design of this simple tool. However, UVA quickly became a base upon which other tools could be developed. The design of UVA is such that the flashlight head fits onto an interchangable power base, consisting of three 18650 lithium polymer cells and a charging subsystem.

The aim of UVA is to encourage others to produce their own tools to work with this ecosystem. Designed around commonly available parts and DIY build methods like 3D printing, it’s intended to allow the average person to create the tools they need when and as they need them, on location. We look forward to seeing how the project progresses further as we head closer to the finale of the 2020 Hackaday Prize!


How To Shoot A Great Project Video

Creating projects is fun, but the real value, as far as the imaginary Internet points are concerned, is how well you show them off for the clout. Taking a few snaps is fine, but if you want to produce a quality video of your project, it pays to put some thought and effort into the process.

Telling The Story

Before setting out to document your project on video, think about what you’re trying to communicate to the viewer. Are you attempting to create a step-by-step guide on how to recreate what you’ve done, or are you simply trying to show off the awesome finished product? These are two very different types of video, and will require different content and delivery entirely. It also guides how you shoot your video.

If you want to show off your build process, you’ll need to shoot as you go. This can be time consuming, but also a great way to show the reality of what goes into your work. I always like it when people convey the pitfalls and successes they faced along the way, and get people involved in the story. It also means that you’ll end up shooting a lot of footage and you’ll spend plenty of time editing it all together. Continue reading “How To Shoot A Great Project Video”

Hackaday Podcast 088: Flywheel Trebuchet, Thieving Magpies, Hero Engines, And Hypermiling

Hackaday editors Elliot Williams and Mike Szczys riff on the hardware hacks that took the Internet by storm this week. Machining siege weapons out of aluminum? If they can throw a tennis ball at 180 mph, yes please! Welding aficionados will love to see the Hero Engine come together. We dive into the high-efficiency game of hypermiling, and spin up the polarizing topic of the Sun Cycle. The episode wouldn’t be complete without hearing what the game of Go sounds like as a loop sequencer, and how a variable speed cassette player can be abused for the benefit of MIDI lovers the world over.

Take a look at the links below if you want to follow along, and as always, tell us what you think about this episode in the comments!

Take a look at the links below if you want to follow along, and as always, tell us what you think about this episode in the comments!

Direct download (60 MB or so.)

Continue reading “Hackaday Podcast 088: Flywheel Trebuchet, Thieving Magpies, Hero Engines, And Hypermiling”

Fat Bottomed-Keebs, You Make The Clackin’ World Go Round

Depending on the circles you run in, it can seem like the mechanical keyboard community is all about reduced layouts, and keebs without ten-keys are about as big as it gets. But trust us, there’s plenty of love out there for the bigger ‘boards like [Ben]’s tasty fat-bottomed keyboard. Man oh man, what a delicious slab of throwback to the days when keyboards doubled as melee weapons.

More specifically, this is a 199-key modified Sun Type 5 layout. It runs on two Teensy 2.0s — one for the keyboard matrix, and one for everything else. [Ben] made the metal enclosure entirely by hand without a CNC or laser cutter. While I don’t personally care for linear switches, I have mad respect for these, which are vintage Cherry Blacks pulled from various 1980s AT/XT boards. That 10-key island on the left is dedicated to elementary macros like undo/redo, cut/copy/paste, and open/close/save.

We absolutely love the gigantic rotary encoders, which give it a bit of a boombox look. There’s even reuse involved here, because the encoder knobs are made from jam jar lids that are stuffed with homemade Sugru. [Ben] can use them to play PONG on the LCD and other games not yet implemented on the everything-else Teensy.

Here’s another Sun-inspired keeb, but this one has a reverse 10-key layout that matches the DTMF phone dial.

This Week In Security: Code Scanning, Information Gathering, And Seams In The Cloud

GitHub has enabled free code analysis on public repositories. This is the fruit of the purchase of Semmle, almost exactly one year ago. Anyone with write permissions to a repository can go into the settings, and enable scanning. Beyond the obvious use case of finding vulnerabilities, an exciting option is to automatically analyse pull requests and flag potential security problems automatically. I definitely look forward to seeing this tool in action.

The Code Scanning option is under the Security tab, and the process to enable it only takes a few seconds. I flipped the switch on one of my repos, and it found a handful of issues that are worth looking in to. An important note, anyone can run the tool on a forked repo and see the results. If CodeQL finds an issue, it’s essentially publicly available for anyone who cares to look for it.

Simpler Code Scanning

On the extreme other hand, [Will Butler] wrote a guide to searching for exploits using grep. A simple example, if raw shows up in code, it often signals an unsafe operation. The terms fixme or todo, often in comments, can signal a known security problem that has yet to be fixed. Another example is unsafe, which is an actual keyword in some languages, like Rust. If a Rust project is going to have vulnerabilities, they will likely be in an unsafe block. There are some other language-dependent pointers, and other good tips, so check it out.

Continue reading “This Week In Security: Code Scanning, Information Gathering, And Seams In The Cloud”