A Portable Serial Terminal That Should Be From The 1970s

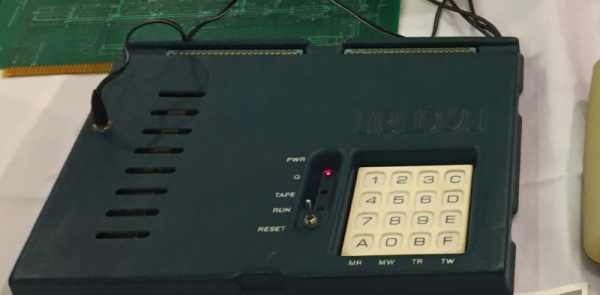
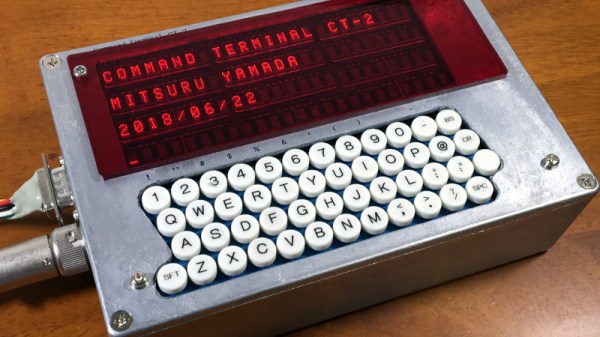
The humble standalone serial terminal might be long gone from the collective computing experience, but in the ghostly form of a software virtual terminal and a serial converter it remains the most basic fall-back and essential tool of the computer hardware hacker. [Mitsuru Yamada] has created the product that should have been made in the serial terminal’s heyday, a standalone handheld terminal using a 6809 microprocessor and vintage HP dot matrix LEDs. In a die-cast box with full push-button keyboard it’s entirely ready to roll up to a DB-25 wall socket and log into the PDP/11 in the basement.

Using today’s parts we might achieve the same feat with a single-chip microcontroller and a small LCD or OLED panel, but with an older microcomputer there is more system-building required. The 6809 is a wise choice from the 1970s arsenal because it has some on-board RAM, thus there’s no need for a RAM chip. Thus the whole thing is achieved with only a 2716 EPROM for the software, a 6850 UART with MAX232 driverĀ  for the serial port, and a few 74 chips for glue logic, chip selects, and I/O ports to handle keyboard and display. There’s no battery in the case, but no doubt that could be easily accommodated. Also there’s not much information on the keyboard itself, but in the video below we catch a glimpse of its wiring as the box is opened.

The value in a terminal using vintage parts lies not only in because you can, but also in something that can’t easily be had with a modern microcontroller. These parts come from a time when a computer system had to be assembled as a series of peripherals round the microprocessor because it had few onboard, leading to a far more in-depth understanding of a computer system. It’s not that a 6809 is a sensible choice in 2020, more that it’s an interesting one.

By comparison, here’s a terminal using technology from today.

Continue reading “A Portable Serial Terminal That Should Be From The 1970s”

Exploring Custom Firmware On Xiaomi Thermometers

If we’ve learned anything over the years, it’s that hackers love to know what the temperature is. Seriously. A stroll through the archives here at Hackaday uncovers an overwhelming number of bespoke gadgets for recording, displaying, and transmitting the current conditions. From outdoor weather stations to an ESP8266 with a DHT11 soldered on, there’s no shortage of prior art should you want to start collecting your own environmental data.

Now obviously we’re big fans of DIY it here, that’s sort of the point of the whole website. But there’s no denying that it can be hard to compete with the economies of scale, especially when dealing with imported goods. Even the most experienced hardware hacker would have trouble building something like the Xiaomi LYWSD03MMC. For as little as $4 USD each, you’ve got a slick energy efficient sensor with an integrated LCD that broadcasts the current temperature and humidity over Bluetooth Low Energy.

You could probably build your own…but why?

It’s pretty much the ideal platform for setting up a whole-house environmental monitoring system except for one detail: it’s designed to work as part of Xiaomi’s home automation system, and not necessarily the hacked-together setups that folks like us have going on at home. But that was before Aaron Christophel got on the case.

We first brought news of his ambitious project to create an open source firmware for these low-cost sensors last month, and unsurprisingly it generated quite a bit of interest. After all, folks taking existing pieces of hardware, making them better, and sharing how they did it with the world is a core tenet of this community.

Believing that such a well crafted projected deserved a second look, and frankly because I wanted to start monitoring the conditions in my own home on the cheap, I decided to order a pack of Xiaomi thermometers and dive in.

Continue reading “Exploring Custom Firmware On Xiaomi Thermometers”

SLA 3D Printed Vortex Cooled Rocket Engine

3D printing is an incredible tool for prototyping and development, but the properties of the materials can be a limiting factor for functional parts. [Sam Rogers] and colleagues at [AX Technologies] have been testing and developing a small liquid-fueled rocket engine and successfully used vortex cooling to protect a resin 3D printed combustion chamber. (Video, embedded below.)

Vortex cooling works by injecting oxygen into the combustion chamber tangentially, just inside the nozzle of the engine, which creates a cooling, swirling vortex boundary layer along the chamber wall. The oxygen moves to the front end of the combustion chamber where it mixes with the fuel and ignites in the center. This does not protect the nozzle itself, which only lasts a few seconds before becoming unusable. However, thanks to the modular design of the test engine, only the small nozzle section had to be reprinted for every test. While this part could be manufactured using a metal 3D printer, the costs are still very high, especially at this experimental stage. The clear resin parts also allow the combustion observed and more accurate conclusions to be drawn from every test.

This engine intended to be used as a torch igniter for a much larger rocket engine. Fuel is injected into the front of the combustion chamber, where a spark plug is located to ignite the oxygen-fuel mixture. The flow of the oxygen and fuel is controlled by two servo-operated valves connected to a microcontroller, which is mounted with the engine on linear rails. This allows the test engine to move freely, and push against a load cell to measure thrust. The spark is created before the valves are opened to prevent a delayed ignition, which can blow up the engine, and getting the valve sequence and timing correct is critical. Many iterations and destroyed parts later, the [AX Technologies] team achieved successful ignition, with a clear supersonic Mach diamond pattern in the exhaust.

This is just one more example of 3D printing and cheap electronics allowing impressive progress on a limited budget. Another example is [Joe Barnard]’s progress in getting a model rocket to land itself with a solid fuel engine. Companies and organisations have been using 3D printed components in rocket engines for a few years now, and we’ve even seen an open source version.

3D Printed Rigid Chain Mechanism

One of the major advantages of 3D printing is the ability to quickly test and then iterate on mechanical designs. [gzumwalt] does a lot of this, and has recently been working on various versions of a rigid chain mechanism. (Video, embedded below.)

A rigid-chain mechanism is one way of fitting a long beam into a small box. It works similar to a zipper, meshing two separate “chains” with specially teeth designed to form a rigid beam. Due to clearances between the teeth, the beam tends to be a bit floppy. [gzumwalt] made various sizes of the mechanism, and also reduced the clearances on later versions to reduce the flop. He also integrated it into a cool “snake in a basket” automaton (second video below) by adding a reversible gearbox and a binary snap-action switch.

One possible use for this type of mechanism is for autonomously assembling long structures in space, as one of the 2017 Hackaday Prize finalist projects, ZBeam, proposed.

[gzumwalt] has not made the files available for download yet, but you can keep and eye on his Instructables pages for updates. He got a number of fascinating 3D printed devices already available, like a domino laying machine or a WiFi controlled rover.

Continue reading “3D Printed Rigid Chain Mechanism”

Inside CHIP-8

Certain old computers — most frequently those using the RCA 1802 — were fond of using an early form of byte-code interpreter for programs, especially games. The interpreter, CHIP-8, was very simple to create but offered high-level features that were tedious to recreate in the native assembly language. Because there are a fair number of simple games written in CHIP-8, there are of course, emulators for it, and [River Gillis] decided to look inside the CHIP-8 byte code interpreter.

Part of the power of CHIP-8 was it only had 35 virtual instructions. That was important when you were trying to shoehorn a game and the interpreter into a very small memory. Remember, in those days 1K of memory wasn’t an unusual number, although the prototypical CHIP-8 host would have 4K.

Continue reading “Inside CHIP-8”

Food Safe Printing Techniques

One thing that always provokes spirited debate around the Hackaday bunker is just how dangerous is it to use 3D printed plastic in contact with food. We mostly agree it isn’t a good thing, but we also know some people do it regularly and they don’t drop dead instantly, either. [Jakub] decided to do some testing and make some recommendations. There’s even a video explaining the results.

Unlike a lot of what we’ve read about this topic in the past, [Jakub’s] post is well-researched and does actual testing including growing bacteria cultures from cups used for milk. He starts out identifying the EU and US regulations about what you can call food-grade. There’s also recognition that while a base plastic might be safe for contact with food, there’s no way to know exactly what additives and other things are in the plastic to change its properties and color.

Continue reading “Food Safe Printing Techniques”

Cassette Synth Plays With Speed Control

Tape may not sound that great compared to vinyl, but cassette players can be tons of fun when it comes to making your own music. See for instance the Mellotron, or this relatively easy DIY alternative, [Rich Bernett]’s Cassettone cassette player synth.

The Cassettone works by substituting the trim pot that controls the speed of the tape player’s motor with a handful of potentiometers. These are each activated with momentary buttons located underneath the wooden keys. In the video after the break, [Rich] gives a complete and detailed guide to building your own. There’s also a polished Google doc that includes a schematic and the pattern pieces for making the cabinet.

Speaking of which, isn’t the case design nice? It’s built out of craft plywood but aged with varnish and Mod-Podged bits and bobs from vintage electronics magazines. This really looks like a fun little instrument to play.

Would you rather control your tape synth with a MIDI keyboard? Just add Arduino.

Continue reading “Cassette Synth Plays With Speed Control”