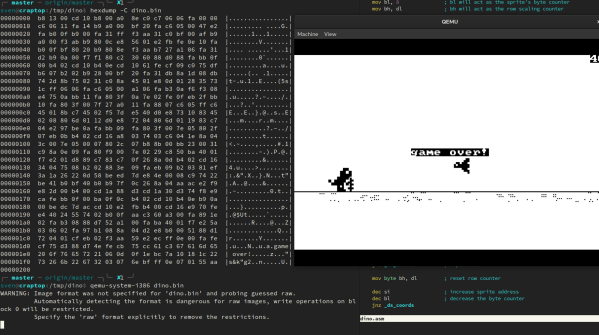
Wire Loop And Amplifier Solve Audio Problem For The Hearing Impaired

Imagine being asked to provide sound reinforcement for a meeting that occurs in a large room, where anyone can be the speaker, and in a situation where microphones would hinder the flow of the meeting. Throw in a couple of attendees who have hearing disabilities, and you’ve got quite a challenge to make sure everyone gets heard.

Such a situation faced [David Schneider] at his Quaker meetinghouse, which he ended up solving with this home-brew audio induction loop system. The worship style of conservative sects of the Religious Society of Friends, as the Quakers are formally known, is “silent worship”, where congregants sit together in silence until someone feels moved to share something. Anyone can speak at any time from anywhere in the room, leading to the audio problem.

Rooms mics and a low power FM transmitter didn’t work because those using radio as aids to hearing the service felt awkward, so [David] decided to take advantage of a feature in the hearing aids worn by some members: telecoils. These are inductive receivers built into some hearing aids to send sound directly to them using magnetic fields generated by a loop in the listening area. [David]’s loop ended up being 240 meters of 20-gauge copper wire in the attic above the meeting room. The impedance ended up close to 8 ohms, perfect for feeding directly from the speaker terminals of an old stereo amplifier. Pumping 160 Watts into the coil allows the hearing-aid wearers below hear the service now.

There’s still work to be done on the input side to improve audio quality, but [David]’s solution is elegant in that it helps those who need it most using technology they already have. And perhaps those who need but don’t yet have hearing aids can roll their own.

Building (And Testing) A DIY Air Purifier

Whether it’s the usual pollution of the city, or the fact that your corner of the globe happens to be on fire currently, poor air quality is a part of daily life for many people. One way of combating this issue is with a high quality HEPA filter in your home, but unfortunately that’s not something that everyone can afford to even has access to.

Which is why [Adam Kelly] decided to design this DIY HEPA air purifier that can be built for less than $100. That might still sound like a lot of money, but compared to the $500 sticker price he was seeing for the models recommended by health officials, it’s certainly a step in the right direction. Of course, it’s only a deal if it actually works, so a big part of the project has also been verifying the design’s ability to filter particles out of the air in a timely manner.

To build his purifier, [Adam] found a HEPA H13 rated replacement filter that was cheap and readily available, and started designing a low-cost way to pulling air through it. He eventually went with a 120 mm computer case fan coupled with a step-up converter that can produce 12 V from a standard USB port. Then he just needed to design a 3D printed “lid” which would position the fan so it draws air through the center of the filter.

In terms of testing, [Adam] wasn’t worried about the purifier’s ability to actually filter out smoke particles; unless the manufacturer lied about the capabilities of the filter itself, that part is a given. But he was curious about how effective the fan would be in terms of circulating air through a room.

By installing a pitot tube from one of his drones into the lid of the purifier, he determined the airflow in the center of the filter to be approximately 160 CFM. By his calculations, that means it should be able to circulate all the air in his 25 cubic meter office around 10 times per hour. That’s a promising start, but [Adam] says he’d still be interested in a more detailed analysis of the design’s performance by anyone who might have the equipment to do so.

As he lives in Australia, this project is more than just a passing fancy for [Adam]. He only has to look out the window to see that the air he’s breathing is filled with smoke from the raging bushfires. They say that necessity is the mother of invention, and breathable air is pretty high up on the list of human necessities. Our hat’s off to anyone who sees their fellow citizens suffering and tries to use their skills to come up with a solution.

Burning Things With Big Lasers In The Name Of Security

Several fields of quantum research have made their transition from research labs into commercial products, accompanied by grandiose claims. Are they as good as they say? We need people like Dr. Sarah Kaiser to independently test those claims, looking for flaws in implementation. At the 2019 Hackaday Superconference she shared her research on attacking commercially available quantum key distribution (QKD) hardware.

Don’t be scared away when you see the term “quantum” in the title. Her talk is very easy to follow along, requiring almost no prior knowledge of quantum research terminology. In fact, that’s the point. Dr. Kaiser’s personal ambition is to make quantum computing an inviting and accessible topic for everyone, not just elite cliques of researchers in ivory towers. You should hear her out in the video below, and by following along with the presentation slide deck (.PPTX).

Quantum Key Distribution

So why is QKD is so enticing? Unlike existing methods, the theoretical foundation is secure against any attacker constrained by the speed of light and the laws of physics.

Generally speaking, if your attacker is not bound by those things, we have a much bigger problem.

But as we know well, there’s always a difference between the theoretical foundation and the actual implementation of cryptography. That difference is where exploits like side-channel attacks thrive, so she started investigating components of a laser QKD system.

As a self-professed “Crazy Laser Lady”, part of this investigation examined how components held up to big lasers delivering power far outside normal operating range. This turned up exciting effects like a fiber fuse (~17:30 in the video) which is actually a plasma fire propagating through the fiber optic. It looks cool, but it’s destructive and useless for covert attacks. More productive results came when lasers were used to carefully degrade select components to make the system vulnerable.

If you want to learn more from Dr. Kaiser about quantum key distribution, she has a book chapter on the topic. (Free online access available, but with limitations.) This is not the first attempt to hack quantum key distribution, and we doubt it would be the last. Every generation of products will improve tolerance to attacks, and we’ll need researchers like our Crazy Laser Lady to find the reality behind advertised claims.

Continue reading “Burning Things With Big Lasers In The Name Of Security”

DDR-5? DDR-4, We Hardly Knew Ye

This month’s CES saw the introduction of max speed DDR5 memory from SK Hynix. Micron and other vendors are also reportedly sampling similar devices. You can’t get them through normal channels yet, but since you also can’t get motherboards that take them, that’s not a big problem. We hear Intel’s Xeon Sapphire Rapids will be among the first boards to take advantage of the new technology. But that begs the question: what is it?

SDRAM Basics

Broadly speaking, there are two primary contenders for a system that needs RAM memory: static and dynamic. There are newer technologies like FeRAM and MRAM, but the classic choice is between static and dynamic. Static RAM is really just a bunch of flip flops, one for each bit. That’s easy because you set it and forget it. Then later you read it. It can also be very fast. The problem is a flip flop usually takes at least four transistors, and often as many as six, so there’s only so many of them you can pack into a certain area. Power consumption is often high, too, although modern devices can do pretty well.

Continue reading “DDR-5? DDR-4, We Hardly Knew Ye”

Soviet Soyuz Clock Teardown

We love spacecraft and we definitely love teardowns, especially if they are for vintage devices. [Ken Shirriff] writes about taking apart the digital clock module from the Soviet Soyuz series of spacecraft and there are a lot of interesting bits to the device. After all, it has been into space.

The Soyuz series of spacecraft made their maiden voyage in 1966, and are still flying today. The clock in question comes from somewhere in the middle, around 1996. On the outside, it seems like any spaceship gizmo, and the digital clock keeps local time along with a stopwatch and an alarm function. The guts are much more interesting with no less than 10 PCBs sandwiched inside the small enclosure.

The system consists of dual layer-boards with a mix of SMD and through-hole components that are interconnected by a series of wires that are bunched and packed to create a wiring harness. The pictures show a very clever way of setting up the stack and the system is serviceable by design as the bunch opens up like a book. This gives access to the unique looking components that include 14-pin flat pack chips, large ceramic multicoil inductors, green colored resistors, and orange rectangular diodes.

There are isolated PSU boards, control boards, clock circuitry, some glue logic to put things together, and LED displays with driver circuits. [Ken Shirriff] dives into the clocking circuit and the various parts involved along with a comparison with US technology. There is a lot of interesting detail in these boards, and it may be a source of inspiration for some.

If you are looking for more spaceborne tech, have a look at the one that stowed away on the International Space Station.

Thanks for the tip [Thorsten Eggert]

Continue reading “Soviet Soyuz Clock Teardown”

Alternative Uses For Nuclear Waste

Nuclear power is great if you want to generate a lot of electricity without releasing lots of CO2 and other harmful pollutants. However, the major bugbear of the technology has always been the problem of waste. Many of the byproducts from the operation of nuclear plants are radioactive, and remain so for thousands of years. Storing this waste in a safe and economical fashion continues to be a problem.

Alternative methods to deal with this waste stream continue to be an active area of research. So what are some of the ways this waste can be diverted or reused?

Fast Breeders Want To Close The Fuel Cycle

The Superphénix reactor in France is one of a handful of operational fast-neutron reactor designs.

One of the primary forms of waste from a typical nuclear light water reactor (LWR) is the spent fuel from the fission reaction. These consist of roughly 3% waste isotopes, 1% plutonium isotopes, and 96% uranium isotopes. This waste is high in transuranic elements, which have half-lives measured in many thousands of years. These pose the biggest problems for storage, as they must be securely kept in a safe location for lengths of time far exceeding the life of any one human society.

The proposed solution to this problem is to instead use fast-neutron reactors, which “breed” non-fissile uranium-238 into plutonium-239 and plutonium-240, which can then be used as fresh fuel. Advanced designs also have the ability to process out other actinides, also using them as fuel in the fission process. These reactors have the benefit of being able to use almost all the energy content in uranium fuel, reducing fuel use by 60 to 100 times compared to conventional methods.

Continue reading “Alternative Uses For Nuclear Waste”

Stylish Thermometer Is DIY Hardware Perfection

Over the last few years, we’ve seen a steady improvement in the sort of custom hardware a dedicated individual can produce. With affordable desktop 3D printers and PCB fabrication services, the line between store bought and home built can get very blurry. This slick MQTT-connected thermometer created by [Martin Cerny] is a perfect example.

The case for the device, which [Martin] calls Temper, is printed in a stone-look PLA filament and has been carefully designed so that LEDs shining behind it illuminate perfect square “pixels” on the front. There’s a living hinge button on the left side, and on the right, an opening for the SHT30 temperature and humidity sensor. Some may say that the look of the sensor aperture could be improved with a printed grille, but there was likely a concern about reduced airflow.

Inside the case is a 13×7 array of SMD LEDs, a few 74HC595 shift registers, a TP4054 charging chip to keep the internal 250 mAh battery topped off via USB, and some passives to round out the party. The ESP-12E module that brings it all together and the battery are on the flip side of the PCB. At a press of the button, the display fires up for 5 seconds and Temper publishes temperature, humidity and battery percentage through MQTT. If you’re looking for more granular data, it can also be configured to publish regular updates at the cost of increased energy consumption.

The physical product is gorgeous on its own, but we’re happy to report that the firmware and documentation have been handled with a similar attention to detail. The project’s GitHub repo has a Wiki to help others build and configure their very own Temper, and the device’s web configuration portal is easily just as nice as anything you’d find in a piece of modern consumer electronics (if not moreso).

We’ve seen plenty of ESP8266-based environmental monitoring devices here at Hackaday, but we think this one really pushes the state-of-the-art forward. This is a device that wouldn’t be out of place on the shelf at a Big Box electronics retailer, and while [Martin] says he has no interest in building and selling them himself, we don’t doubt that folks out there will be spinning up their own Temper clones before too long.