Home Automation For Fans Of Quick-and-Dirty Solutions

At Hackaday, we celebrate all kinds of projects, but we’ll have to admit that the polished and professional-looking builds tend to catch our eye a lot more than perhaps they should. There’s plenty of love to be had for the rougher builds, though, of which this quick-and-dirty home automation system is a perfect example.

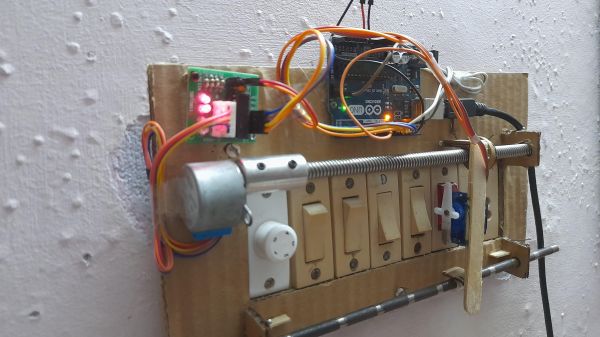
Before anyone rushes to state the obvious with, “Should have used some relays,” consider that [MAKE_IT_WITH_ME]’s stated goal was to get the basics of a home automation system built with pretty much nothing but what can be found in one of those Arduino starter kits. And further, consider that landlords might not look kindly on tenants who wire a bunch of SSRs or Sonoff switches into the walls of their building. So this minimalist build is perfect for certain use cases. Its interface to the building’s electrical system is 100% mechanical, via a servo that travels along the bank of switches on a stepper-driven leadscrew. The servo has a modified horn to properly flick the rocker-style switches, and although changing from switch to switch is a bit slow, it works surprisingly well. The video below shows it in action.

While we can see it possibly working as-is for Decora-style switches that are seen in some markets, we’d think some mods would be in order for the more standard toggle-style switch — perhaps a finger extending out from the horn, along with a second servo to tilt the whole assembly away from the wall to allow it to clear the switch bats.

Continue reading “Home Automation For Fans Of Quick-and-Dirty Solutions”

Home Automation Controller Uses Chalk

Responding to the Rethink Displays challenge of the 2021 Hackaday Prize contest, freelance design engineer [Rick Pannen] brings a retro look to his DIY home automation controller. You could be forgiven for not even realizing it is a controller at first glance. [Rick] built this using a magnetic chalk board and installed all the control electronics on the back. The main processor is a Raspberry Pi 400 running Raspian with IOBroker and Node-Red. Panel lettering and graphics are done free-hand with, you guessed it, chalk.

The controls on this panel are an eclectic hodgepodge of meters, switches, and sensors that [Rick] scored on eBay or scavenged from friends. We are curious about the simple-looking rotary dial that sends a pulse train based on the number set on the dial — this seems to have all the functionality of an old phone’s rotary dial without any of the fun.

But [Rick]’s design allows for easy changes — dare we say, it encourages them — so maybe we’ll see a salvaged rotary dial added in future revisions. Also note the indoor lighting ON/OFF switch that must be a real joy to operate. We wonder, is there any way the controls could be magnetized and moved freely around the board without permanently attaching them? Maybe an idea for version 4 or 5.

This design has a lot of possibilities, and we look forward to any upgrades or derivative versions of this unique home automation controller. Let us know in the comments below if you have any suggestions for expanding upon this idea.

Simple MP3 Player Hides Home Automation Brilliance

Like bubble wrap or the corkscrew, plenty of everyday objects have lost almost all ties to their original purpose. It could be that the original product had no market but was able to find one in an unexpected place, or simply that the original use case disappeared. We think that this MP3 player for children might arrive at a similar fate as a home automation controller thanks to a recent project by [Sebastian].

The MP3 player is known as a Jooki and works by using small figurines (and a few buttons) to control the device. Different figurines cause the MP3 player to change playlists, for example, but it turns out that the device is capable of communicating over MQTT. This means that [Sebastian] was able to use the MQTT messages from the Jooki to do all kinds of things beyond its intended use with openHAB, an open-source home automation system, such as dimming the lights and closing the blinds when he puts his son to bed.

This platform has considerable potential for hacking thanks to the lightweight communications system it uses under the hood. The Jooki is a little pricey, but if you happen to have one around, it’s an impressive tool that can go well beyond its original intended use.

Home Automation Covers Everything

When starting out on a project, it’s accepted best practice to try to avoid feature creep. Of course, we can’t all say that we follow this guideline completely every time. In fact, sometimes it can get away from us, and in rare situations it might actually turn out pretty well. That appears to be what happened with [superczar]’s home automation project which now covers basically everything possible in home automation.

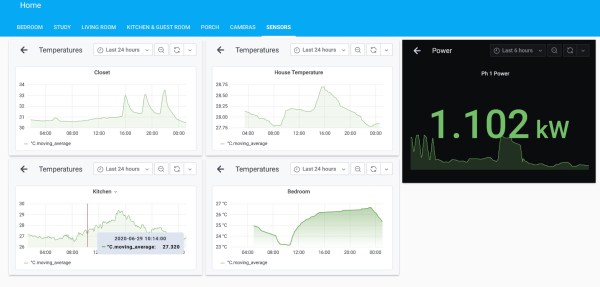
The build started in 2013, so we assume that features have been added periodically and that the system wasn’t designed and built all in one furious weekend. Either way, though, it covers a lot: lights, switches, media players in several rooms, includes sensors and logging for temperature, smoke, fire, and power, supports a number of cameras, the doorbell, and the locks. It also includes voice control for most of the systems.

That’s an impressive list, but what really drew our attention to this project is that it used to be based on domoticz, but that community has waned over the years and [superczar] had kept his system patched together with self-built scripts. An accidental upgrade recently broke the entire setup, so rather than rebuild everything a migration was made to home-assistant, an open-source platform that has a more active community. We’ve seen plenty of projects around here that use it as a platform, for ceiling fans, custom remotes, and doorbells.

Thanks to [pradeepmur] for the tip!

An ESP32 Home Automation Swiss Army Knife

Thanks to the ESP8266 and the ESP32, we’ve seen an explosion in DIY home automation projects recently. When it only takes $3 and a few lines of code to bring your gadgets onto the network, that’s hardly a surprise. But hacking bare ESP modules onto devices will only get you so far. Eventually you’ll probably want to put together a slightly more mature home automation system, and that’s where things can get a little tricky.

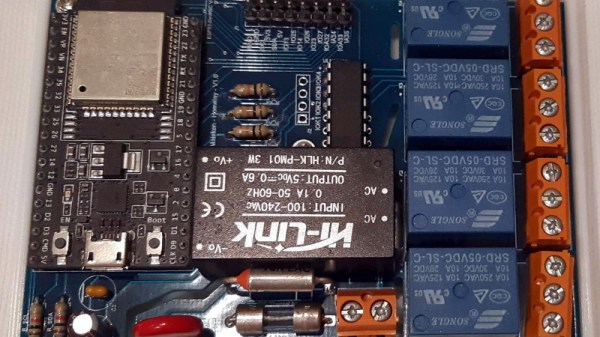
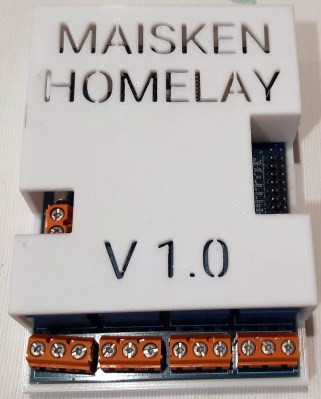
Which is why [Alfredo] created the Maisken Homelay. This device is a one-stop-shop for your home automation needs that leverages the power of the ESP32. With the microcontroller slotted into this compact PCB, you’ll be able to trigger four relays for your high current or AC loads, and still have 8 GPIOs and the I2C bus for expansion. All while retaining compatibility with existing open source projects like Home Assistant and ESPHome.

What really sets this project apart is the attention to detail. [Alfredo] has included a HLK-PM01 power supply on the board which takes mains voltage and brings it down to 5 VDC for the ESP32, so won’t need a separate power cable. He’s also taken the time to add isolation slots to separate the potential high-voltage connected to the relays from the rest of the board, added current and thermal fuses for protection, and peppered the board with screw terminals so you can easily connect everything up.

Sure you could get a simple relay board shipped to your door for a few bucks from the usual suspects. But it’s not going to offer the kind of quality of life and safety features that the Maisken Homelay has. There’s even a 3D printed enclosure available to help tidy things up.

With some of the blatantly anti-consumer decisions big-name home automation companies have been making recently, there’s more reason than ever to roll your own smart home using open source hardware and software. It still takes more effort than buying a bunch of modules from the Big Box retailer, but projects like this one are certainly starting to blur the line between consumer and DIY.

NFC For Your Home Automation

If home automation in the IoT era has taught us anything, it is that no one wants to run wires. Many of us rent, so new cabling is not even an option, even if we wanted to go that route. If you want a unique sensor, you have to build your own, and [tmkThings] wanted an NFC scanner at his front door. Just like arriving at work, he scans his credentials, and the door unlocks automagically.

Inside a little white box, we find an ESP8266 speaking Wifi attached to a PN532 talking NFC, and both are familiar names on these pages. The code, which is available on GitHub, links up with IFTTT and MQTT. For the security-minded, we won’t see this on your front door, but you can trigger your imagination’s limit of events from playing your favorite jams at the end of the day to powering down all the televisions at bedtime.

NFC hacks are great because they are instantly recognizable and readers are inexpensive, but deadbolt hacking is delightful in our books.

Continue reading “NFC For Your Home Automation”

An Eight-Day Home Automation Hackathon Is Inspiration For Getting More Projects Done

There’s nothing quite like a deadline to cut through extras and get right at the heart of the problem. Maybe we should all follow Interpreet’s example and stop thinking about automating our homes and just make it in an eight-day hackathon. His talk at the 2019 Hackaday Superconference covers the zero-to-deployment home automation build he finished in the eight days leading up to his move from one continent to another.

Hackaday’s very own Inderpreet Singh found himself pulling up roots and moving from his home in India to teach at Centennial College in Toronto, Canada. He needed a way to keep an eye on his home from afar and the name of the game is IoT. When the only choice is “whatever works right now”, you can learn a lot about simple solutions.

He chose familiar hardware to work with, with the ESP8266 making up the bulk of the nodes and a Raspberry Pi as as a central hub for the setup. He chose to communicate between all the nodes on his system using WiFi because the hardware is robust and available. With security in mind, he keeps the automation system separate from the daily use WiFi system by grabbing an extra access point to serve as the automation network. The Raspberry Pi serves as a router of sorts; its Ethernet port is connected to the IoT device’s AP, while the onboard WiFi is used to connect to the home’s main AP for a connection to the wider Internet.

Software for the system is built on a REST API served by a Python Flask app. Many would advocate for using MQTT but Inderpreet’s testing with that protocol came up short as the broker he intended to use was no longer available. One of the interesting parts of his system design is that all nodes will check in at regular intervals; this allows them to inquire about actions they need to take, but it also allows the system to detect a malfunctioning node immediately. I’ve seen a similar trick used by Elliot Williams where he assigns a “ping” topic to all MQTT devices that causes them to report in with their IP address. Having a system to query and ensure the health of every node is a big tip to take away from this talk.

Continue reading “An Eight-Day Home Automation Hackathon Is Inspiration For Getting More Projects Done”