Bus Sniffing Leads To New Display For Vintage Casio

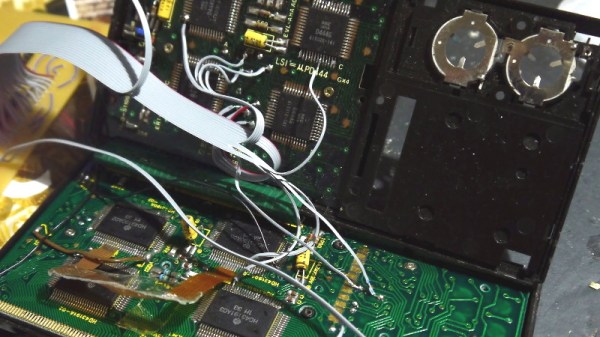
Despite his best efforts to repair the LCD on his Casio FX-702P, it soon became clear to [Andrew Menadue] that it was a dead-end. Rather than toss this relatively valuable device in the trash, he wondered if would be possible to replace the LCD with a more modern display. Knowing that reverse engineering the LCD panel itself would be quite a challenge, he decided instead to focus his efforts on decoding the communications between the calculator’s processor and display controller.

With his logic analyzer connected to the Casio’s four bit bus [Andrew] was able to capture a sequence of bytes during startup that looked promising, although it didn’t quite make sense at first. He had to reverse the order of each nibble, pair them back up into bytes, and then consult the FX-702P’s character map as the device doesn’t use ASCII. This allowed him to decode the message “READY”, and proved the concept was viable.

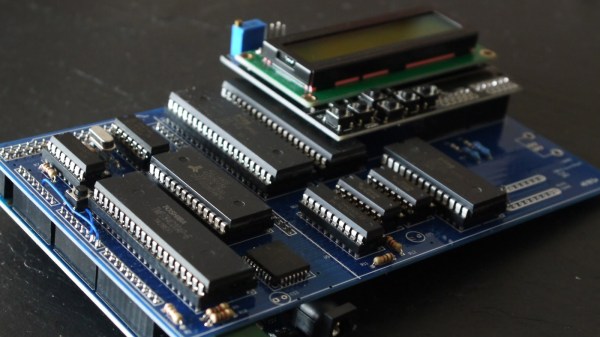
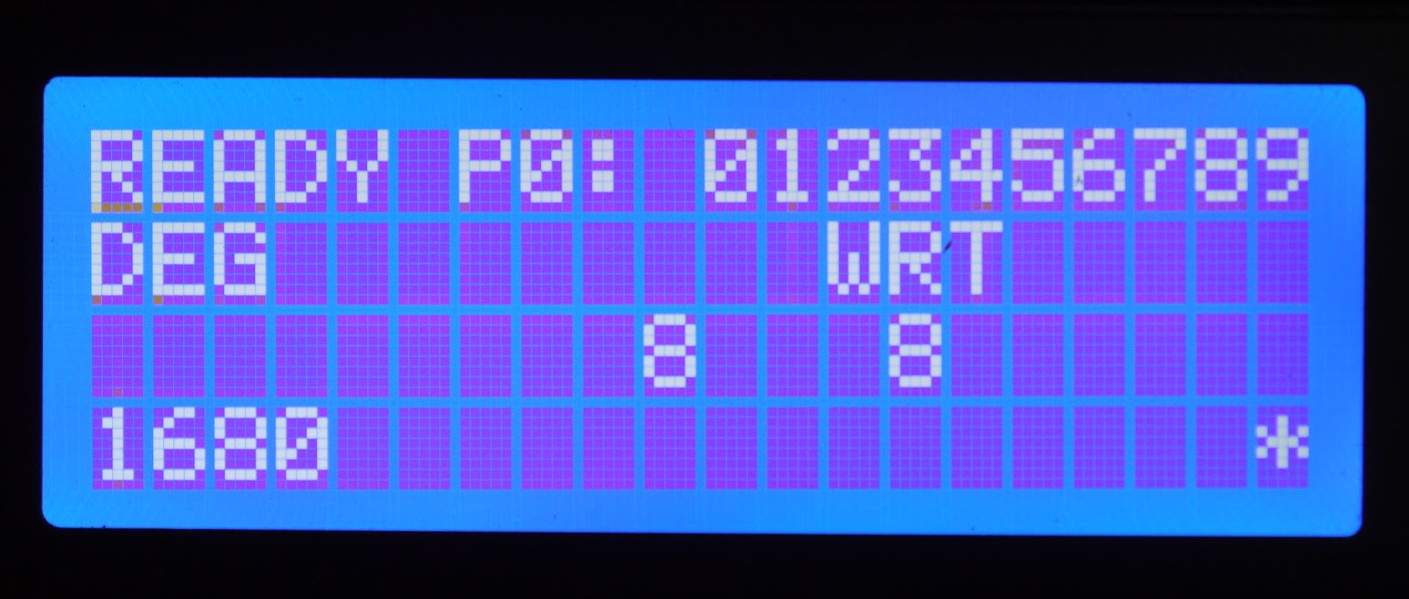
Of course a calculator with a logic analyzer permanently attached to it isn’t exactly ideal, so he started work on something a bit more compact. Armed with plenty of display controller data dumps, [Andrew] wrote some code for a STM32 “Blue Pill” ARM Cortex M3 microcontroller that would sniff and decode the data in near real-time. In the video after the break you can see there’s a slight delay between when he pushes a button and when the corresponding character comes up on the LCD below, but it’s certainly usable.

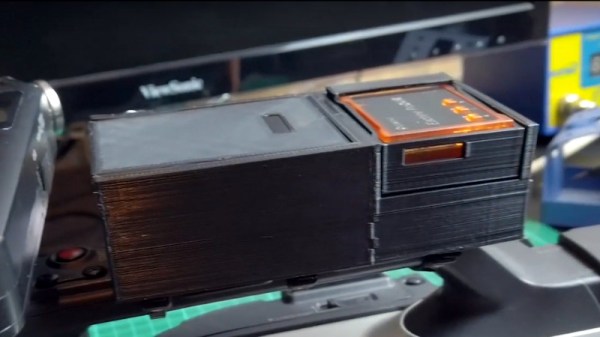
Unfortunately, the hardware he’s created for this hack is just slightly too large to fit inside the calculator proper. The new LCD is also nowhere near the size and shape that would be required to replace the original one. But none of that really matters. While [Andrew] says he could certainly make the electronics smaller, the goal was never to restore the calculator to like-new condition. Sometimes it’s more about the journey than the destination.

Continue reading “Bus Sniffing Leads To New Display For Vintage Casio”

Robot Fights Fire With IR

Fighting fire with robots may take jobs away from humans, but it can also save lives. [Mell Bell Electronics] has built a (supervised) kid-friendly version of a firefighting robot that extinguishes flames by chasing them down and blowing them out.

This hyper-vigilant robot is always on the lookout for fire, and doesn’t waste movement on anything else. As soon as it detects the presence of a flame, it centers itself on the source and speeds over to snuff it out with a fan made from a propeller and a DC motor.

Here comes the science: fire emits infrared light, and hobbyist flame sensors use IR to, well, detect fire. This fire bot has three of these flame sensors across the front that output digital data to what has got to be the world’s smallest Arduino – the ATmega32U4-based PICO board that [Mell Bell] just so happens to sell. Cover your mouth and nose and crawl along the floor toward the break to see how responsive this thing is.

Firefighters aren’t the only brave humans involved in the process of keeping the forests standing, or who feel the rising pressure of automation. Hackaday’s own [Tom Nardi] wrote a piece on a dying breed called fire lookouts that will no doubt ignite your interest.

Continue reading “Robot Fights Fire With IR”

Velocity Based Training, With A Camera

In the world of weight training, the buzzword of the moment is VBT, or Velocity Based Training. This involves sensors being used to measure the speed and position of a weight as it moves through each repetition, and thus provide instant feedback for the athlete and glean information from which they can work upon their training routine. Typically the sensors involved may be accelerometers, but [Kris] has taken a different tack using a webcam and machine vision to do the same job.

The barbell has a green disc attached to its end, and the software tracks it and measures the velocity. It issues a warning when the velocity of a repetition drops below a preset level, telling the athlete to stop their set before pushing themselves too far. Under the hood is a Python script and OpenCV, and the write-up in his GitHub repository takes us through its camera calibration to remove the effects of distortion, and set-up. All calibration of distances within the image is made through the known size of the green disc, allowing the software to accurately chart the distance through which it travels.

We’ve not seen a machine vision approach to weight training before, but we have seen one using accelerometers. Maybe this project will re-ignite interest in this field.

Smashed Laptop Becomes Stylish All-In-One

Many of us will have broken a laptop at one point or another, destroying the screen or smashing the case. It can be frustrating, as there’s a perfectly usable computer in there, trapped inside a broken husk of a body. [Matthew] saw this not as a problem, but an opportunity – and built a beautiful all-in-one desktop PC. (Video, embedded below.)

With a badly damaged Thinkpad laptop to hand, an ASUS monitor was sourced with a thin body and flat back, perfect for mounting hardware. An MDF base was created, on to which the laptop motherboard was mounted. A USB hub and audio amplifier were then added, along with a USB power isolator and soundcard to avoid problems with groundloops from the onboard headphone output. Speakers were Harman Kardon units salvaged from an old television, providing great quality sound for the build.

There’s plenty of great ideas in the video, from using epoxy for a strong permanent assembly, to a nifty hack to make the power button work. It has us contemplating a build for our own broken laptops in the junkpile. We’ve seen other creative all-in-one builds too, like this one inside a printer.

Continue reading “Smashed Laptop Becomes Stylish All-In-One”

Z80 Computer Is Both Arduino And Shield

There have been plenty of Z80 computer builds here on Hackaday, but what sets them apart is what you do with them. [Andrew] writes in with his Z80 single-board computer made from scratch, using the Arduino standard headers for its I/O. In turn, since he needed an easy way to program the flash memory which holds the software to run on the Z80, he used an Arduino Mega as a debugger, making the SBC an Arduino shield itself.

Using such a common header pinout for the Z80 computer allows it to be used with a variety of readily-available Arduino shields. This compatibility is achieved with an analog-digital converter and a 3.3 V regulator, mimicking the pins found in an Arduino Uno. The code, available on GitHub, includes an extensive explanation and walkthrough over the process in which the Mega takes over the bus from the Z80 to function as a fully-featured debugger. Programs can be loaded through embedding an assembly listing into the Mega’s sketch, or, once the debugger is up you can also upload a compiled hex file through the serial connection.

This isn’t the first time [Andrew] has been featured here, and his past projects are just as interesting. If you need to translate a Soviet-era calculator’s buttons into English, hack a metallurgical microscope or even investigate what’s that Clacking Clanking Scraping Sound, he’s the one you should call.

If Coffee == True {

Having a shared coffee maker in the workplace is both a blessing and a curse. It’s nice to have constant access to coffee, but it can be frustrating to find the coffee pot emptied right as you walk in to the break room. To solve this problem in their office, [Vitort] and co. built an IOT solution that notifies everyone of the current coffee status on a Slack channel.

This project wasn’t built just as a convenience for the office, either. It makes extensive use of AWS SNS, the simple notification system from Amazon Web Services because they wanted to learn to use this technology specifically. Besides the notification system, the device itself is based on a NodeMCU/ESP8266, communicating over WiFi, and is a simple push-button design which coffee drinkers push when a fresh pot is made, and then push again when the coffee is empty.

While relatively straightforward, this project is a good one to look at if you’ve been interested in AWS at all, especially the simple notification system. It’s a pretty versatile tool, and all of the code used in the project is available on the project page for your reading pleasure. If you’re more interested in the coffee aspect of this project, we have a special coffee maker for you too.

That Retro Video Look, Without The Tapes

We’re lucky to live in an age of rapid technological advancement, lucky in more ways than one because as well as receiving a constant supply of new things, we have the benefit of the older tech that once we lusted over, at knock-down prices. [Luke Baker] spent his youth as a skateboarder, and the cameras of desire in that community were the high-end MiniDV models. They may not have high definition but their output has a Millennial aesthetic that captures the period, so he’s brought one into the 2020s by adding a digital SD card recorder designed for a multirotor to it.

On the face of it this is a pretty straightforward job of coupling an off-the-shelf recorder to a battery and the camera’s analogue output terminals. But the resulting spaghetti on what is supposed to be a portable device is hardly attractive, so he’s created an all-in-one 3D-printed enclosure that is attached to the camera’s handle with a set of cable ties. It’s shaped to fit the recorder and has a sliding lid over the battery compartment, and he’s added a handy on-off switch. Whether or not he takes it to the skate park in a bid to roll back the decades, as you can see int he video below the break it’s a well-executed piece of work that should serve to remind that there’s still life in some of this easily-available old tech if you’re prepared for a bit of lateral thinking.

This isn’t the first vintage video hack we’ve seen, back in 2016 we were treated to the grainy period feel of a vintage 8mm camera through the eye of a Raspberry Pi.

Continue reading “That Retro Video Look, Without The Tapes”