3D Printed Rover Enjoys Long Walks On The Beach

More than a few hackers have put in the considerable time and effort required to build a rover inspired by NASA’s robotic Martian explorers, but unfortunately even the most well funded home tinkerer can’t afford the ticket to send their creation offworld. So most of these builds don’t journey through anything more exciting than a backyard sandbox. Not that we can blame their creators, we think a homebrew rover will look just as cool in your living room as it would traipsing through a rock quarry.

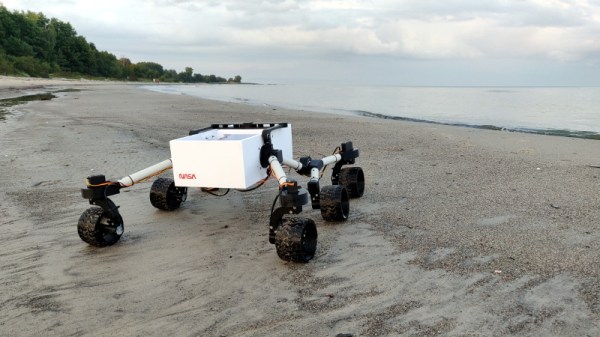
But the DIY rover status quo clearly wasn’t sufficient for [Jakob Krantz], who decided the best way to test his new Curiosity-inspired rover was to let it frolic around on the beach for an afternoon. But judging by the video after the break, his beefy 3D printed bot proved to be more than up to the task; powering through wildly uneven terrain with little difficulty.

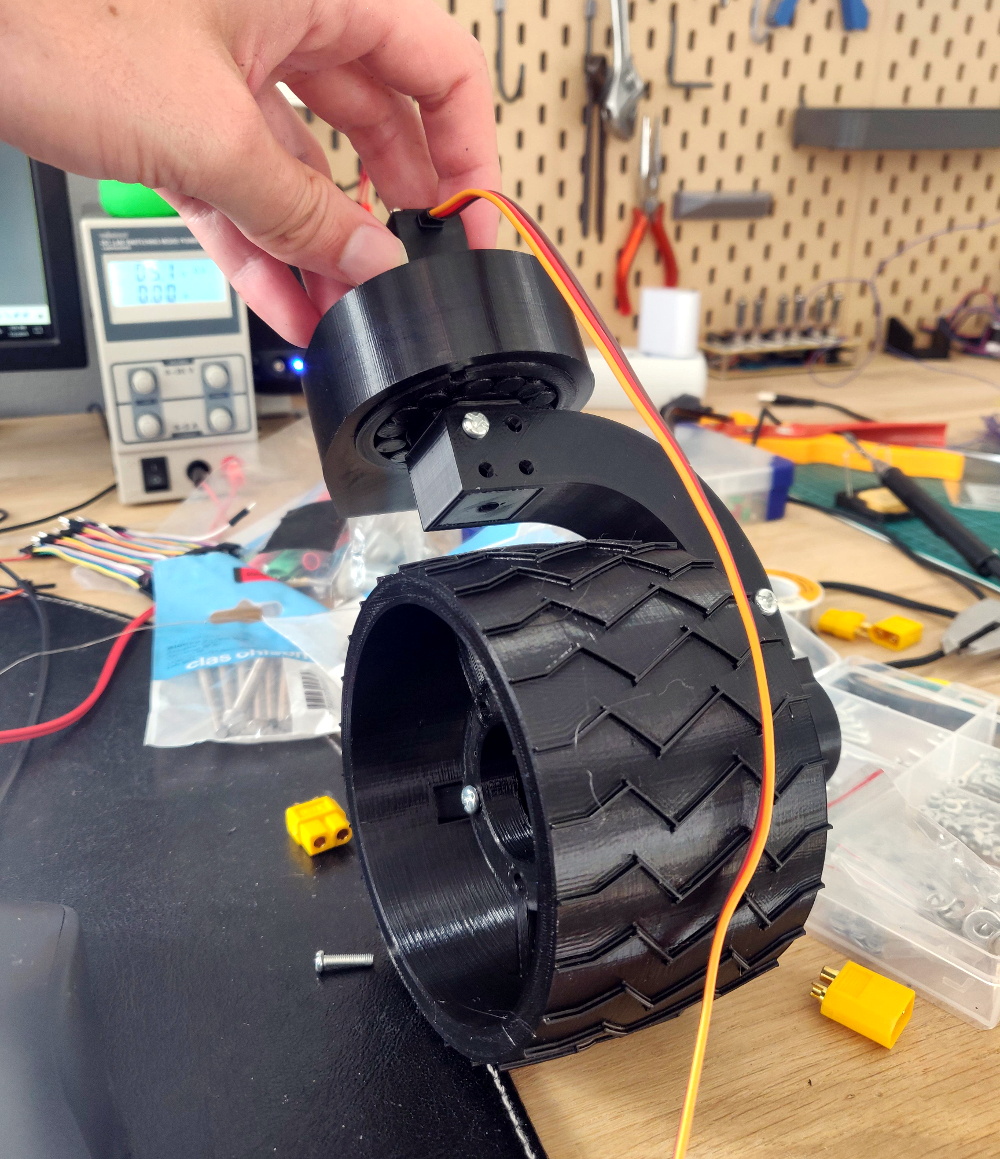
Beyond a few “real” bearings here and there, all of the key components for the rover are 3D printed. [Jakob] did borrow a couple existing designs, like a printable bearing he found on Thingiverse, but for the most part he’s been toiling away at the design in Fusion 360 and using images of the real Curiosity rover as his guide.

Right now, he’s controlling the rover with a standard 6 channel RC receiver. Four channels are mapped to the steering servos, and a fifth to the single electronic speed control that commands the six wheel motors. But he’s recently added an Arduino to the rover which will eventually be in charge of interpreting the RC commands. This will allow more complex maneuvers with fewer channels, such as the ability to rotate in place.

We’re proud to count our very own [Roger Cheng] among the rover wrangling hackers of the world. An entire community has sprung up around his six-wheeled Sawppy, and the knowledge gained during its design and construction could be applicable to any number of other projects.

Continue reading “3D Printed Rover Enjoys Long Walks On The Beach”

GigaDevice Releasing RISC-V MCUs And Development Boards

Probably not too many people have heard of Chinese manufacturer GigaDevice who so far has mostly been known as a NOR Flash memory manufacturer. Their GD32 range of MCUs is however STM32-compatible, making them interesting (cheaper) alternatives to sourcing directly from ST. Now GigaDevice has announced during a presentation that they are releasing a range of RISC-V-based MCUs: the GD32V series.

As GigaDevice has not yet updated their English-language website, the information we do have is based on CNX-Software‘s translations from Chinese. The specs for the GD32VF103 series of MCUs are listed by them as follows:

  • Core – GD32VF103 RISC-V “Bumblebee Core” @ 108 MHz
  • Memory – 8KB to 32KB SRAM
  • Storage  – 16KB to 128KB flash
  • Peripherals – USB OTG and CAN 2.0B
  • I/O – 3.3V, 5V tolerant
  • Supply Voltage – 2.6 to 3.6V
  • Package – QFN36, LQFP48, LQFP64, and LQFP100 packages

Whether they are pin-compatible with the GD32 MCUs is still to be confirmed. If that turns out to be the case, then this might be an interesting drop-in solution for some products. From the specs it seems clear that they are targeting the lower-end ARM-based MCUs such as ST’s Cortex-M3-based STM32F103, which are quite common in a large range of embedded systems.

Seeing a performance comparison between both types of MCU would be interesting to see as lower power usage and higher efficiency compared to the ARM cores is being claimed. Both MCUs and development boards are already available for sale at Tmall, with the basic GD32VF103C-START board going for about $11 and the GD32VF103TBU6 MCU (QFN36, 64 kB Flash) for roughly $1.27.

Documentation and SDKs in English seem to be a bit scarce at this point, but hopefully before long we too will be able to use these MCUs without having to take up Chinese language classes.

Thanks to [Flaviu] for the tip!

Another World On The Apple II

What’s more fun than porting an old game released for an old system such as the Apple IIgs to its 10-year-older predecessor, the Apple II from 1977? Cue [Deater]’s port of the classic video game ‘Another World‘ to the original Apple II. As was fairly obvious from the onset, the main challenges were with the amount of RAM, as well as with the offered graphics resolutions.

Whereas the Apple II could address up to 48 kB of RAM, the 16-bit Apple IIgs with 65C816 processor could be upgraded to a maximum of 8 MB. The graphics modes offered by the latter also allowed ‘Another World’ to run at a highly playable 320×200, whereas the ported version is currently limited to the ‘low resolution’ mode at 40×48 pixels.

The game itself still needs a lot of work to add missing parts and fix bugs, but considering that it has been implemented in 6502 assembler from scratch, using just the gameplay of the IIgs version as reference, it’s most definitely an achievement which would have earned [Deater] a lot of respect back in the late ’80s as well.

Feel free to check out the Github page for this project, grab a floppy disk image from the project page and get playing. Don’t forget to check out the gameplay video linked after the break as well.

Continue reading “Another World On The Apple II”

Quantum Radar Hides In Plain Sight

Radar was a great invention that made air travel much safer and weather prediction more accurate, indeed it is even credited with winning the Battle of Britain. However, it carries a little problem with it during times of war. Painting a target with radar (or even sonar) is equivalent to standing up and wildly waving a red flag in front of your enemy, which is why for example submarines often run silent and only listen, or why fighter aircraft often rely on guidance from another aircraft. However, researchers in Italy, the UK, the US, and Austria have built a proof-of-concept radar that is very difficult to detect which relies upon quantum entanglement.

Despite quantum physics being hard to follow, the concept for the radar is pretty easy to understand. First, they generate an entangled pair of microwave photons, a task they perform with a Josephson phase converter. Then they store an “idle” photon while sending the “signal” photon out into the world. Detecting a single photon coming back is prone to noise, but in this case detecting the signal photon disturbs the idle photon and is reasonably easy to detect. It is likely that the entanglement will no longer be intact by the time of the return, but the correlation between the two photons remains detectable.

Continue reading “Quantum Radar Hides In Plain Sight”

Debug Superpowers Bring An STM32 Back From The Dead

When a processor has a fault it can leave what looks to be precious little in the way of cause and effect. Debug-by-print-statement works surprisingly well in simple cases, but where in a desktop environment you would drop into a debugger to solve trickier problems this can be an onerous task on an embedded system. [Ross Schlaikjer]’s excellent blog post walks through setting up one of our favorite Open Hardware debug probes and shows us that with the right tooling in place, unexpected faults aren’t quite so impenetrable. Continue reading “Debug Superpowers Bring An STM32 Back From The Dead”

3D Printed Pen Plotter Is As Big As You Need It To Be

There’s nothing quite like building something to your own personal specifications. It’s why desktop 3D printers are such a powerful tool, and why this scalable plotter from the [Lost Projects Office] is so appealing. You just print out the end pieces and then pair it with rods of your desired length. If you’ve got some unusually large computer-controlled scribbling in mind, this is the project for you.

The design, which the team calls the Deep Ink Diver (d.i.d) is inspired by another plotter that [JuanGg] created. While the fundamentals are the same, d.i.d admittedly looks quite a bit more polished. In fact, if your 3D printed parts look good enough, this could probably pass for a commercial product.

For the electronics, the plotter uses an Arduino Uno and a matching CNC Shield. Two NEMA 17 stepper motors are used for motion: one to spin the rod that advances the paper, and the other connected to a standard GT2 belt and pulley to move the pen back and forth.

We particularly like the way [Lost Projects Office] handled lifting the pen off the paper. In the original design a solenoid was used, which took a bit of extra circuitry to drive from the CNC Shield. But for the d.i.d, a standard SG90 servo is used to lift up the arm that the pen is attached to. A small piece of elastic puts tension on the assembly so it will drop back down when the servo releases.

If this plotter isn’t quite what you’re after, don’t worry. There’s more where that came from. We’ve seen a number of very interesting 3D printed plotters that are just begging for a spot in your OctoPrint queue.

Candy-Colored Synth Sounds Sweet

Let’s face it, synthesizers are awesome. But commercial synths are pretty expensive. Even the little toy ones like the KORG Volca and the MicroKORG will run you a few hundred bucks. For the most part, they’re worth the price because they’re packed with features. This is great for experienced synth wizards, but can be intimidating to those who just want to make some bleeps and bloops.

[Kenneth] caught the mini-synth bug, but can’t afford to catch ’em all. After a visit to the Moog factory, he was inspired to engineer his own box based on the Moog Sirin. The result is KELPIE, an extremely portable and capable synth with 12 voices, 16 knobs, and 4 LED buttons. KELPIE is plug and play—power and a MIDI device, like a keyboard, are the only requirements. It has both 1/8″ and 1/4″ jacks in addition to a standard MIDI DIN connection. [Kenneth] rolled his own board based on the Teensy 3.2 chip and the Teensy audio shield.

Part of the reason Kenneth built this synthesizer is to practice designing a product from the ground up. Throughout the process, he has tried to keep both the production line and the DIYer in mind: the prototype is a two-part resin print, but the design could also be injection molded.

We love that KELPIE takes its visual design cues from the translucent candy-colored Game Boys of the late 90s. (We had the purple one, but always lusted after the see-through kind.)  Can we talk about those knobs? Those are resin-printed, too. To color the indicators, [Kenneth] used the crayon technique, which amounts to dripping molten crayon into the groove and scraping it off once hardened. Don’t delay; glide past the break to watch a demo.

Continue reading “Candy-Colored Synth Sounds Sweet”