Blinging Buttons For Pick And Place

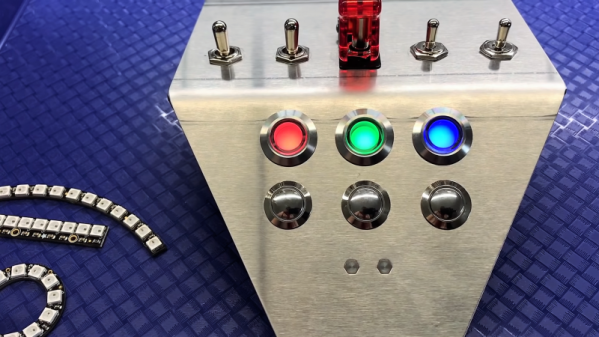
With 3D-printing, cheap CNC machines, and the huge variety of hardware available these days, really slick-looking control panels are getting to be commonplace. We’re especially fond of those nice indicators with the chrome bezels, and the matching pushbuttons with LED backlighting; those can really make a statement on a panel.

Sadly for [Proto G], though, the LEDs in his indicator of choice were just boring old one-color units, so he swapped them out and made these addressable RGB indicators. The stock lamps are not cheap units, but they do have a certain look, and they’re big enough to allow room for a little modification. The original guts were removed with a Dremel to make way for a Neopixel board. [Proto G] wanted to bring the board’s pads out to screw terminals, so he had to adapt the 3.0-mm pitch blocks he had on hand to the 2.54-mm pitch on Neopixel board, but that actually came out neater than you’d think. With a little hot glue to stick it all back together, he now has fully-addressable indicators that can be daisy-chained together and only take up a single GPIO pin.

These indicators and the nice looking panel they’re on is part of a delta pick-and-place robot build [Proto G] has been working for a while. He’s had some interesting side projects too, like the clickiest digital clock in the world and easing ESP32 setup for end-users. While we like all his stuff, we can’t wait to write up the finished delta.

Continue reading “Blinging Buttons For Pick And Place”

Casting A 3D Printed Extruder Body In Aluminum

Creating 3D prints is great, but sometimes you need something more durable. [Myfordboy] printed a new 3D printer extruder in PLA and then used the lost PLA method to cast it in aluminum. You can see the results in the video below.

The same process has been used for many years with wax instead of PLA. The idea is to produce a model of what you want to make and surround it with a material called investment. Once the investment sets, heat melts the PLA (or wax) leaving a mold made of the investment material. Once you have the mold, you can place it in a frame and surround it with greensand. Another frame gets a half pipe placed and packed with greensand. The depression made by this pipe will provide a path for the metal to flow into the original mold. Another pipe will cut a feeder into the greensand over this pipe.

Continue reading “Casting A 3D Printed Extruder Body In Aluminum”

A Tale Of More Than One Amiga 1500

If you were an Amiga enthusiast back in the day, the chances are you had an Amiga 500, and lusted after a 2000 or maybe later a 3000. Later still perhaps you had a 600 or a 1200, and your object of desire became the 4000. The amusingly inept Commodore marketing department repackaged what was essentially the same 68000-based Amiga at the bottom end of the range through the platform’s entire lifetime under their ownership, with a few minor hardware upgrades in the form of chipset revisions that added a relatively small number of features.

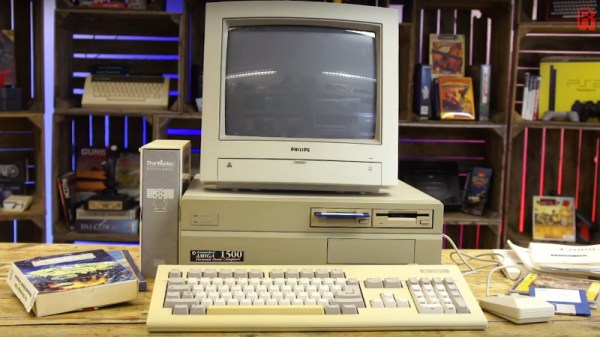
We’ve probably listed above all the various Amigas you’ll be familiar with, with a few exceptions you either didn’t have or only saw in magazines. The original A1000, the chipset-upgraded A500+, the CDTV multimedia  platform, or the CD32 games console as examples. But there’s one we haven’t listed which you may never have seen unless you hail from the United Kingdom, and it’s an Amiga behind which lies a fascinating tale that has been unearthed by [RetroManCave].

In the late 1980s, Commodore sold the A500 all-in-one cased Amiga to consumers with marketing based heavily upon gaming, and the A2000 desktop Amiga to businesses with the promise of productivity software. Both machines had a 16-bit Motorola 68000 running at the same speed, with the A2000 having a lot of extra memory and a hard drive lurking within that case. The price difference between the two was inordinately high, creating a niche for an enterprising British company called Checkmate Computers to fill with their provocatively named A1500, a clever case for an A500 mainboard that gave it an expansion slot and space for that hard drive and memory.

This machine’s existence angered Commodore, to the extent that they vowed to eradicate the upstart by releasing their own UK-only A1500. The result, a comically badly concealed rebadge of an A2000 with two floppies and no hard drive, is something we remember seeing at the time, and dare we admit it, even lusting after. But the full story in the video below is well worth a watch for an engrossing insight into a little-known saga in one corner of the computing world during the 16-bt era. Towards the end it becomes a plug for the Checkmate Computers co-founder’s current Kickstarter project, but if that holds no interest for you then you are at least forewarned.

Of course, if you have either A1500 today, you might want an up-to-date graphics card for it.

Continue reading “A Tale Of More Than One Amiga 1500”

Bandpass Filters From The CNC Mill

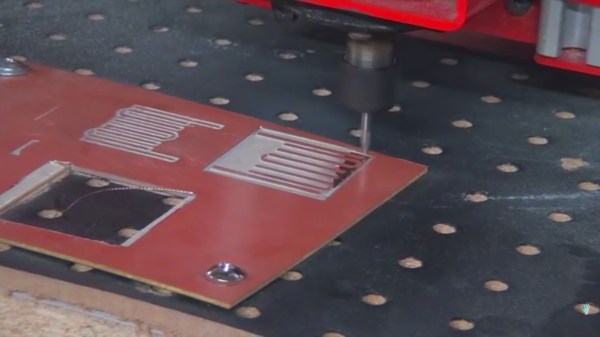
A bandpass allows a certain electrical signal to pass while filtering out undesirable frequencies. In a speaker bandpass, the mid-range speaker doesn’t receive tones meant for the tweeter or woofer. Most of the time, this filtering is done with capacitors to remove low frequencies and inductors to remove high frequencies. In radio, the same concept applies except the frequencies are usually much higher. [The Thought Emporium] is concerned with signals above 300MHz and in this range, a unique type of filter becomes an option. The microstrip filter ignores the typical installation of passive components and uses the copper planes of an unetched circuit board as the elements.

A nice analogy is drawn in the video, which can also be seen after the break, where the copper shapes are compared to the music tuning forks they resemble. The elegance of these filters is their simplicity, repeatability, and reproducability. In the video, they are formed on a CNC mill but any reliable PCB manufacturing process should yield beautiful results. At the size these are made, it would be possible to fit these filters on a business card or a conference badge.

Continue reading “Bandpass Filters From The CNC Mill”

Explore Low-Energy Bluetooth By Gaming

For several years now, a more energy-efficient version of Bluetooth has been available for use in certain wireless applications, although it hasn’t always been straightforward to use. Luckily now there’s a development platform for Bluetooth Low Energy (BLE) from Texas Instruments that makes using this protocol much easier, as [Markel] demonstrates with a homebrew video game controller.

The core of the project is of course the TI Launchpad with the BLE package, which uses a 32-bit ARM microcontroller running at 48 MHz. For this project, [Markel] also uses an Educational BoosterPack MKII, another TI device which resembles an NES controller. To get everything set up, though, he does have to do some hardware modifications to get everything to work properly but in the end he has a functioning wireless video game controller that can run for an incredibly long time on just four AA batteries.

If you’re building a retro gaming console, this isn’t too bad a product to get your system off the ground using modern technology disguised as an 8-bit-era controller. If you need some inspiration beyond the design of the controller, though, we have lots of examples to explore.

Continue reading “Explore Low-Energy Bluetooth By Gaming”

Quantum Computing For Computer Scientists

Quantum computing is coming, so a lot of people are trying to articulate why we want it and how it works. Most of the explanations are either hardcore physics talking about spin and entanglement, or very breezy and handwaving which can be useful to get a little understanding but isn’t useful for applying the technology. Microsoft Research has a video that attempts to hit that spot in the middle — practical information for people who currently work with traditional computers. You can see the video below.

The video starts with basics you’d get from most videos talking about vector representation and operations. You have to get through about 17 minutes of that sort of thing until you get into qubits. If you glaze over on math, listen to the “index array” explanations [Andrew] gives after the math and you’ll be happier.

Continue reading “Quantum Computing For Computer Scientists”

Custom Circuit Makes For Better Battery Level Display

Isn’t it always the way? There’s a circuit right out of the textbooks, or even a chip designed to do exactly what you want — almost exactly. It’s 80% perfect for your application, and rather than accept that 20%, you decide to start from scratch and design your own solution.

That’s the position [Great Scott!] found himself in with this custom LED battery level indicator. As the video below unfolds we learn that he didn’t start exactly from scratch, though. His first pass was the entirely sensible use of the LM3914 10-LED bar graph driver chip, a device that’s been running VU meters and the like for the better part of four decades. With an internal ladder of comparators and 1-kilohm resistors, the chip lights up the 10 LEDs according to an input voltage relative to an upper and lower limit set by external resistors. Unfortunately, the fixed internal resistors make that a linear scale, which does not match the discharge curve of the battery pack he’s monitoring. So, taking design elements from the LM3914 datasheet, [Great Scott!] rolled his own six-LED display from LM324 quad-op amps. Rather than a fixed resistance for each stage, trimmers let him tweak the curve to match the battery, and now he knows the remaining battery life with greater confidence.

Perhaps the 18650 battery pack [Great Scott!] is building is for the e-bike he has been working on lately. If it is, we’re glad to see that he spot-welded the terminals, unlike a recent e-bike battery pack build that may have some problems down the road.

Continue reading “Custom Circuit Makes For Better Battery Level Display”