Infrared certainly has its uses, but if you’re trying to locate objects, ultrasonic detection is far superior. It’s contact-less, undetectable to the human ear, and it isn’t affected by smoke, dust, ambient light, or Silly String.
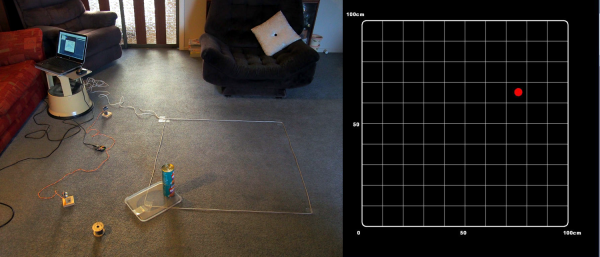
[lingib]’s dual sensor echo locator uses two HY-SRF05s, but the cheap and plentiful HC-SR04s will work, too. Both sensors are arranged for maximum beam overlap and wired up to an Arduino Uno. One sensor’s emitter is blocked with masking tape, so all it does is listen.
When the system registers the object, it shows up as a red dot on a grid inside a Processing sketch along with a bunch of details like the object’s coordinates, its distance from each sensor, and the area of the triangle formed by the two sensors and the object. [lingib] reports that the system is quite accurate and will work for much larger playgrounds than the 1 meter square in the demo after the break.
Shared libraries are our best friends to extend the functionality of C programs without reinventing the wheel. They offer a collection of exported functions, variables, and other symbols that we can use inside our own program as if the content of the shared library was a direct part of our code. The usual way to use such libraries is to simply link against them at compile time, and let the linker resolve all external symbols and make sure everything is in place when creating our executable file. Whenever we then run our executable, the loader, a part of the operating system, will try to resolve again all the symbols, and load every required library into memory, along with our executable itself.
But what if we didn’t want to add libraries at compile time, but instead load them ourselves as needed during runtime? Instead of a predefined dependency on a library, we could make its presence optional and adjust our program’s functionality accordingly. Well, we can do just that with the concept of dynamic loading. In this article, we will look into dynamic loading, how to use it, and what to do with it — including building our own plugin system. But first, we will have a closer look at shared libraries and create one ourselves.
Occasionally we come across a piece of information which reminds us that, while flying cars are still nowhere to be found, we’re definitely living in the future. Usually it’s about some new application of artificial intelligence, or maybe another success in the rapidly developing field of private spaceflight. But sometimes it’s when you look at a website and say to yourself: “Oh cool, they have 1.5kW electromagnetic accelerators in stock.”
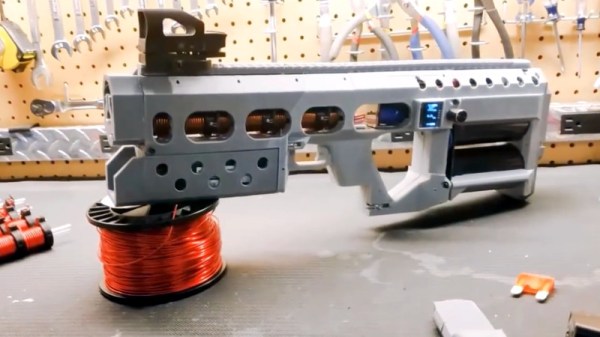
Arcflash Labs, a partnership between [David Wirth] and [Jason Murray], have put their EMG-01A Gauss gun up for sale for anyone who’s brave enough and willing to put down $1,000 USD on what’s essentially a high-tech BB gun. The creators claim it obtains an efficiency of 6.5% out of its RC-style 6S LiPo battery pack, which allows it to fire over 100 rounds before needing to be recharged. Firing 4.6g steel projectiles at a rather leisurely 45 m/s, this futuristic weapon would be more of a match for tin cans than invading alien forces, but at least you’ll be blasting those cans from a position of supreme technical superiority.
The EMG-01A builds on the work of the team’s previous experiments, such as the semi-automatic railgun we covered last year. They’ve made the device much smaller and lighter than their previous guns, as well as worked on making them safer and more reliable. That said, the page for the EMG-01A has a number of warnings and caveats that you won’t see on the back of a Red Ryder BB gun box; it’s certainly not a toy, and anyone who takes ownership of one needs to be respectful of the responsibility they’re taking on.
Speaking of which, who can actually buy one of these things? The Arcflash Labs site makes it clear they will only ship to the United States, and further gives a list of states and cities were they can’t send a completed gun. Essentially they are following the same laws and guidelines used for shipping air guns within the US, as they believe that’s a fair classification for their electromagnetic guns. Whether or not the ATF feels the same way is unclear, and it should be interesting to see what kind of legal response there may be if Arcflash Labs starts moving enough units.
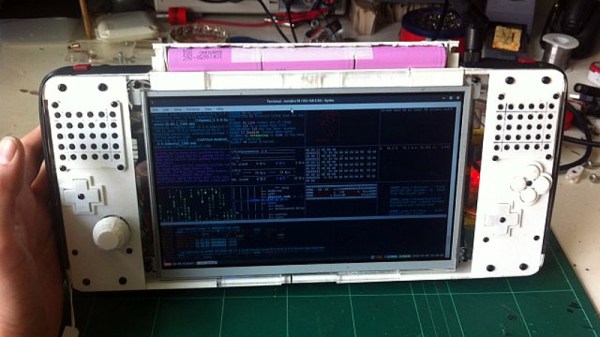
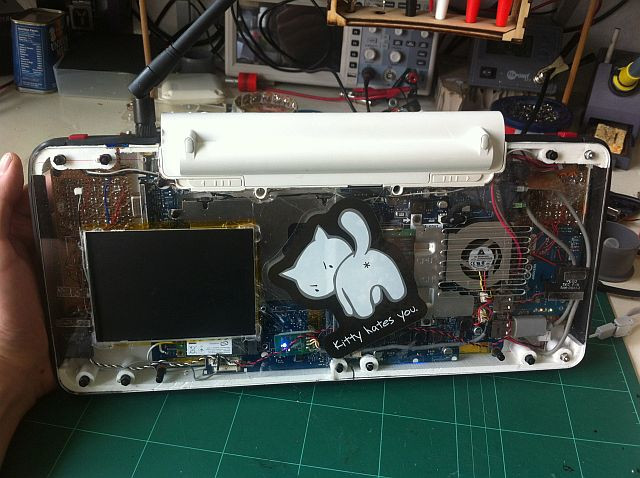
Between smartphones and tablets, computing is becoming increasingly mobile in nature. It used to be that everyone had a desktop computer, then laptops became the norm, and now many people don’t have anything beyond their mobile device. Unless you’re the kind of person who actually needs the power and versatility offered by a “real” computer, mobile devices are simply a more convenient option to browse the web and consume content.
[mnt] describes the Hacktop as an “Emergency Gaming/Hacking Station”, and says he uses it everywhere he goes. Inspired by his Nintendo DSi, gaming controls are front-and-center on the Hacktop and he uses the machine to play everything from Half-Life to classic emulators.
But the Hacktop is capable of more than just playing Amiga games. The hand-soldered QWERTZ keyboard can be used with his thumbs, and the D-Pad doubles as the cursor keys. There’s a laptop touch pad on the back of the case, and the ten-inch LCD display is a touch screen as well. Definitely no shortage of input devices on this thing. It’s also packing some interesting special features, such as integrated RTL-SDR and LIRC hardware for mobile exploration and experimentation. [mnt] says the nine-cell battery should keep it alive and kicking for twelve hours or so, but it of course depends on what kind of stuff he gets into while out and about.
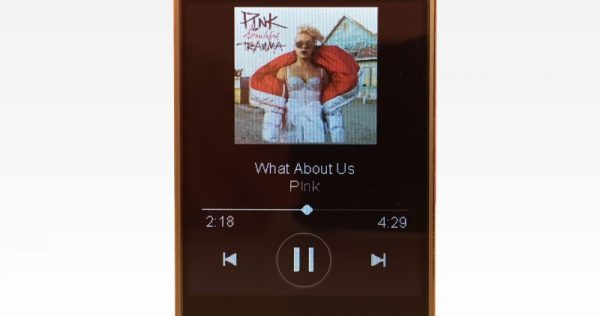
In 2017 Spotify finally deprecated their public vanilla C SDK library, libspotify, and officially replaced it with dedicated SDKs for iOS and Android and this new-fangled web thing we’ve all heard so much about. This is probably great for their maintainability but makes writing a native application for a Linux or a hardware device significantly harder, at least without an application process and NDA. Or is it? Instead of using that boring slab of glass and metal in their pocket [Dani] wanted to build a handy “now playing” display and remote control interface but was constrained by the aforementioned SDK limitations. So they came up with a series of clever optimizations resulting in the clearly-named ESP8266 Spotify Remote Control.
The Spotify Remote Control has a color LCD with a touchscreen. Once attached to a Spotify account it will show the album art of the currently playing track (with a loading indicator!) and let you play/pause/skip tracks from its touch screen, all with impressively low latency. To get here [Dani] faced two major challenges: authorizing the ESP to interact with a user’s Spotify account, and low latency LCD drawing.
2 Bit Cover Art
If you’re not on iOS or Android, the Spotify web API is the remaining non-NDA’d interface available. But it’s really designed to be used on relatively rich platforms such as fully featured web browsers, not an embedded device. To that end, gone are the days of asking a user to enter their username and password in a static login box, the newer (better) way is to negotiate for a per-user token (which is individually authorized per application), then to use that to authenticate your interaction. With this regime 3rd party applications (in this case an ESP8266) never see a user’s password. One codified and very common version of this process is called OAuth and the token dance is called a “workflow”. [Dani] has a pretty good writeup of the process in their post if you want more detail about the theory. After banging out the web requests and exception handling (user declines to authorize the device, etc) the final magic ended up being using mDNS to get the user’s browser to redirect itself to the ESP’s local web server without looking up an IP first. So the setup process is this: the ESP boots and displays a URL to go to, the user navigates there on a WiFi connected device and operates the authorization workflow, then tokens are exchanged and the Remote Control is authorized.
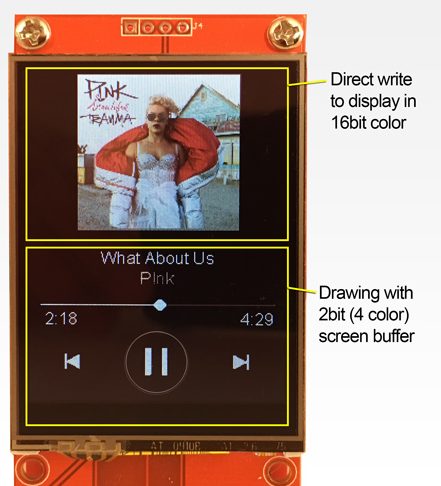
The second problem was smooth drawing. By the ESP’s standards the album art for a given track at full color depth is pretty storage-large, meaning slow transfers to the display and large memory requirements. [Dani] used a few tricks here. The first was to try 2 bit color depth which turned out atrociously (see image above). Eventually the solution became to decompress and draw the album art directly to the screen (instead of a frame buffer) only when the track changed, then redraw the transport controls quickly with 2 bit color. The final problem was that network transfers were also slow, requiring manual timesharing between the download code and the display drawing routing to ensure everything was redrawn frequently.
Check out [Dani]’s video after the break, and take a peek at the sources to try building a Spotify Remote Control yourself.
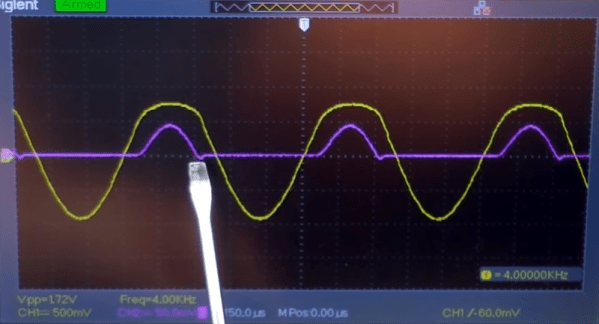
There are at least two phases to learning about electronics. In the first phase, you learn about how components are supposed to work. In the second phase, you learn about how they really work. Wires have resistance and inductance. Adjacent wires have capacitance. Capacitors leak. Inductors have resistance. All of these things matter. [Learnelectronics] has a recent video that explores recovery time for a diode — a phase two conversation.
If you haven’t run into recovery time before, it is the amount of time the diode takes to shut off after it is conducting. This manifests itself as a little undershoot where the signal that the diode should block leaks through briefly.
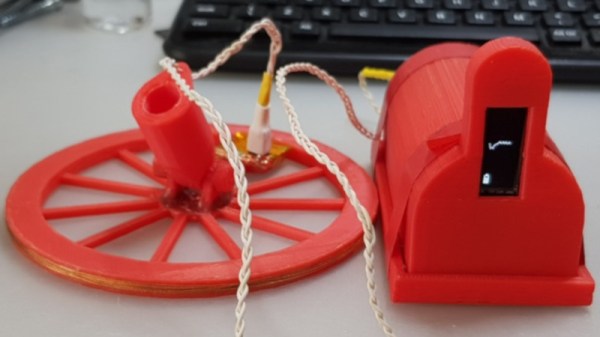
The detector is a thoroughly modern one – fans of the 555 may want to look away now. A Collpits oscillator, built from two transistors, is used to generate a frequency that is passed through the detection coil. This frequency is measured by an Arduino that plots a graph of the received frequency on an OLED display. As the coil is passed near metal objects, the oscillator frequency changes, and this is visible on the frequency plot on-screen.
Not only is it a quick and easy build that is achievable from what are now junkdraw components, it’s also one that would be readily usable by the hearing-impaired, too. It’s a great project to tackle if you’re looking to get to grips with basic oscillators, frequency measurement, or just microcontroller programming in general.


 The second problem was smooth drawing. By the ESP’s standards the album art for a given track at full color depth is pretty storage-large, meaning slow transfers to the display and large memory requirements. [Dani] used a few tricks here. The first was to try 2 bit color depth which turned out atrociously (see image above). Eventually the solution became to decompress and draw the album art directly to the screen (instead of a frame buffer) only when the track changed, then redraw the transport controls quickly with 2 bit color. The final problem was that network transfers were also slow, requiring manual