Flat Pack Generators

We just wrapped up the Power Harvesting challenge in the Hackaday Prize, and with that comes some solutions to getting power in some very remote places. [Vijay]’s project is one of the best, because his project is getting power in Antarctica. This is a difficult environment: you don’t have the sun for a significant part of the year, it’s cold, and you need to actually get your equipment down to the continent. [Vijay]’s solution was to use one of Antarctica’s greatest resources — wind — in an ingenious flat pack wind turbine.

There are a few problems to harvesting wind power in a barren environment. The first idea was to take a standard, off-the-shelf motor and attach some blades, but [Vijay] found there was too much detent torque, and the motor would be too big anyway.

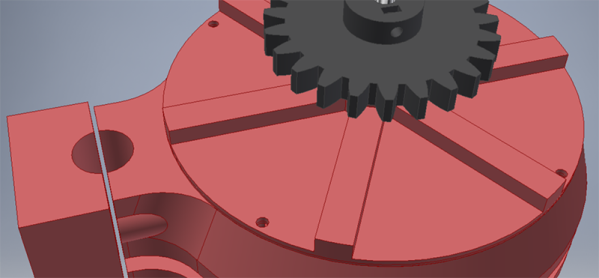
The solution to this problem was to wind his own motor that didn’t have the problems of off-the-shelf brushless motors. The design that [Vijay] settled on is a dual axial flux generator, or a motor with a fixed stator with magnets and two rotors loaded up with copper windings. Think of it as a flattened, inverted version of the motor on your drone.

One interesting aspect of this design is that it takes up significantly less space than a traditional motor, while still being able to output about 100 Watts with the wind blowing. Add in some gearing to get the speed of the rotor right, and you have a simple wind generator that can be set up in minutes and carried anywhere. It’s a great project, and we’re glad to see this make it into the finals of The Hackaday Prize.


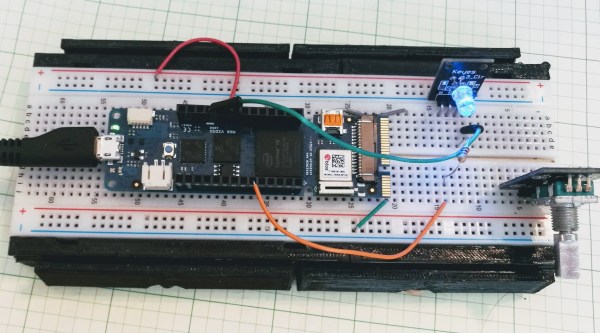
Hands-On With New Arduino FPGA Board: MKR Vidor 4000

Hackaday brought you a first look the Arduino MKR Vidor 4000 when it announced. Arduino sent over one of the first boards so now we finally have our hands on one! It’s early and the documentation is still a bit sparse, but we did get it up and running to take the board through some hello world exercises. This article will go over what we’ve been able to figure out about the FPGA system so far to help get you up and running with the new hardware.

Continue reading “Hands-On With New Arduino FPGA Board: MKR Vidor 4000”

A Stereo Tube Amp For Less Than $5

Many of us have aspirations of owning a tube amp. Regardless of the debate on whether or not tube audio is nicer to listen to, or even if you can hear the difference at all, they’re gorgeous to look at. However, the price of buying one to find out if it floats your boat is often too high to justify a purchase.

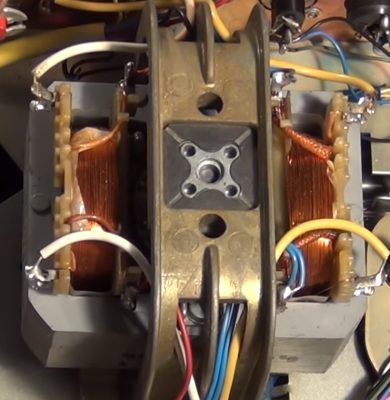
A motor transformer

[The Post Apocalyptic Inventor] has built a stereo tube amplifier in the style of the Fallout video games. The idea came when he realised that the TK 125 tape recorder manufactured by Grundig was still using tube audio in the late 60s. What’s more, they frequently sell on eBay for 1-10€ in Germany. [TPAI] was able to salvage the main power amplifier from one of these models, and restore it so that it could be re-purposed and see use once more.

The teardown of the original cassette recorder yields some interesting parts. Firstly, an integrated motor transformer — an induction motor whose stator acts as the magnetic core of the transformer responsible for the tube electronics. There’s also an integrated capacitor which contains three separate electrolytics. The video after the break is well worth a watch (we always find [TPAI]’s videos entertaining).

A new chassis is created out of a steel base plate and aluminium angle, and some neat frames for the motor transformers are made from scrap copper wire bent and soldered together. It looks great, though there’s always the option to use a cake tin instead.

If you’re interested in the design of tube amps, we’ve covered heaps of cool builds: from this low-voltage design to this tiny guitar amp, or even ones using tubes which are flat.

Continue reading “A Stereo Tube Amp For Less Than $5”

Video Review: AND!XOR DEF CON 26 Badge

The AND!XOR team have somehow managed to outdo themselves once again this year. Their newest unofficial hardware badge for DEF CON 26 just arrived. It’s a delightful creation in hardware, software, and the interactive challenges built into both.

They call this the “Wild West of IoT”, a name that draws from the aesthetic as well as the badge-to-badge communications features. Built on the ESP32-WROVER module which brings both WiFi and Bluetooth to the party, the badges are designed to form a wireless botnet at the conference. Anyone with a badge can work to advance their level and take more and more control of the botnet as they do.

Check out the video overview and then join me below for a deeper dive into all this badge has to offer.

Continue reading “Video Review: AND!XOR DEF CON 26 Badge”

Side Channel Attacks Against Mixed Signal Microcontrollers

You shouldn’t transmit encryption keys over Bluetooth, but that’s exactly what some popular wireless-enabled microcontrollers are already doing. This is the idea behind Screaming Channels, an exploit published by researchers at EUERCOM, and will be a talk at Black Hat next week. So far, the researchers have investigated side-channel attacks on Bluetooth-enabled microcontrollers, allowing them to extract tinyAES keys from up to 10 meters away in controlled environments. A PDF of the paper is available and all the relevant code is available on GitHub.

The experimental setup for this exploit consisted of a BLE Nano, a breakout board for a Nordic nRF52832 Bluetooth microcontroller, a Hack RF, a USRB N210 software defined radio from Ettus, and a few high-gain antennas and LNAs. The example attack relies on installing firmware on the BLE Nano that runs through a few loops and encrypts something with tinyAES. Through very careful analysis of the RF spectrum, the AES keys can be extracted from the ether.

Side channel attacks have received a bit more popularity over recent years. What was once limited to Three Letter Agency-level Van Eck phreaking can now be done inexpensively and in a system with devices like the ChipWhisperer.

Of course, this is only a demonstration of what is possible with side-channel attacks in a highly controlled environment with a significant amount of work gone into the firmware running on the microcontroller. This isn’t evidence that balaclava-wearing hackers are sniffing your phone from across the parking lot to get the password to your Instagram account, but it does show what is possible with relatively cheap, off-the-shelf hardware.

Amiga Repairs Put One Tough Little Machine Back In Service

Returning a piece of retro hardware to factory condition is generally a labor of love for the restorationist. A repair, on the other hand, is more about getting a piece of equipment back into service. But the line between repair and restoration is sometimes a fine one, with the goals of one bleeding over into the other, like in this effort to save an otherwise like-new Amiga 2000 with a leaky backup battery.

Having previously effected emergency repairs to staunch the flow of electrolyte from the old batteries and prevent further damage, [Retromat] entered the restoration phase of the project. The creeping ooze claimed several caps and the CPU socket as it spread across the PCB, but the main damage was to the solder resist film itself. In the video below you can clearly see flaky, bubbly areas in the mask where the schmoo did its damage.

Using a fiberglass eraser, some isopropyl alcohol, and far more patience than we have, [Retromat] was able to remove the damaged resist to reveal the true extent of the damage below. Thankfully, most of the traces were still intact; only a pair of lines under the CPU socket peeled off as he was removing it. After replacing them with fine pieces of wire, replacing the corroded caps and socket, and adding a coin-cell battery holder to replace the old battery, the exposed traces were coated with a varnish to protect them and the machine was almost as good as new.

Amigas were great machines in their day and launched more than one business. They’ve proved their staying power too, some even in mission-critical roles.

Continue reading “Amiga Repairs Put One Tough Little Machine Back In Service”

The Nitty-Gritty Of Making A Brass Clock

Among all the timepieces that we feature here at Hackaday, surprisingly we bring you relatively few clocks. That might seem an incomprehensible statement given the plethora of, well, clocks, that appear here, but it’s one that hinges upon the type of clock. Electronic clocks of extreme skill, complexity, and beauty, yes, but traditional mechanical clocks? Not so many.

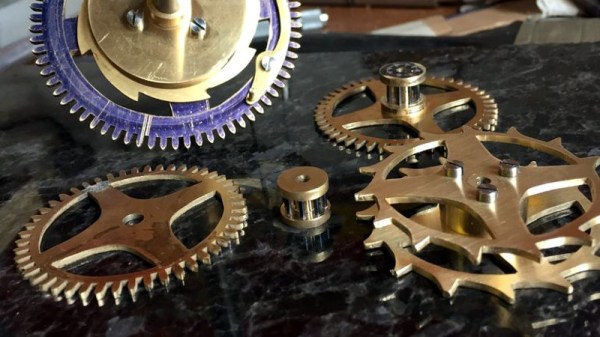
So [Thonemeister]’s wall-mounted brass alarm clock was a welcome sight on our tips line, and his write-up is a fascinating exposition of the path taken by a novice clockmaker on their first build. He starts by describing his workshop, then steps methodically through each of the constituent parts of the clock.

We see the frame, escapement mechanism, gears, and movement taking shape, and we learn something about clockmaker’s tools from the pitfalls he encountered. He was a complete lathe novice at the start of this build, and it’s fun to follow along with his learning curve. As we see thed finished clock taking shape, we even get to see the little touches like forming the hooks for the weights. He bought the bell for the clock off-the-shelf, not wishing to expend the considerable piece of brass stock it would have taken to machine it himself. But for the most part, this is an engaging scratch build you won’t want to miss.

Many of us will never make a traditional clock. But that need not stop us finding the work that goes into one an extremely fascinating read. We have more for you if this has whetted your appetite: you’ll be interested in the escapement mechanism, and if brass is a bit much, how about wood?