
Sometimes, startups fail due to technical problems or a lack of interest from potential investors and fail to gain development traction. This latter case appears to be the issue befalling A3 Audio. So, the developers have done the next best thing, made the project open source, and are actively looking for more people to pitch in. So what is it? The project is centered around the idea of spatial audio or 3D audio. The system allows ‘audio motion’ to be captured, mixed and replayed, all the while synchronized to the music. At least that’s as much as we can figure out from the documentation!
The system is made up of three main pieces of hardware. The first part is the core (or server), which is essentially a Linux PC running an OSC (Open Sound Control) server. The second part is a ‘motion sampler’, which inputs motion into the server. Lastly, there is a Mixer, which communicates using the OSC protocol (over Ethernet) to allow pre-mixing of spatial samples and deployment of samples onto the audio outputs. In addition to its core duties, the ‘core’ also manages effects and speaker handling.
The motion module is based around a Raspberry Pi 4 and a Teensy microcontroller, with a 7-inch touchscreen display for user input and oodles of NeoPixels for blinky feedback on the button matrix. The mixer module seems simpler, using just a Teensy for interfacing the UI components.
We don’t see many 3D audio projects, but this neat implementation of a beam-forming microphone phased array sure looks interesting.


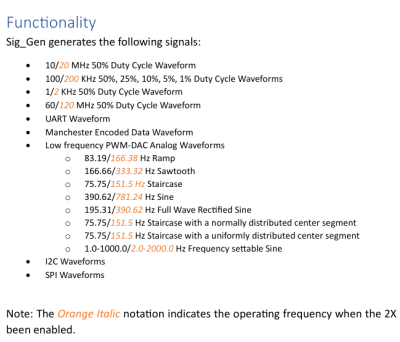 Despite the name it’s not a signal generator as we know it, as it’s not flexible in the signals it generates. Instead, it creates a dozen signals at more or less the same time — from square waves of various frequencies and duty cycles, to a PWM-driven DAC driving eight different waveforms, to Manchester-encoded data I2C/SPI/UART transfers for all your protocol decoder testing.


