Remote Controlling A Dog

Until the industrial revolution, humans made use of animals to make our labor easier. This is still seen in some niche areas, like how no machine yet has been invented that’s as good at sniffing out truffles as pigs are. [William] has hearkened back to humanity’s earlier roots, but in a more modern twist has made something of a general purpose dog that could feasibly do any work imaginable. Now his dog is remote-controlled.

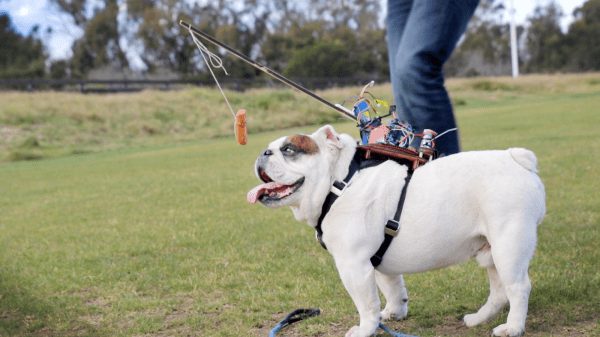
[William] accomplished the monumental task in a literally cartoonish fashion using the old trope of hanging a hot dog in front of something’s face to get them to chase it. The attachment point was fitted with a remote control receiver and an actuator to get the hanging hot dog to dangle a little bit more to the dog’s right or left, depending on where the “operator” wants the dog to go. [William]’s bulldog seems to be a pretty good sport about everything and isn’t any worse for wear either.

Believe it or not, there has been some actual research done into remote controlling animals, although so far it’s limited to remote-controlled cockroaches. We like the simplicity of the remote-controlled dog, though, but don’t expect to see these rigs replacing leashes anytime soon!

Continue reading “Remote Controlling A Dog”

AT To XT Keyboard Adapter

If you got an old PC/XT stored somewhere in basement and want to use a newer keyboard, here’s a little project you might like. [Matt] built an AT2XT keyboard adapter on a prototype board using an AT to PS/2 keyboard cable. An AT2XT keyboard adapter basically allows users to attach AT keyboards to XT class computers, since the XT port is electronically incompatible with PC/AT keyboard types. For those retro computing fans with a lot of old PCs, this trick will be great to connect the XT machines to a KVM (keyboard/Video/Mouse) switch.

[Matt] found schematics for the project on the Vintage Computer Federation Forum, but used a PIC12F675 instead of the specified PIC12F629. He does provide the .hex file for his version but unfortunately no code. You could just burn the .hex file or head up to the original forum and grab all files to make your own version. The forum has the schematics, bill of materials, PCB board layout and firmware (source code and .hex), so you just need to shop/scavenge for parts and get busy.

And if you are felling really 31337, you can make a PS/2 version of the binary keyboard to justify the use of your new adapter.

[via DangerousPrototypes]

Persistence of vision Death Star

Persistence Of Vision Death Star

Death Stars were destroyed twice in the Star Wars movies and yet one still lives on in this 168 LED persistence of vision globe made by an MEng group at the University of Leeds in the UK. While Death Stars are in high demand, they mounted it on an axis tilted 23.4° (the same as the Earth) so that they can show the Earth overlaid with weather information, the ISS position, or a world clock.

More details are available on their system overview page but briefly: rotating inside and mounted on the axis is a Raspberry Pi sending either video or still images through its HDMI port to a custom made FPGA-based HDMI decoder board.  That board then controls 14 LED driver boards mounted on a well-balanced aluminum ring. All that requires 75W which is passed through a four-phase commutator. Rotation speed is 300 RPM with a frame rate of 10 FPS and as you can see in the videos below, it works quite well.

Continue reading “Persistence Of Vision Death Star”

Lego Boosts Their Robotic Offering

Kids often have their first exposure to robots in school using Lego Mindstorm kits. Now Lego is rolling out Boost — a robotic kit targeting all Lego builders from 7 years old and up. The kit is scheduled to be on the market later this year (it appeared at the recent CES) and will sell for about $160.

[The Brothers Brick] had a chance to try the kit out at CES (see the video below) and you might find their review interesting. The kit provides parts and instructions to build five different models: a cat, a robot, a guitar, a 3D printer, and a tracked vehicle. You can check out the official page, too.

Continue reading “Lego Boosts Their Robotic Offering”

A Motherboard Manufacturer’s Take On A Raspberry Pi Competitor

In the almost five years since the launch of the original Raspberry Pi we have seen a huge array of competitors emerge in the inexpensive single board computer market. Many have created their own form factors, but an increasing number have gone straight for the jugular of the fruity board from Cambridge by copying its form factor and interfaces as closely as possible. We’ve seen sterling efforts from the likes of Banana Pi, Odroid, and several others, but none have yet succeeded in toppling it from its pedestal.

The ASUS Tinker specification.

The latest contender in this arena might just make more of an impact though, because it comes from a major manufacturer, a name you will have heard of. Asus have quietly released their Tinker, board that follows the Pi form factor very closely, and packs a 1.8 GHz quad-core ARM Cortex A17 alongside an impressive spec we’ve captured as an image for this article. Though they are reticent about it on their website, there is a SlideShare presentation with some of the details, which we’ve placed below the break.

At £55 (about $68) where this is being written it’s more expensive than the Pi, but Asus go to great lengths to demonstrate that it is significantly faster. We will no doubt verify the accuracy of that claim as the boards find their way into the hands of our community. Still, it features a mostly-Pi-compatible I/O header, and the same display and camera connectors as the Pi. There is no information as to how compatible these last two are though.

Other boards in this arena have boasted impressive hardware, but have fallen down when it comes to the support for their operating systems. When you buy a Raspberry Pi it is not just the hardware you are taking on but the Raspbian operating system and its impressive community support. The Tinker supports Debian, so if Asus is to make a mark they must ensure that its support rivals that of the board it is targeting. If they succeed in that endeavor then the result can only be good news for us.

Continue reading “A Motherboard Manufacturer’s Take On A Raspberry Pi Competitor”

DreamBlaster X2 on a Sound Blaster Sound Card

DreamBlaster X2: A Modern MIDI Synth For Your Sound Blaster Card

Back in the 90s, gamers loaded out their PCs with Creative’s Sound Blaster family of sound cards. Those who were really serious about audio could connect a daughterboard called the Creative Wave Blaster. This card used wavetable synthesis to provide more realistic instrument sounds than the Sound Blaster’s on board Yamaha FM synthesis chip.

The DreamBlaster X2 is a modern daughterboard for Sound Blaster sound cards. Using the connector on the sound card, it has stereo audio input and MIDI input and output. If you’re not using a Sound Blaster, a 3.5 mm jack and USB MIDI are provided. Since the MIDI uses TTL voltages, it can be directly connected to an Arduino or Raspberry Pi.

This card uses a Dream SAM5000 series DSP chip, which can perform wavetable synthesis with up to 81 polyphonic voices. It also performs reverb, chorus, and equalizer effects. This chip sends audio data to a 24 bit DAC, which outputs audio into the sound card or out the 3.5 mm jack.

The DreamBlaster X2 also comes with software to load wavetables, and wavetables to try out. We believe it will be the best upgrade for your 486 released in 2017. If you’re interested, you can order an assembled DreamBlaster. After the break, a review with audio demos.

Continue reading “DreamBlaster X2: A Modern MIDI Synth For Your Sound Blaster Card”

Hidden Bookshelf Door Shows Incredible Motion

Who didn’t dream of a hidden door or secret passage in the house when they were kids? Some of us still do! [SPECTREcat] had already built a secret door in a fully functioning bookcase with a unique opening mechanism. The intriguing mechanism allows the doors to start by sliding slightly away form one another before hinging into the hidden space. Their operation was, however, was manual. The next step was to automate the secret door opening mechanism with electronics.

The project brain is an off-the-shelf Arduino Uno paired with a MultiMoto Arduino shield to drive 4 Progressive Automations PA-14 linear actuators. These linear actuators have 50lb force, allowing the doors to fully open or close within 10 seconds and maintain a speed that wouldn’t throw the books off the bookcases.

Not wanting to drill a hole through the bookshelf for a switch or other opening mechanisms, [SPECTREcat] added a reed switch that is activated on the other side by a DVD cover with a magnet inside. In addition to that, there is a PIR sensor on the inside room to automatically close the doors if no motion is detected for 2 hours. Dont worry, there’s also a manual switch inside just in case.

Using one of the items on the shelf to trigger the secret passage is a classic move. He could also have used a secret knock code, like the Secret Attic Library Door we covered in the past. Check out the video below to see the hinge and slide movement in action.

Continue reading “Hidden Bookshelf Door Shows Incredible Motion”