Light Pipes And LEDs Team Up For A Modern Take On The Nixie Tube

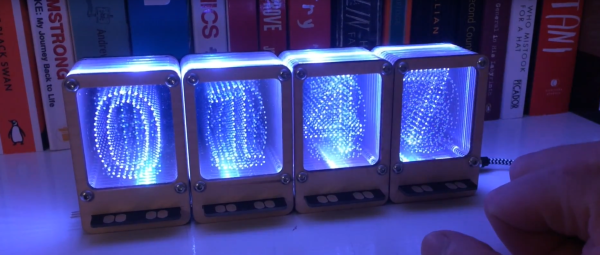
There’s no doubting the popularity of Nixie tubes these days. They lend a retro flair to modern builds and pop up in everything from clocks to weather stations. But they’re not without their problems — the high voltage, the limited tube life, and the fact that you can have them in any color you want as long as it’s orange. Seems like it might be time for a modern spin on the Nixie that uses LEDs and light pipes. Meet Nixie Pipes.

Inspired by an incandescent light-pipe alphanumeric display from a 1970s telephone exchange, [John Whittington]’s design captures the depth and look of a Nixie by using laminated acrylic sheets. Each layer is laser etched with dots in the shape of a character or icon, and when lit from below by a WS2812B LED, the dots pick up the light and display the character in any color. [John]’s modular design allows one master and an arbitrary number of slaves, so large displays can simply be plugged together. [John] is selling a limited run of the Nixie Pipes online, but he’s also open-sourced the project so you can build your own modules.

We really like the modularity and flexibility of Nixie Pipes, and the look is pretty nice too. Chances are good that it won’t appeal to the hardcore Nixie aficionado, though, in which case building your own Nixies might be a good project to tackle.

Continue reading “Light Pipes And LEDs Team Up For A Modern Take On The Nixie Tube”

Raspberry Pi Camera Flash

The Raspberry Pi Camera is a great tool; it allows projects that require a camera to be put together quickly and on a budget. Plus, having a Linux back end for a little processing never hurt anybody. What can be difficult however, is imaging in low light conditions. Most smartphones have an LED flash built in for this purpose. [Wim Van Gool] decided to follow suit and build an LED flash for the Raspberry Pi.

The project consists of a custom PCB with surface-mount LEDs in an attractive concentric layout. This is a good way to get a nice even distribution of light, particularly when taking photos close up. The board is designed around the Texas Instruments TPS61169 LED driver, which is controlled by a PWM signal from the Raspberry Pi. The flash mounts as a Raspberry Pi HAT, and there’s a hole routed in the centre to allow the camera to fit in nice and snug when using standard 11mm standoffs. It might seem simple, but it’s an impressively tidy piece of engineering and a testament to [Wim]’s abilities.

The Raspberry Pi Camera turns up in all sorts of projects — like these far-seeing PiNoculars.

New Part Day: Better Pins

If you’re making a circuit that is designed to plug into a breadboard, you have a problem. Those 0.1″ header pins are square, and the metal leaf contacts inside a solderless breadboard will eventually get bent out of shape. You only need to look at the breadboards in a university electronics lab for evidence of this.

The solution to this problem is to make pins that are as similar as possible to the leads on DIP chips. They should be flat, of course, and it would be nice if they didn’t have those plastic spacers and didn’t present a blob of solder on the top side of the chip.

Flip-Pins are the answer. Think of them as standard pin headers, but meant for breadboard applications, and having a great aesthetic for your projects. They’re designed to look as much like standard IC pins as possible, and have the same thickness (0.020″) as standard DIP leads.

The application of Flip-Pins is a lot like soldering standard 0.1″ pin headers. The pins ship in neat little plastic retainers and can be tacked onto a PCB with just a little bit of solder. There’s a datasheet, and models for Altium, KiCad, and Eagle.

Flip-Pins grew out of another project, the OSHChip, to create an all-in-wonder chip containing an ARM microcontroller, radio, and a crossbar so any pin can be mapped to any peripheral. The OSChip itself is very cool, but one question constantly asked of the creator of this neat chip was, ‘where did you get those pins?’ From a factory. Now you can buy these pins from Evil Mad Scientist and Tindie. They’re a bit pricey, but they do look great.

Practical Deep Learning

Deep Learning — the use of neural networks with modern techniques to tackle problems ranging from computer vision to speech recognition and synthesis — is certainly a current buzzword. However, at the core is a set of powerful methods for organizing self-learning systems. Multi-layer neural networks aren’t new, but there is a resurgence of interest primarily due to the availability of massively parallel computation platforms disguised as video cards.

The problem is getting started in something like this. There are plenty of scholarly papers that can be hard to wade through. Or you can grab some code from GitHub and try to puzzle it out.

A better idea would be to take a free class entitled: Practical Deep Learning for Coders, Part 1. The course is free unless you count your investment in time. They warn you to expect to commit about ten hours a week for seven weeks to complete the course. You can see the first installment in the video, below. Continue reading “Practical Deep Learning”

An Eye-Catching Raspberry Pi Smart Speaker

[curcuz]’s BoomBeastic mini is a Raspberry Pi based smart connected speaker. But don’t dis it as just another media center kind of project. His blog post is more of a How-To guide on setting up container software, enabling OTA updates and such, and can be a good learning project for some. Besides, the design is quite elegant and nice.

boombeastic_02The hardware is simple. There’s the Raspberry-Pi — he’s got instructions on making it work with the Pi2, Pi2+, Pi3 or the Pi0. Since the Pi’s have limited audio capabilities, he’s using a DAC, the Adafruit I2S 3W Class D Amplifier Breakout for the MAX98357A, to drive the Speaker. The I2S used by that part is Inter-IC Sound — a 3 wire peer to peer audio bus — and not to be confused with I2C. For some basic visual feedback, he’s added an 8×8 LED matrix with I2C interface. A Speaker rounds out the BoM. The enclosure is inspired by the Pimoroni PiBow which is a stack of laser cut MDF sheets. The case design went through four iterations, but the final result looks very polished.

On the software side, the project uses Mopidy — a Python application that runs in a terminal or in the background on devices that have network connectivity and audio output. Out of the box, it is an MPD and HTTP server. Additional front-ends for controlling Mopidy can be installed from extensions, enabling Spotify, Soundcloud and Google Music support, for example. To allow over-the-air programming, [curcuz] is using resin.io which helps streamline management of devices that are hard to reach physically. The whole thing is containerized using Docker. Additional instructions on setting up all of the software and libraries are posted on his blog post, and the code is hosted on GitHub.

There’s a couple of “To-Do’s” on his list which would make this even more interesting. Synced audio being one: in a multi-device environment, have the possibility to sync them and reproduce the same audio. The other would be to add an Emoji and Equalizer display mode for the LED matrix. Let [curcuz] know if you have any suggestions.

Continue reading “An Eye-Catching Raspberry Pi Smart Speaker”

Cheap Powerbank Logic And Teardown

A fixture on many British high streets are pound shops. You may have an equivalent wherever in the world you are reading this; shops in which everything on sale has the same low price. They may be called dollar stores, one-Euro stores, or similar. In this case a pound, wich translates today to a shade under $1.24.

Amid the slightly random selection of groceries and household products are a small range of electronic goods. FM radios, USB cables and hubs, headphones, and mobile phone accessories. It was one of these that caught [Julian Ilett]’s eye, a USB power bank. (Video embedded below.)

You don’t get much for a quid, and it shows in this product. A USB cable that gets warm at the slightest current, a claimed 800 mA of output at 5V from a claimed 1200 mAh capacity, and all from an 18650 Li-ion cell of indeterminate origin. The active component is an FM9833E SOIC-8 switching regulator and charger (220K PDF data sheet, in Chinese).

A straightforward teardown of a piece of near-junk consumer electronics would not normally be seen as something we’d tempt you with, but [Julian] goes on to have some rather pointless but entertaining fun with these devices. If you daisy-chain them, they can be shown to have the properties of rudimentary digital logic, and in the video we’ve put below the break it is this that he proceeds to demonstrate. We see a bistable latch, a set-reset latch, a very slow astable multivibrator, and finally he pulls out a load more power banks for a ring oscillator.

If only [MacGyver] had found himself trapped in a container of power banks somewhere from which only solving a complex mathematical conundrum could release him, perhaps he could have fashioned an entire computer! The best conclusion is the one given at the end of the video by [Julian] himself, in which he suggests (and we’re paraphrasing here) that if you feel the idea to be unworthy of merit, you can tell him so in the comments.

Continue reading “Cheap Powerbank Logic And Teardown”

Alan Yates: Why Valve’s Lighthouse Can’t Work

[Alan Yates] is a hacker’s engineer. His job at Valve has been to help them figure out the hardware that makes virtual reality (VR) a real reality. And he invented a device that’s clever enough that it really should work, but difficult enough that it wasn’t straightforward how to make it work.

In his presentation at the Hackaday Supercon 2016, he walked us through all of the design and engineering challenges that were eventually conquered in getting the Lighthouse to market. We’re still a bit overwhelmed by the conceptual elegance of the device, so it’s nice to have the behind-the-scenes details as well.

Continue reading “Alan Yates: Why Valve’s Lighthouse Can’t Work”