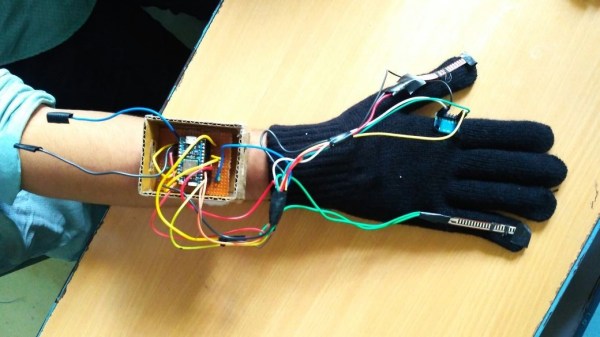
Raspberry Pi Zero, Or Minus One?

The Wall Street Journal reported that [Eric Schmidt] of Google and now Alphabet Inc, promoted the idea of an inexpensive version of the Raspberry Pi to the Raspberry Pi foundation’s [Eben Upton]. Apparently [Upton] accepted this recommendation despite existing plans to make a more expensive, more powerful version of the Pi. The outcome is the Raspberry Pi Zero that sells, in some places, for $5.00 and was given away for free on the cover of the MagPi magazine.

From the WSJ article:

“He [Schmidt] said it was very hard to compete with cheap. He made a very compelling case. It was a life-changing conversation,” Mr. Upton said, adding that he went back to the lab and scrapped all the engineering plans for more expensive versions of future Pi computers. “The idea was to make a more powerful thing at the same price, and then make a cheaper thing with the same power.”

Plans were scrapped. The more powerful Pi 2 was released at the price point of existing Pis, and now we have the Zero.

Pi’s Purpose

Foundation Mission

The Raspberry Pi Foundation is a registered educational charity in the UK. The purpose of this Foundation according to their About Us page is to, ‘advance the education of adults and children, particularly in the field of computers, computer science, and related subjects.’

Why is the Raspberry Pi Foundation so concerned about computer education? From the 1990s onward, fewer and fewer A Level students in the UK applying to study Computer Science had previous experience as hobbyist programmers. An applicant in the 2000s usually might have only done a little web design.

Why then does the Raspberry Pi Zero exist? [Upton] also told Cnet, “We really hope this is going to get those last few people in the door and involved in computer programming.”

Very good, but how well does the Zero support this goal or address their concerns?

Continue reading “Raspberry Pi Zero, Or Minus One?”

A Short History Of AI, And Why It’s Heading In The Wrong Direction

Sir Winston Churchill often spoke of World War 2 as the “Wizard War”. Both the Allies and Axis powers were in a race to gain the electronic advantage over each other on the battlefield. Many technologies were born during this time – one of them being the ability to decipher coded messages. The devices that were able to achieve this feat were the precursors to the modern computer. In 1946, the US Military developed the ENIAC, or Electronic Numerical Integrator And Computer. Using over 17,000 vacuum tubes, the ENIAC was a few orders of magnitude faster than all previous electro-mechanical computers. The part that excited many scientists, however, was that it was programmable. It was the notion of a programmable computer that would give rise to the ai_05idea of artificial intelligence (AI).

As time marched forward, computers became smaller and faster. The invention of the transistor semiconductor gave rise to the microprocessor, which accelerated the development of computer programming. AI began to pick up steam, and pundits began to make grand claims of how computer intelligence would soon surpass our own. Programs like ELIZA and Blocks World fascinated the public and certainly gave the perception that when computers became faster, as they surely would in the future, they would be able to think like humans do.

But it soon became clear that this would not be the case. While these and many other AI programs were good at what they did, neither they, or their algorithms were adaptable. They were ‘smart’ at their particular task, and could even be considered intelligent judging from their behavior, but they had no understanding of the task, and didn’t hold a candle to the intellectual capabilities of even a typical lab rat, let alone a human.

Continue reading “A Short History Of AI, And Why It’s Heading In The Wrong Direction”

Listening To The Sounds Of The Earth

A geophone is a specially built microphone for listening to the Earth. [JTAdams] found them at a reasonable price so bought some to play with. A geophone is used to detect vibrations from earthquakes, explosions, rumbling trucks, and vibroseis vehicles. To be useful it needs an amplifier and a recording device to capture the signals.

24

[JTAdams] used a standard amplifier design for an LT1677 op-amp, fed the signal to an MCP3008 A/D converter, and read the output using a Raspberry Pi. A Python script records the data to a CSV file for processing. The Pi worked well because the entire setup needs to be portable to take into the field. Another Python script plots the data which is made available from a web page. A neat simple way of presenting the raw data. [JTAdams] promises more information in the future on post-processing the data. You don’t need a geophone to detect seismic waves if you build your own, but a real ‘phone will be more rugged.

Oh, what’s a vibroseis? It’s a truck with a big flat plate underneath it. The plate is hydraulically lowered to the ground until the weight of the truck is on it. The truck then causes the plate to vibrate, usually sweeping from around 10 hz to 100 hz. This infrasound pass through the ground until it is reflected back by underlying rock layers. A long string of geophones, think 1,000s of feet, detects the waves, which are recorded. In practice, many trucks are used to generate a synchronized signal of sufficient strength. Or, you can set off an explosion which is the technique used in water. Typically the information is used for oil and gas exploration.  A video of one of the trucks in action after the break.

Continue reading “Listening To The Sounds Of The Earth”

Matthias Builds A Belt Sander

[Matthias Wandel] is the preeminent YouTube woodworker, with dozens of machines constructed from wooden gears, amazing machines that produce perfect mortise and tenons, and home-built table saws and jointers. Actually building something instead of buying it is a hallmark of [Matthias]’ channel, and he’s at it again, building his own woodworking machines. This time it’s a 1″ wide belt sander. Of course anyone can go out and simply buy one of these sanders for under $100, but what’s the point in that when you can build one out of plywood and a motor you picked out of the trash?

The design of this belt sander – just like the commercial version he’s improving upon – uses three wheels to guide the 42″ long strip of sandpaper around its course. [Matthias] is using rollerblade wheels for the front wheels. Rollerblade wheels aren’t the best shape for bearings, this can be fixed by using a table saw as a lathe. Yes, [Matthias] lathes with a table saw. He’s just that good.

The rest of the frame was carefully constructed out of plywood and powered by a 1/3 horsepower furnace fan motor pulled from the trash. There are a few interesting features that make this belt sander exceptionally useful: a rounded platen behind the belt makes sanding interior corners very easy, and is something that isn’t usually found on commercial belt sanders.

You can check out [Matthias]’ video below.

Continue reading “Matthias Builds A Belt Sander”

Conjuring Capacitive Touch Sensors From Paper And Aluminum Foil

Stumbling around YouTube, we found what has to be the lowest-tech method of producing a touchpad to make a capacitive touch keyboard, and we just had to share it with you. If you’re afraid of spoilers, skip down to the video below the break now.

[James Eckert] got his hands on a Freescale MPR121 capacitive touch sensor. The chip in question speaks I2C and senses up to twelve simultaneous capacitive sense electrodes; break-out boards are available in all of the usual places. It’s a sweet little part.

So [James] had to make a twelve-key capacitive keyboard on the quick. He printed out a key template on paper — something that he does often in his woodwork — and spray-glued aluminum foil on the back side. The video doesn’t say how many hours he spent with the razor blade tracing it all out, but the result is a paper, foil, and packing tape keyboard that seems to work just fine.

A pin-header was affixed to the foil with conductive paint and more tape. If you’ve ever tried soldering directly to aluminum foil, you’d know why. (And if you’ve got any other good tips for connecting electrically to aluminum foil, we’d love to hear them.)

Continue reading “Conjuring Capacitive Touch Sensors From Paper And Aluminum Foil”

Easy Power Supply Mod Takes Control

Inexpensive bench top power supplies are great for the home hobbyist, featuring wide voltage range and current limiting for a low price. What’s not to love? The controls; most have a single-turn pot that is typically very fidgety, especially at low voltage.

The solution is to replace the factory pots with nice wire-wound 10 turn units in order to gain 10x the precision. Of course nothing is ever drop in, the new pots didn’t fit the old holes, but that is nothing a few moments with a drill can’t fix. Also the original knobs no longer fit, but that’s just an opportunity for a knob upgrade.

The end result is still a power supply with fidgety controls, but instead of holding your breath, tippy tapping knobs to get within 100mV of your target, you can dial right in to within 10mV of your target. That makes life much easier, especially on low voltage projects that may not have power regulation quite yet.

Join us after the break for a video with all the info.

Continue reading “Easy Power Supply Mod Takes Control”

KiCad 4.0 Is Released

If you’re a KiCad user, as many of us here at Hackaday are, you’ll be elated to hear that KiCad 4.0 has just been released! If you’re not yet a KiCad user, or if you’ve given it a shot in the past, now’s probably a good time to give it a try. (Or maybe wait until the inevitable 4.0.1 bugfix version comes out.)

If you’ve been using the old “stable” version of KiCad (from May 2013!), you’ve got a lot of catching-up to do.

The official part footprint libraries changed their format sometime in 2014, and are all now hosted on GitHub in separate “.pretty” folders for modularity and ease of updating. Unfortunately, this means that you’ll need to be a little careful with your projects until you’ve switched all the parts over. The blow is softened by a “component rescue helper” but you’re still going to need to be careful if you’re still using old schematics with the new version.

The most interesting change, from a basic PCB-layout perspective, is the push-and-shove router. We’re looking for a new demo video online, but this one from earlier this year will have to do for now. We’ve been using various “unstable” builds of KiCad for the last two years just because of this feature, so it’s awesome to see it out in an actual release. The push-and-shove router still has some quirks, and doesn’t have all the functionality of the original routers, though, so we often find ourselves switching back and forth. But when you need the push-and-shove feature, it’s awesome.

If you’re doing a board where timing is critical, KiCad 4.0 has a bunch of differential trace and trace-length tuning options that are something far beyond the last release. The 3D board rendering has also greatly improved.

Indeed, there are so many improvements that have been made over the last two and a half years, that everybody we know has been using the nightly development builds of KiCad instead of the old stable version. If you’ve been doing the same, version 4.0 may not have all that much new for you. But if you’re new to KiCad, now’s a great time to jump in.

We’ve covered KiCad hacks before, and have another article on KiCad add-on utilities in the pipeline as we write this. For beginners, [Chris Gammell]’s tutorial video series is still relevant, and is a must-watch.

Thanks [LC] for the newsworthy tip!