Discussing The Finer Points Of Space-Worthy Software

At the dawn of the Space Race, when computers were something that took up whole rooms, satellites and probes had to rely on analog electronics to read from their various sensors and transmit the resulting data to the ground. But it wasn’t long before humanity’s space ambitions outgrew these early systems, which lead to vast advancements in space-bound digital computers in support of NASA’s Gemini and Apollo programs. Today, building a spacecraft without an onboard computer (or even multiple redundant computers) is unheard of. Even the smallest of CubeSats is likely running Linux on a multi-core system.

Jacob Killelea

As such, software development has now become part an integral part of spacecraft design — from low-level code that’s responsible for firing off emergency systems to the 3D graphical touchscreen interfaces used by the crew to navigate the craft. But as you might expect, the stakes here are higher than any normal programming assignment. If your code locks up here on Earth, it’s an annoyance. If it locks up on a lunar lander seconds before it touches down on the surface, it could be the end of the mission.

To get a bit more insight into this fascinating corner of software development, we invited Jacob Killelea to host last week’s
Software for Satellites Hack Chat. Jacob is an engineer with a background in both aero and thermodynamics, control systems, and life support. He’s written code for spacecraft destined for the Moon, and perhaps most importantly, is an avid reader of Hackaday.

Continue reading “Discussing The Finer Points Of Space-Worthy Software”

DisplayPort: Under The Hood

Last time, we looked at all the things that make DisplayPort unique for its users. What about the things that make it unique for hackers? Let’s get into all the ways that DisplayPort can serve you on your modern tech wrangling adventures.

You Are Watching The AUX Channel

With DisplayPort, the I2C bus we’ve always seen come bundled with VGA, DVI and HDMI, is no more – it’s been replaced by the AUX bus. AUX is a 1 MHz bidirectional diffpair – just a bit too complex for a cheap logic analyzer, though, possibly, something you could wrangle with the RP2040’s PIOs. Hacking thoughts aside, it’s a transparent replacement for I2C, so that software doesn’t have to be rewritten – for instance, it usually does I2C device passthrough over AUX, so that EDID data can still be stored in a separate EEPROM chip on the monitor or eDP LCD panel.

AUX isn’t just a differential bus, it’s more pseudodifferential, like USB2 – for instance, AUX_P and AUX_N are used separately, with a combination of 1 MΩ and 100 kΩ pullups and pulldowns signaling different states of the physical connection – for instance, a pullup on AUX+ and a pulldown on AUX- means that an external device has been connected. If you’d like to learn which combination of resistors means what, you can find in the DisplayPort specification, which isn’t distributed openly but isn’t hard to come by, either.

Also, DisplayPort link training happens over AUX, and in order to facilitate that, a piece of DisplayPort controller’s external memory is usually exposed over the AUX channel, through a mechanism that’s called DPCD. If you dig a bit, using “DPCD” as the keyword, you can easily reach into the lower-level details of your DisplayPort connection. Some of the DPCD memory map is static, and some parts are FIFOs you can funnel data into, or out of. You can find a wide variety of documents online which describe the DPCD structure – for now, here’s a piece of Bash that works on Linux graphics drivers for AMD and Intel, and will show you you the first 16 bytes of DPCD:

# sudo dd if=/dev/drm_dp_aux0 bs=1 skip=256 count=16 |xxd
00000000: 0084 0000 0000 0000 0108 0000 0000 0000 ................
[...]

In particular, the 4th nibble (digit) here describes the amount of lanes for the DisplayPort link established – as you can see, my laptop uses a four-lane link. Also, the /dev/drm_dp_aux0 path might need to be adjusted for your device. In case you ever want to debug your DP link, having direct access to the DPCD memory space like this might help you quite a bit! For now, let’s move onto other practical aspects. Continue reading “DisplayPort: Under The Hood”

Hackaday Links Column Banner

Hackaday Links: July 16, 2023

Last week, we noted an attempt to fix a hardware problem with software, which backfired pretty dramatically for Ford when they tried to counter the tendency for driveshafts to fall out of certain of their cars by automatically applying the electric parking brake.

This week, the story is a little different, but still illustrates how software and hardware can interact unpredictably, especially in the automotive space. The story centers on a 2015 Optima recall for a software update for the knock sensor detection system. We can’t find the specifics, but if this recall on a similar Kia model in the same model year range and a class-action lawsuit are any indication, the update looks like it would have made the KSDS more sensitive to worn connecting rod damage, and forced the car into “limp home mode” to limit damage to the engine if knocking is detected.

A clever solution to a mechanical problem? Perhaps, but because the Kia owner in the story claims not to have received the snail-mail recall notice, she got no warning when her bearings started wearing out. Result: a $6,000 bill for a new engine, which she was forced to cover out of pocket. Granted, this software fix isn’t quite as egregious as Ford’s workaround for weak driveshaft mounting bolts, and there may very well have been a lack of maintenance by the car’s owner. But if you’re a Kia mechanical engineer, wouldn’t your first instinct have been to fix the problem causing the rod bearings to wear out, rather than papering over the problem with software?

Continue reading “Hackaday Links: July 16, 2023”

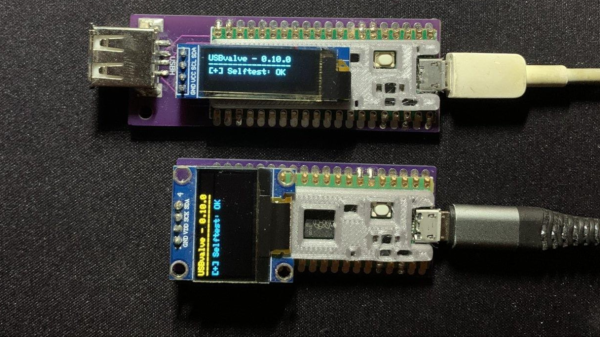
two USBValve devices on a table, both with a USB cable plugged in. The top one with a long narrow OLED display and the bottom one with a 128x64 OLED display.

Sleuth Untrusted USB Communication With USBValve

USB devices are now ubiquitous and, from an information security standpoint, this is a terrifying prospect as malicious software can potentially be injected into a system by plugging in a compromised USB stick. To help get some piece of mind, [Cesare Pizzi] created USBValve to help expose suspicious USB activity on the fly.

The idea behind USBValve is to have the onboard microcontroller advertise itself as a storage device, pretending to have a filesystem with some common files available. When an unknown USB device is first inserted into the USB port on the USBValve tool, USBValve displays usage information, via the attached OLED screen, on whether the USB device is accessing files it shouldn’t be or immediately trying to write to the filesystem, which is a clear sign of malicious behavior.

The USBValve hardware is a straight forward composition of a Raspberry Pi Pico, an tiny I2C OLED screen and an optional PCB carrier board with a 3D printed spacer. The software uses Adafruit’s Tiny USB library along with the SSD1306AsciiWire library to drive the OLED display. And it’s all open source, including the code and PCB design files.

There’s a lot of security fun to be had with USB, from DIY dirt cheap Rubber Duckies to open source hardware Rubber Duckies, to discussions on the BadUSB exploits. The simplicity of the USBValve project allows it to be low cost, easy to use and can provide concise, critical information for a variety of real world threats.

After the break, be sure to check out [Cesare Pizzi]’s talk about USBValve at the SCC Insomnihack conference which has a wealth of information on how it fares against some known malware attacks, discussions on some of its shortcomings and potential avenues for improvement.

Thanks to [watchdog] for the tip!

Continue reading “Sleuth Untrusted USB Communication With USBValve”

Gravity Wave Detector Is Galactic Sized

Detecting gravity waves isn’t easy. But what if you had a really big detector for a long time? That’s what researchers did when they crunched 15 years’ worth of data from the NANOGrav data set. The data was collected from over 170 radio astronomers measuring millisecond pulsars as a way to potentially detect low-frequency gravity waves.

Millisecond pulsars spin fast and make them ideal for the detection of low-frequency gravity waves, which are difficult to detect. The bulk of the paper is about the high-powered data analysis for a very large data set.

Continue reading “Gravity Wave Detector Is Galactic Sized”

Pi Zero Runs DOOM Via Wireless Power

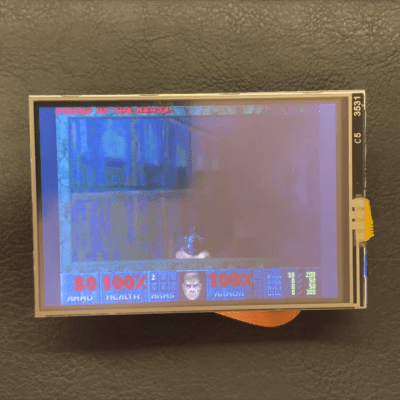
What’s better than a Raspberry Pi Zero running DOOM on a 3.5″ touchscreen? Running it over wireless power, of course!

[atomic14] has been interested in wireless power for a while, and while most of the hardware he’s tested over the years has been less than impressive, he demonstrates one that’s able to reliably deliver 5 V at about 1 A which is more than enough to boot a Raspberry Pi W2 into X and launch DOOM. But while that’s neat, he explains that wireless power isn’t quite yet an effortless solution.

The hardware can deliver 5 V at about 1 A wirelessly, which is plenty, but coil alignment is critical to efficiency.

For one thing, the hardware he’s using — similar to those used for mobile phone charging — need the receiver to be very close to the transmitter. In addition, they need to be aligned well or efficiency drops off sharply. For mobile phones this isn’t much of a problem, but it’s difficult to position a Raspberry Pi and display just so when one can’t see the coils. Misalignment means brownouts and other unreliable operation.

So while the wireless power is capable of running the Pi directly, [atomic14] attempts to put a small battery and charger circuit into the mix in order to make the whole thing both portable and more reliable. But because nothing is easy, he discovers that his charging board — which should be able to output as low as 4.5 V — isn’t able to be adjusted down any lower than 5.66 V. It turns out that a resistor marked 104 (which should be 100 kΩ) is actually measuring 57 kΩ, and the trim pot doesn’t go lower than 10 kΩ. The solution is a bit of component swapping, but we suppose it’s a reminder that sometimes with cheap parts, one pays in other ways.

You can see [atomic14]’s wireless power Raspberry Pi running the classic shooter in the video below. Wireless power may have its issues, but it’s certainly a lot less messy than running DOOM with a gigantic potato battery.

Continue reading “Pi Zero Runs DOOM Via Wireless Power”

Planar Speaker Build Uses Hard Drive Magnets

We like to see people building things that are a little unusual, and we really like it when said unusual thing uses salvaged parts. This project from [JGJMatt] ticks all our boxes — the build creates a planar speaker that uses salvaged magnets from a hard drive.

A planar speaker, according to the post, uses wires and magnets to manipulate a flat film that acts as the transducer. The speaker housing is 3D printed and looks great but is otherwise unremarkable. The fun starts when a Dremel with a diamond disk cuts the magnets in half. Cutting neodymium poses several challenges. For example, if you heat the material up too much while cutting, it can lose its magnetism.

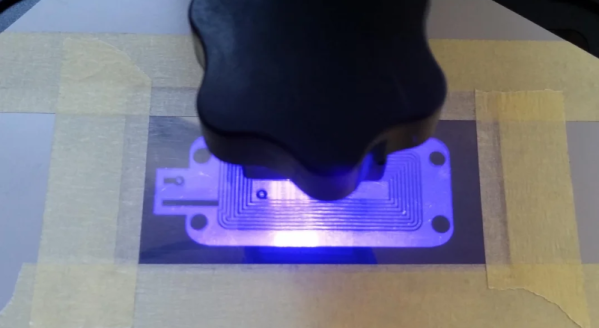
With the proper magnets, you can move to the tedious method of creating the coils. The post shows three different methods. But the part we really liked was using a resin 3D printer as a UV source to expose a resist mask which transfers to a copper or aluminum foil that will be the sound-generating film. [JGJMatt] used a similar technique to put resist on PC board blanks, too. Unfortunately, there were some issues so the finished speakers didn’t use the foil prepared using this method. Instead, a quick modification to the resin printer allowed a thin film of resin to rest on the foil, which was then exposed.

Once you have the pieces, there isn’t much left to do but put them together. Honestly, this is one of those things you probably won’t do yourself unless you are obsessed with speakers. But there were a lot of interesting techniques here that might come in handy, even if you don’t care about audio reproduction.

[JGJMatt] showed us a ribbon speaker before. We have seen some speakers that are practically all 3D printed.