Sometimes wheels just don’t cut it. When the going gets tough, the tough make tracks. Continuous track drive systems – aka tank treads, or tracks, have been around for centuries. The first known use in relatively modern history is a system designed in 1770’s by [Richard Lovell Edgeworth]. Since then there has been a slew of engineers, hackers, and makers who have contributed to this versatile drive system. Today, tread systems find their way into plenty of robotics and transportation projects. This week’s Hacklet is all about some of the best track drive projects on Hackaday.io!
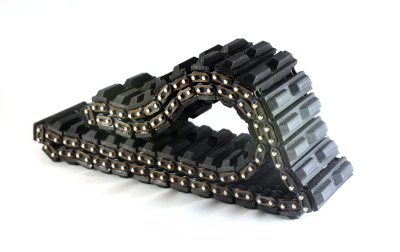 We start with [jupdyke] and Modular Continuous Track System. [Jupdyke] has made a project out of making the tracks themselves. These tracks are strong – shore 70A urethane rubber is no joke! Quite a bit of research and experimentation has gone into this project. [Jupdyke] started with 3D printed parts, before moving on to molded 2 part rubber. The rubber is cast in custom machined aluminum molds. The molds are even heated to ensure a quality casting. Rubber alone doesn’t make a track though. The backbone of these tracks are machined steel pins. The pins go through the treads and connect through roller chain components. We’re betting a set of these tracks could easily carry a person!
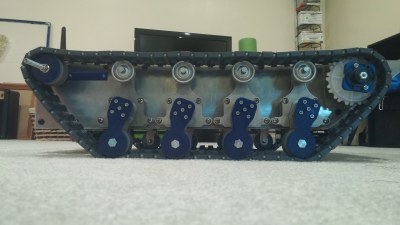 Next up is [williamg42] with Expandable Ruggedized Robotic Platform. [Williamg42] describes this vehicle as “able to operate in harsh environments”. We would shorten that to “It’s a beast”. Some incredible machine work has gone into this robot, especially on the suspension and idler wheels. Everything is made of metal – the frame is 8020 aluminum extrusion covered in plates. The suspension is aluminum and steel. Motors are mini-CIM motors. This robot isn’t lacking on brains, as a BeagleBone black controls it through a custom cape board. Next time we go out on a desert trek, we want this ‘bot at our side!
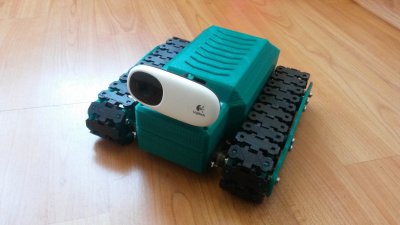 From the mind of [TinHead] comes TTBN Alpha, a TelePresence robot. TTBN alpha is based on a Raspberry Pi. Rather than start with Raspbian, [TinHead] built his own lightweight Linux distribution with buildroot. Control is through a web interface. The operator’s view of the world is through the electronic eye of a Logitech C110 webcam. [TinHead] printed his own tracks, using straightened paperclips as pins. Two servos modified for continuous rotation serve as the main drive motors.
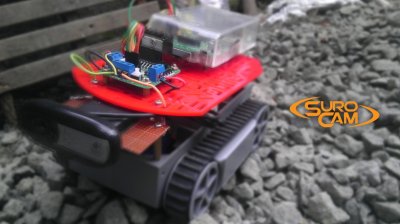
Finally we have [Hendra Kusumah] with Surveillance Robot Camera (SUROCAM). SUROCAM was [Hendra’s] project for both the 2014 and 2015 Hackaday Prize. The chassis is based upon the common RP5 robot kit. This robot’s DC motors are driven by the classic L298n driver chip. Unlike TTBN Alpha above, SUROCAM uses a full Raspbian install, so this Pi is ready for anything. The code is written in Python, and pagekite and ngrok to help make connections to the outside world.
If you want to see more tank treaded rovers, check out our new tracked projects list. Did I miss your project? Don’t be shy, just drop me a message on Hackaday.io. That’s it for this week’s Hacklet; As always, see you next week. Same hack time, same hack channel, bringing you the best of Hackaday.io!