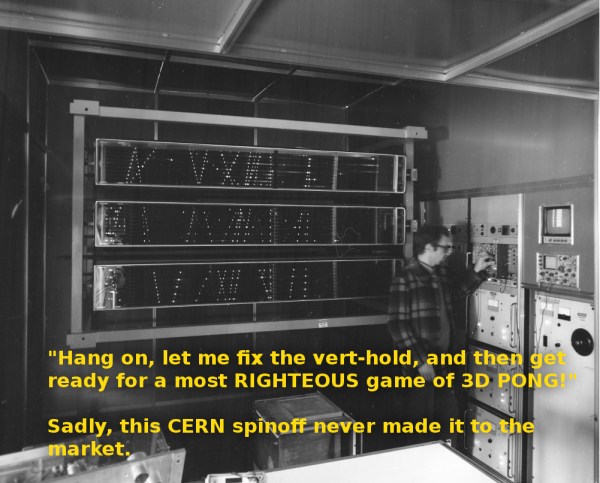
Week 16 of the Caption CERN Contest just flew by, but not without sparking some cosmic comic genius in the minds of everyone who wrote a comment. Thanks to everyone who entered! If you followed last week’s blog post, you already know that this image isn’t an early POV display, or some sort of strange data display technique. It’s actually a spark chamber. Spark chambers use high voltage and noble gases to create a visible trail of cosmic rays. Since this image is dated 1979, well after spark chambers were used for hard science, we’re guessing it was part of a demonstration at CERN’s labs.
The Funnies:
- “Here we see Doug playing a Massively multiplayer Pong game against his peers in the next building over.” – [John Kiniston]
- “It said “Would you like to play a game?” and I said yes. Are those missile launch tracks?”- [jonsmirl]
- “Before Arduino you needed a whole room full of equipment to blink LEDs!” – [mjrippe]
After two weeks as a runner-up, this week’s winner is The Green Gentleman with “‘Hang on, let me fix the vert-hold, and then get ready for a most RIGHTEOUS game of 3D PONG!’ Sadly, this CERN spinoff never made it to the market”
We’re sure [The Green Gentleman] will be very courteous to his fellow hackers in sharing his new Bus Pirate From The Hackaday Store! Congratulations [The Green Gentleman]!
Week 17
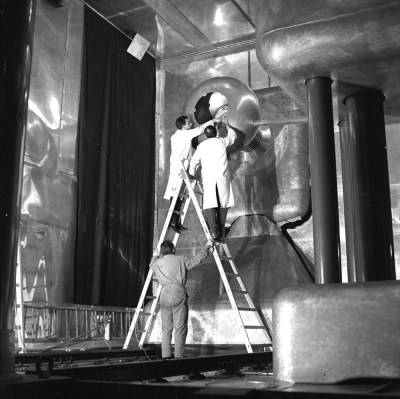 Coils, gleaming metal, giant domes, now this is a proper mad scientist image! The CERN scientists in this image seem to be working on a large metal device of some sort. It definitely looks like an electrode which would be at home either at CERN or the well equipped home lab of one Dr. Frankenstein’s. We don’t have a caption, but we do have a rough date of August, 1961. What is happening in this image? Are these scientists setting up an experiment, or plotting world domination?
You tell us!
This week we’re giving away a Logic Pirate from The Hackaday Store.
Add your humorous caption as a comment to the contest log. Make sure you’re commenting on the contest log, not on the contest itself.
As always, if you actually have information about the image or the people in it, let CERN know on the original image discussion page.
Good Luck!


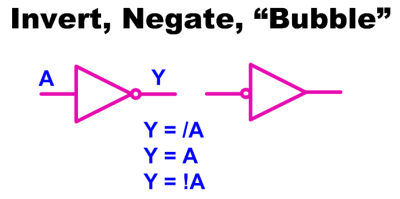 The most simple piece of logic is inversion; making a high change to low or a low change to high. Shown are a couple of ways to write an inversion including the ubiquitous “bubble” that we can apply almost anywhere to imply an inversion or a “True Low”. If it was a one it is now a zero, where it was a low it is now a high, and where it was true it is now untrue.
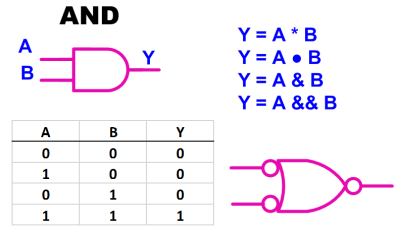 Moving on to the AND gate we see a simple truth table, also known as a Boolean Table, where it describes the function of “A AND B”. This is also our first opportunity to see the application of an alternate symbol. In this case a “low OR a low yields a low”
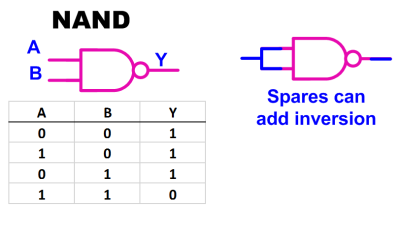 Most if not all of the standard logic blocks come in an inverted form also such as the NAND gate shown here. The ability to invert logic functions is so useful in real life that I probably used at least three times the number of NAND gates as regular AND gates when doing medium or larger system design. The useful inversion can occur as spares or in line with the logic.