An Interview With Tesla Battery Hacker [wk057]

We covered [wk057] and his Tesla Model S battery teardown back in September. Since then we had some time to catch up with him, and ask a few questions.

You’ve mentioned that you have a (non hacked) Tesla Model S. What do you think of the car?

It’s the best car I’ve ever driven or owned, period. Not to get too into it, but, I love it. I’ve put almost 20,000 miles on it already in under a year and I have no real complaints. Software feature requests… but no complaints. After almost a year, multiple 1700-miles-in-a-weekend trips, and an overall great experience… I can never go back to a gas vehicle after this. It would be like going back to horses and buggies.

A salvage Tesla Lithium battery had to be expensive compared to a Lead Acid setup. What made you go with the Tesla?

Actually, if you consider that the Model S battery is already pre-setup as a high-capacity pack, contains the wiring to do so, and the modules are much more energy and power dense than any lead acid battery bank, it’s actually almost cheaper than a comparable lead acid bank and all the trimmings.

I haven’t officially weighed them, but the modules from the Model S battery are roughly 80 lbs. 80 lbs for a 5.3 kWh battery is around 15 lbs per kWh, which is impressive. For comparison, a decent lead acid battery will have a little over 1 kWh (of low-rate discharge capacity) and weigh almost the same.

Also, the Tesla pack is much more powerful than a lead acid bank of the same capacity.
Generally a lead acid battery bank would have a capacity that would only be realized with slow discharges, so, 1/20C. Much over that and you sacrifice capacity for power. 1/20C for an 85kWh pack is only 4.25kW, barely enough for a central air unit and some lights without losing capacity.

Now the Tesla pack can be discharged (based on how it does so in the vehicle) at up to 3.75C for short periods, and at 1/2C continuously without really affecting the overall capacity of the pack. That means I can run 10x more power than lead acid without a loss in overall charge capacity. Leads to a much more flexible battery solution since the loads will, in reality, always be so low that this will not even come into play with the Tesla pack, but would almost always be a factor with lead acid.

Charging is also somewhat better with the Tesla battery. Charge a lead acid battery at a 1/2C and it will boil. Charge the Tesla pack at 1/2C (42kW) and it might warm up a few degrees. Oh, and the charging losses at high rates are much less than lead acid also.
Overall, without continuing to yack about the technical aspects, it’s just a much better battery, takes up less space, weighs less, and has more power available.

There are likely decent arguments for other solutions, but the rest aside, this one won out because it was definitely more interesting.

Click past the break to read the rest of our interview with [wk057]!

Continue reading “An Interview With Tesla Battery Hacker [wk057]”

Tiny R/C P-51D Mustang Tips The Scales At 3 Grams

Commercial R/C aircraft have been getting smaller and smaller with each passing year. In the early 2000’s, a palm-sized plane or helicopter was the dream of many an R/C enthusiast. Today, you can pick them up for around $20 USD at the local mall. The smallest models however, are still built by an elite group of modelers. Weighing in at a mere 3 grams, [Martin Newell’s] P-51D mustang model certainly puts him into that group. While the P-51’s 11.6 cm wingspan may not make it the smallest plane in the world, its many functions make it incredible.

The Mustang is an 8 channel affair, with elevator, throttle, rudder, ailerons, flaps, navigation lights, working retracts, and flashing cannon lights. That’s Wright, we did say retracts, as in retractable landing gear on a 3 gram model.

All the Mustang’s flight surfaces feature fully proportional control. However, there are no closed loop servos involved. The flight surfaces use magnetic actuators, consisting of a tiny neodymium magnet surrounded by a coil of magnet wire. We’re not sure if the signals to these actuators is straight PWM or if [Martin] is varying the frequency, but the system works. The retracts use heat-sensitive Nitinol “muscle wire” along with a bellcrank system to make sure the landing gear is up and locked after takeoff, and comes down again before a landing.

We don’t have any in-flight video of the Mustang, but we do have footage of an even smaller 1.2 gram plane [Martin] has been flying lately. Click past the break to check it out!

Continue reading “Tiny R/C P-51D Mustang Tips The Scales At 3 Grams”

Test Your Signal With The WiFi Cup

[CNLohr] wanted to test the WiFi range in his house. One look at his roommate’s cup and an unorthodox idea was born. The WiFi Cup used an ESP8266 to connect to his home network. For output, [CNLohr] also added a WS2812 LED strip to the cup. The ESP8266 was programmed to send UDP packets to [CNLohr’s] laptop. When the laptop responded back, the ESP8266 turned on the LEDs, lighting up the cup. The cup’s response to signal strength was very quick – about a second.

[CNLohr] took the WiFi Cup around the house. He was surprised to detect the connection in corners he didn’t expect; in fact, the signal wasn’t weakening at all! He proceeded to walk outside with it, hoping to see the signal strength decrease. As a testament to his roommate’s robust router, the cup merely flickered. Hoping for a better test, [CNLohr] switched out the router for a cheaper TP-Link with shorter antennas. While the initial ping test showed a slower response time, the cup detected WiFi around the house just fine. It only wavered for a couple of moments when it was placed inside a metal bucket. We have to wonder how thin [CNLohr’s] walls are. WiFi never works that well in our house!

Continue reading “Test Your Signal With The WiFi Cup”

Forkless Motorcycle Tears Up The Track

The bike above may look like a pristine Yamaha prototype, but it’s actually the work of [Julian Farnam], a motorcycle hacker of the highest level. We caught his Yamaha A-N-D FFE 350 on OddBike, and you can read [Julian’s] own description of the bike on his Slideshare link.

The FFE 350 started life as a Yamaha 1990’s RZ350 two-stroke racer. From there, [Julian] gave it his own Forkless Front End (FFE) treatment. Gone is the front fork, which while common in motorcycle and bicycle design, has some problems. Fore-aft flex is one – two thin tubes will never make for a rigid front end. Changing geometry is another issue. Since forks are angled forward, the front wheel moves up and to the rear as the shocks compress. This changes the motorcycle’s trail, as well.

Forkless designs may not have these issues, but they bring in a set of their own. A forkless design must have linkages and bellcranks which are often the source of slop and vibration. [Julian’s] design uses two sets of linkages in tension. The tension between the two linkages removes most of the slop and provides that directly connected feel riders associate with forks.

The FFE 350 wasn’t just a garage queen either – it laid down some serious laps at local tracks in Southern California. Unfortunately, the forkless design was too radical to catch on as a commercial venture, and the FFE has spent the last few years in storage. [Julian] is hard at work bringing it back to its 1998 glory, as can be seen on his restoration thread over on the Custom Fighters forum.

Seeing The World Through Depth Sensing Cameras

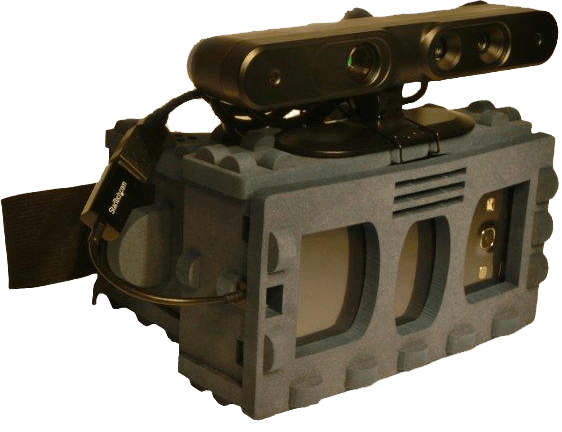
The Oculus Rift and all the other 3D video goggle solutions out there are great if you want to explore virtual worlds with stereoscopic vision, but until now we haven’t seen anyone exploring real life with digital stereoscopic viewers. [pabr] combined the Kinect-like sensor in an ASUS Xtion with a smartphone in a Google Cardboard-like setup for 3D views the human eye can’t naturally experience like a third-person view, a radar-like display, and seeing what the world would look like with your eyes 20 inches apart.

[pabr] is using an ASUS Xtion depth sensor connected to a Galaxy SIII via the USB OTG port. With a little bit of code, the output from the depth sensor can be pushed to the phone’s display. The hardware setup consists of a VR-Spective, a rather expensive bit of plastic, but with the right mechanical considerations, a piece of cardboard or some foam board and hot glue would do quite nicely.

[pabr] put together a video demo of his build, along with a few examples of what this project can do. It’s rather odd, and surprisingly not a superfluous way to see in 3D. You can check out that video below.

Continue reading “Seeing The World Through Depth Sensing Cameras”

Teensys And Old Synth Chips, Together At Last

The ancient computers of yesteryear had hardware that’s hard to conceive of today; who would want a synthesizer on a chip when every computer made in the last 15 years has enough horsepower to synthesize sounds in software and output everything with CD quality audio? [Brian Peters] loves these old synth chips and decided to make them all work with a modern microcontroller.

Every major sound chip from the 80s is included in this roundup. The Commodore SID is there with a chip that includes working filters. The SN76489, the sound chip from the TI99 and BBC Micro are there, as is the TIA from the Atari consoles. Also featured is the Atari POKEY, found in the 8-bit Atari computers. The POKEY isn’t as popular as the SID, but it should be.

[Brian] connected all these chips up with Teensy 2.0 microcontrollers, and with the right software, was able to control these via MIDI. It’s a great way to listen to chiptunes the way they’re meant to be heard. You can check out some sound samples in the videos below.

Thanks [Wybren] for the tip.

Continue reading “Teensys And Old Synth Chips, Together At Last”

Wax Motors Add Motion To Your Projects

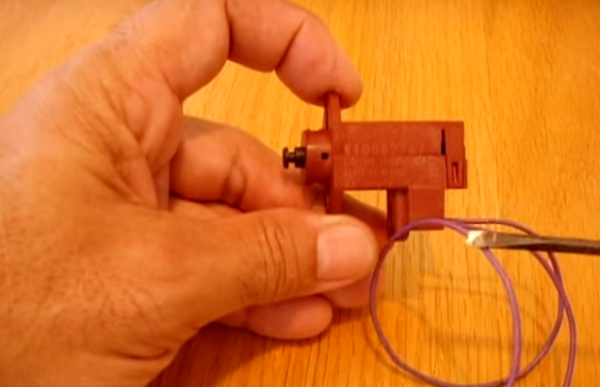
[electronicsNmore] has uploaded a great teardown and tutorial video (YouTube link) about wax motors. Electric wax motors aren’t common in hobby electronics, but they are common in the appliance industry, which means the motors can be often be obtained cheaply or for free from discarded appliances. Non-electric wax motors have been used as automotive coolant thermostats for years.  Who knows, this may be just what the doctor ordered for your next project.

As [electronicsNmore] explains, wax motors are rather simple devices. A small block of wax is sealed in a metal container with a movable piston. When heated, the wax expands and pushes the piston out. Once the wax cools, a spring helps to pull the piston back in.

The real trick is creating a motor which will heat up without cooking itself. This is done with a Positive Temperature Coefficient (PTC) thermistor. As the name implies, a PTC thermistor’s resistance increases as it heats up. This is the exact opposite of the Negative Temperature Coefficient (NTC) thermistors we often use as temperature sensors. PTC’s are often found in places like power supplies to limit in rush current, or small heating systems, as we have in our wax motor.

As the PTC heats up, its resistance increases until it stops heating. At the same time, the wax is being warmed, which drives out the piston. As you might expect, wax motors aren’t exactly efficient devices. The motor in  [electronicsNmore’s] video runs on 120 volts AC. They do have some advantages over solenoid, though. Wax motors provide smooth, slow operation. Since they are resistive devices, they also don’t require flyback diodes, or create the RF noise that a solenoid would.

Continue reading “Wax Motors Add Motion To Your Projects”