Building A Home Made IPhone

iThing 
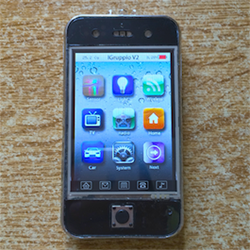
A few years ago, [Michele] built a mobile device with a touch screen, a relatively powerful processor, and a whole bunch of sensors. To be honest, the question of why he built this was never asked because it’s an impressive display of electronic design and fabrication. [Michele] calles it the iGruppio. Although it’s not a feature-packed cell phone, it’s still an impressive project that stands on its own merits.

Inside the iGruppio is a Pic32mx microcontroller, a 240×320 TFT touchscreen, and enough sensors to implement a 10 DOF IMU. The software written for the iGruppio is heavily inspired by the iPhone and a completely homebrew project – all the software was written by [Michele] himself. While the first version of the iGruppio was a little clunky, the second revision (seen in the pic above) uses an old iPhone case to turn a bunch of boards and plugs into a surprisingly compact device.

No, there’s no cellular modem inside the latest version, but [Michele] has put all the sources up on Github, and anyone wanting to build a homebrew cell phone could do worse than to take a look at his work. Video demo below.

Continue reading “Building A Home Made IPhone”

Focus Your Ears With The Visual Microphone

VideoMicrophone

A Group of MIT, Microsoft, and Adobe researchers have managed to reproduce sound using video alone. The sounds we make bounce off every object in the room, causing microscopic vibrations.  The Visual Microphone utilizes a high-speed video camera and some clever signal processing to extract an audio signal from these vibrations. Using video of everyday objects such as snack bags, plants, Styrofoam cups, and water, the team was able to reproduce tones, music and speech. Capturing audio from light isn’t exactly new. Laser microphones have been around for years. The difference here is the fact that the visual microphone is a completely passive device. No laser or special illumination is required.

The secret is in the signal processing, which the team explains in their SIGGRAPH paper (pdf link). They used a complex steerable pyramid along with wavelet filters to obtain local pixel motion values. These local values are averaged into a global motion value. From this global motion value the team is able to measure movement down to 1/1000 of a pixel. Plenty of resolution to decode audio data.

Most of the research is performed with high-speed video cameras, which are well outside the budget of the average hacker. Don’t despair though, the team did prove out that the same magic can be performed with consumer cameras, albeit with lower quality results. The team took advantage of the rolling shutter found in most of today’s CMOS imager based consumer cameras. Rolling shutter CMOS sensors capture images one row at a time. Each row can be processed in a similar fashion to the frames of the high-speed camera. There are some inter-frame gaps when the camera isn’t recording anything though. Even with the reduced resolution, it’s easy to pick out “Mary had a little lamb” in the video below.

We’re blown away by this research, and we’re sure certain organizations will be looking into it for their own use. Don’t pull out your tin foil hats yet though. Foil containers proved to be one of the best sound reflectors.

Continue reading “Focus Your Ears With The Visual Microphone”

THP Entry: A CPLD Video Card With VGA And NTSC

NTSC

[PK] is working on a very simple video card, meant to output 640×480 VGA with a cheap CPLD. The interface will be 5 Volt SPI, meaning there’s a ton of potential here for anyone wanting put a reasonable (and cheap) display in a microcontroller project. The project has come a long way, and his latest update showcases something that has only been done once before: color NTSC with programmable logic

The brains of the outfit is a $5, 100-pin CPLD from Xilinx. Apart from that, the rest of the components are a crystal, PLL, and an almost hilarious number of resistors for the R2R ladder. The one especially unique component is the 25.056815 MHz crystal – multiply by that by two, and it’s fast enough to drive a VGA monitor. Divide the crystal by seven, it’s the 3.579545 MHz you need for an NTSC colorburst frequency. That’s VGA and NTSC in a single programmable logic project, something the one FPGA project we could find that did color NTSC couldn’t manage.

The next step in the project is designing a PCB and figuring out the code for the framebuffer. [PK] put up a demo showing off both VGA and NTSC; you can check that out below.


SpaceWrencherThe project featured in this post is an entry in The Hackaday Prize. Build something awesome and win a trip to space or hundreds of other prizes.

Continue reading “THP Entry: A CPLD Video Card With VGA And NTSC”

Hit The Polls Before Friday

astronot Don’t forget to vote in the newest round of Astronaut or Not. In addition to deciding which projects should be recognized as “Too Cool for Kickstarter”, you will be eligible for the voter lottery.

What is this voter lottery we speak of? On Friday we’ll draw a random number and see if that hacker profile on Hackaday.io has voted at least once in this round, which started on Monday.

If they voted they’ll received a prize package packed with all kinds of prototyping hardware. This cycle offers several breakout boards, a bunch of programmers and debuggers, as well as a digital multimeter and a bench power supply (full list here). For the hackers who haven’t registered a vote? Nothing!

We’ll be drawing the number from a hotel room in Vegas since we’ll be there for DEFCON. If you’re also attending the conference track us down to show off your own hardware or just to grab some stickers.

Reverse Engineering A NAND Flash Device Management Algorithm

unsoldered flash chip

Put your hand under you chin as here comes a 6 months long jaw-dropping reverse engineering work: getting the data back from a (not so) broken SD card. As you can guess from the picture above, [Joshua]’s first step was to desolder the card’s Flash chip as the tear-down revealed that only the integrated SD-to-NAND Flash controller was damaged. The flash was then soldered on a breadboard so it could be connected to a Digilent Nexys-2 FPGA board. [Joshua] managed to find a similar Flash datasheet, checked that his wire-made bus was reliable and generated two 12GiB dump files on his computer.

In order to extract meaningful data from the dumps he first had to understand how SD-to-NAND controllers work. In his great write-up he provides us with a background of the Flash technology, so our readers can better understand the challenges we face with today’s chips. As flash memories integrate more storage space while keeping the same size, they become less reliable and have nifty problems that should be taken care of. Controllers therefore have to perform data whitening (so neighboring blocks of data don’t have similar content), spread data writes uniformly around the flash (so physical blocks have the same life expectancy) and finally support error correcting codes (so damaged bits can still be recovered). We’ll let our users imagine how complex reverse engineering the implementation of such techniques is when you don’t know anything about the controller. [Joshua] therefore had to do a lot of research, perform a lot of statistical analysis on the data he extracted and when nothing else was possible, use bruteforce…

Paperclip Lock Picking Sets

Lockpicking has become a trademark skill of hackers all across the world, and is regularly taught at hackerspaces and maker faires. But a lot of the time, the sets have already been made or bought online somewhere. However, [Sean] has demonstrated how to create a lock picking set with ordinary paperclips in the video embedded at the end of this post. Wikihow also has these awesome instructions on how to build them.

What’s great is that the material for these picks are easily found. There are other ways to fashion a set together. For example, street sweeper bristles can be used. And electrical metal tape is a good material as well, but these paperclip sets are, by far, the most accessible. Pretty much anywhere that has office stationary supplies will have mounds of these little metal clips lying around.

But how well do they work? Have you made a paperclip lock picking set before?

If so, let us know in the comments, and tell us how well they did.

Continue reading “Paperclip Lock Picking Sets”

Raspberry Pi Spies On Your Front Door

doorbell pictures

One of [Sander]’s first projects with a Raspberry Pi was to get it to send messages to his iPhone. From there he decided to take it a step further and wire the tiny computer up to his doorbell, creating a system that can send push messages to his phone whenever someone is at the front door.

[Sander]’s doorbell is wireless, and he decided to keep all of its original functionality. All it took to signal the Pi was a simple circuit tied to the doorbell’s status LED which turns off whenever the doorbell is pushed.

The Raspberry Pi runs a python program that handles the GPIO pin which is wired to the doorbell. When the doorbell is pushed, the program processes and sends the push notification while taking pictures of the visitor with an attached webcam. The pictures are included in the message so [Sander] can see who is at the front door. The code for the project is included on his project page.

This project rang a bell for us since we’ve seen projects using a Raspberry Pi and push notifications. None of them so far have included a webcam or utilized an existing wireless doorbell though, and this is a great step forward!