Halloween Costume Turned Positive Pressure Suit

As a general rule, you probably shouldn’t be getting your Personal Protective Equipment (PPE) from the party store. But these are exceptional times, and rather than potentially depriving medical professionals the equipment they so desperately need on the front lines, the team at [Robots Everywhere] has been looking into improvised PPE. We’re not sure things are at the point where you would need to don this DIY Positive Pressure Suit (PAPR), but it’s certainly an interesting look at what’s possible when you think outside the box.

At the most basic level, a PAPR is a mostly air-tight garment that is continuously pumped full of filtered air. As long as the pressure inside the suit is higher than outside, there’s no way airborne bacteria and viruses can get in without traveling through the filter first.

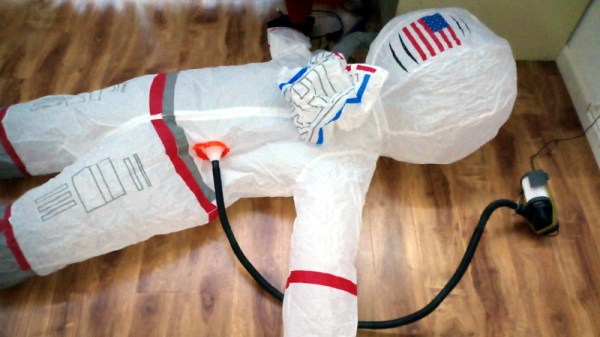
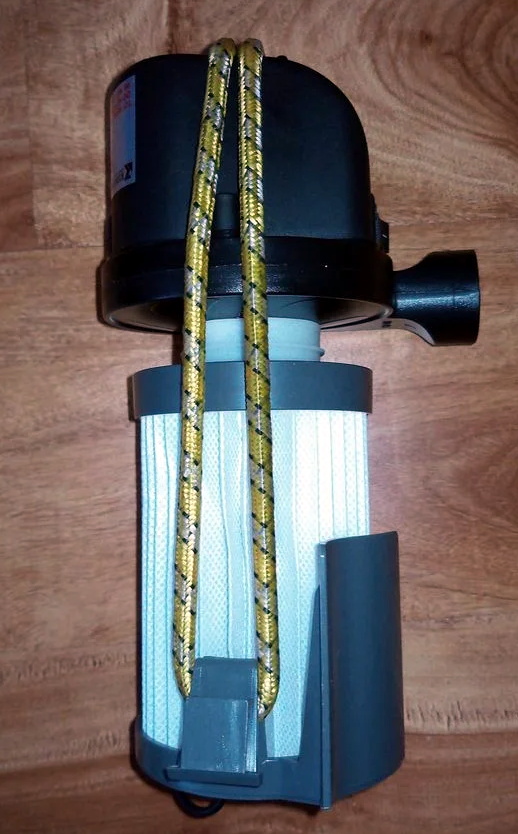
For this project, the folks at [Robots Everywhere] took an inflatable astronaut costume and replaced the dinky original air pump with a much larger 12 V unit designed for inflating air beds. Upgrading the pump not only increased the internal air pressure of the suit, but also made it easier to add a HEPA filter to the inlet. As long as the suit is inflated and there are no leaks in the hose, the wearer will be surrounded by a bubble of filtered air.

Presumably, you don’t want to be tethered to the wall though, so the write-up briefly touches on how the pump system can be made more mobile with the addition of an RC-style battery pack. With the pump and batteries secured in a pouch attached to the suit, the wearer is free to venture outside the confines of their self-isolation bunker and go about their dystopian daily business.

A getup like this might seem a bit excessive, but with so many folks desperate for information on homemade protective gear, we aren’t passing any judgment. The team says you can modify a cheap painter’s suit in much the same way, but frankly, that doesn’t sound nearly as fun to us.

[Thanks to Aron for the tip.]

Slide Your Switch Into A Gamecube Controller

The Gamecube was certainly a divisive design when it was released back in 2001, but the fact that people are still happily hacking away at its controller nearly 20 years later proves that Nintendo must have gotten something right. The latest project from Nintendo wizard [Bill Paxton] turns the unique Gamecube controller into an even more unique mobile dock for the Switch.

To build this “Gamecube Grip”, [Bill] literally cut an original controller and its PCB in half so they could be relocated on either end of the 3D printed central frame. Internally, the controller PCB is wired up to a GC+ board, which is an open hardware project that uses a PIC18F25K22 microcontroller to bring enhanced features to the classic peripheral such as adjustable stick dead zones and rumble intensity. From there, it’s connected to the switch with a GBros adapter from 8bitdo.

The grip also includes an Anker PowerCore 20,100 mAh battery that should keep the system going for hours, and some components liberated from a third party Switch dock. Everything has been finished off with the attention to detail that we’ve come to expect from [Bill] and his projects, including the seemingly flawless glossy paint job that’s something of hallmark for his custom gaming creations.

Continue reading “Slide Your Switch Into A Gamecube Controller”

An All Lead Screw 3D Printer You Can Build Yourself

There was a time when the curious hardware hackerĀ  had to build their own 3D printer, because commercial models were so expensive as to be unaffordable except by well-funded institutions. We’re fortunate then to live in an era in which a good quality off-the-shelf machine can be had without breaking the bank, but that is not to say that home-made 3D printers are a thing of the past. Instead the community of rapid prototyping experimenters continue to push the boundaries of the art, and from that we all benefit. An example comes from [Morgan Lowe], whose 3DLS lead screw driven 3D printer joins the freely downloadable designs to be found on Thingiverse.

If at first sight you think it looks a little familiar, you are correct, as it takes its frame design from the popular AM8 metal frame upgrade for the Anet A8 off-the-shelf printer. It draws heavily from other A8 upgrades, and brings in some parts such as the extruder and bed from the Creality Ender3. This is the beauty of incremental open source, and the result is a belt-free printer that does a decent-looking Benchy on the bench, and as a party piece manages to print a slightly more hairy little plastic boat when suspended at 45 degrees by a rope from the ceiling.

When dipping a toe into the world of home made 3D printers it’s interesting to take a look into some of the earlier Hackaday RepRap posts, and see how far we’ve come.

Custom Bluetooth Joystick In A Nunchuk Shell

With the Wii’s unique controller, Nintendo not only provided new gaming experiences to players, but gave hardware hackers a platform for experimentation that’s still going strong. Case in point, this modification of a third party Wii “Nunchuk” by [Giliam de Carpentier] that turns the accessory into a stand-alone wireless controller powered by a ATtiny44A.

Milling a new home for the AVR

It turns out there’s a considerable amount of free space inside the Nunchuk case, so [Giliam] found adding in the new hardware wasn’t nearly as difficult as you might expect. Of course, it helps that the diminutive SMD ATtiny44A and its support hardware are housed on a very neatly milled PCB that attaches to the back of the original board.

Most of the other hardware comes in the form of modular components, like the Bluetooth transmitter and TP4056 charge controller for the 300 mAh battery. A micro USB charging port is mounted where the original Nunchuk cable entered the case, making the whole thing look very professional.

Even if you aren’t interested in making your own controller, [Giliam] covers many interesting topics in this write-up such as handling different methods of Bluetooth connectivity and various power management techniques to eke out as much life from the relatively small battery as possible. It’s not only a fascinating read, but a great example of what thorough project documentation should look like.

In the past we’ve seen Bluetooth conversions for the Wii Nunchuck, but traditionally they left the original electronics in place. On the other side of the spectrum, we’ve also seen the internals get replaced with something as powerful as the Raspberry Pi Zero.

Continue reading “Custom Bluetooth Joystick In A Nunchuk Shell”

This Week In Security: Nintendo Accounts, Pernicious Android Malware, And An IOS 0-day

A rash of Nintendo account compromises has made the news over the last week. Nintendo’s official response was that they were investigating, and recommended everyone enabled two factor authentication on their accounts.

[Dan Goodin] over at Ars Technica has a canny guess: The compromised accounts were each linked to an old Nintendo Network ID (NNID). This is essentially a legacy Nintendo account — one made in the Wii U and 3DS era. Since they’re linked, access via the NNID exposes the entire account. Resetting the primary account password doesn’t change the NNID credentials, but turning on two factor authentication does seem to close the loophole. There hasn’t yet been official confirmation that NNIDs are responsible, but it seems to fit the situation. It’s an interesting problem, where a legacy account can lead to further compromise.

Just Can’t Lose You: xHelper

xHelper, an Android malware, just won’t say goodbye. xHelper looks like a cleaner application, but once installed it begins rather stubbornly installing itself via the Triada trojan. The process begins with rooting the phone, and then remounting /system as writable. Binaries are installed and startup scripts are tampered with, and then the mount command itself is compromised, preventing a user from following the same steps to remove the malware. Additionally, if the device has previously been rooted, the superuser binary is removed. This combination of techniques means that the infection will survive a factory reset. The only way to remove xHelper is to flash a clean Android image, fully wiping /system in the process. Continue reading “This Week In Security: Nintendo Accounts, Pernicious Android Malware, And An IOS 0-day”

Printed It: Collet Drill Stop

You’d think that being quarantined in your home would be perfect for hackers and makers like us, as we all have a project or two that’s been sitting on the back burner because we didn’t have the time to tackle it. Unfortunately, some are finding that the problem now is actually getting the parts and tools needed to do the job. When there’s a bouncer and a line outside the Home Depot like it’s a nightclub on Saturday night, even the simplest of things can be difficult to source when making in the time of COVID.

Which is exactly the situation I found myself in recently when I needed to drill a bunch of holes to the same depth. The piece was too big to put in the drill press, and while I contemplated just wrapping the bit in some tape to serve as a makeshift stop, I wasn’t convinced it would be accurate or repeatable enough. It occurred to me that a set of drill stop collars would be easy enough to design and 3D print, but before I fired up OpenSCAD, I decided to see what was already available online.

Which is how I found the “Collet Drill Stop” from Adam Harrison. Rather than the traditional ring and setscrew arrangement, his design uses a printable collet that will clamp down on the bit at an arbitrary position without tools. So not only could I avoid a trip to the store by printing this design out, it looked like it would potentially be an upgrade over what I would have bought.

Of course, it’s wise not to take anything for granted when dealing with 3D printing. The only way I could be sure that Adam’s design would work for me was to commit it to plastic and try it out.

Continue reading “Printed It: Collet Drill Stop”

ESP32 Refines Game Boy Bluetooth Adapter

Last year we brought word of a project from [Shyri Villar] that turned a stock Game Boy Advance into a Bluetooth controller by exploiting the system’s “multiboot” capability. The prototype hardware was a bit ungainly, but the concept was certainly promising. We’re now happy to report that the code has been ported over to the ESP32, making the project far more approachable.

To clarify, the ESP32 is now theĀ only component required for those who want to play along at home. Just five wires connect the microcontroller to the GBA’s Link Cable connector, which is enough to transfer a small ROM over to the system and ferry user input to the Bluetooth hardware. Even if you aren’t interested in using it as a game controller, this project is an excellent example of how you can get your own code running on a completely stock GBA.

While the original version of the hardware was a scrap of perfboard dangling from the handheld’s expansion connector, reducing the part count to one meant [Shyri] was able to pack everything into a tidy enclosure. Specifically, a third party GBA to GameCube link cable. This not only provides a sleek case for the microcontroller that locks onto the handheld with spring loaded tabs, but also includes a male Link Cable connector you can salvage. It looks as though there’s a bit of plastic trimming involved to get the ESP32 to fit, but otherwise its a very clean installation.

The GBA will be 20 years old soon, but that doesn’t mean the hardware and software exploration is over. The original Game Boy is over 30, and people are still giving talks about it.