Burning Man: Pirate Ship Sports Arduino Powered Flame Sails

The 2011 Burning Man festival starts in just a few short days, and with that we have an excellent mutant vehicle accessory that no insane desert dweller should be without. An Arduino powered fire cannon sequencer! [Paul] was asked by Lostmachine’s [Andy] to spice up the flame effects on their Priate Ship mutant vehicle and provide a cool looking fire show that represented the ship’s sails.

[Paul] tossed together a hand full of arcade buttons, switches, and an LCD display to control eight 12V Solenoid valves tasked with switching on various regulated propane sources that throw some brutal looking flame effects. The controller combines a Teensy 2.0 with a custom board that contains eight P-channel MOSFET circuits. Flyback from the coils is handled through zener diodes, and the IRFR5305s are sized quite above and beyond what is needed for the 12v solenoids. With the heat, dust, and chaos of the desert one can’t be too careful. [Paul] even tosses in RC snubber circuits just to prevent things from getting too out of hand. Of the twelve arcade buttons eight are used for manual over rides, and the remaining four arcade buttons, knobs, switches, and the LCD display are all connected to the Teensy to handle the sequencing. [Paul], sadly, will not be able to make it out to Burning Man to troubleshoot the sequencer, which is a cause for some concern throughout the build.

It just so happens that I leave for Burning Man this Friday, and have an 18″ by 18″ Hackaday QR Code that will mark my area, see if you can find me out there! Also check out a video of the sequencer controlling what is easily a 6 foot flame bar after the jump!

Continue reading “Burning Man: Pirate Ship Sports Arduino Powered Flame Sails”

“Counting Box” Also Saves Calculators From Small Children

[Nathan]’s son really loves numbers and counting, and one of his favorite things to do is add 1 to a calculator over and over again. Being the awesome dad that he is, [Nathan] built his son a counting box that has a 10-digit rotary switch and two arcade buttons to add and subtract.

One goal of the project was to have the counting box retain memory of the display while being powered off. The easiest way to do this is to write the display data to the ATmega’s EEPROM. This EEPROM is only rated for 100,000 write cycles (although in practice it’s much higher), so [Nathan] included a 24LC256 in a little spasm of over-engineering. All the electronics are laid out on perf board, and the case is constructed from bamboo that was laser cut by Ponoko. The quality of the case itself is fairly remarkable – we’re really impressed with the finish and the magnetic battery access door.

From experience, we know that playing with an HP-15C eventually leads to a broken calculator and having our Nintendo taken away. We’re really happy for [Nathan]’s son, and wish we had our own counting box at his age.

Controlling Dioder Light Strips Wirelessly

dioder_universal_io

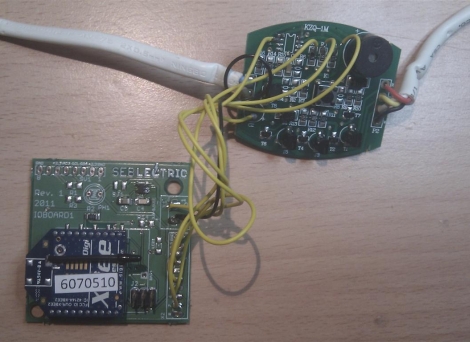
[SeBsZ] does a lot of work in home automation, using Xbee modules, LEDs, and other home lighting systems. Naturally, people look to him for help with different electronics projects, but one thing he has been asked time and time again is if he can make a simple mood lighting solution that can be easily installed.

He has always been interested in playing around with RGB LEDs, but he wasn’t looking to reinvent the wheel with this project. Instead he based his work off the Ikea Dioder product, an off-the-shelf set of adjustable LED strips. As we’ve seen before, the control module for these LEDs leaves a bit to be desired, so he removed the Dioder’s onboard PIC and wired up a controller of his own. His “Universal IO Board” uses an Atmega88 for control and has all the pins required to attach an Xbee wireless module. With everything wired up, he now has full wireless control of the Dioder light strips, without a ton of fuss.

Although he’s selling a few different hardware kits, the schematics for his IO board are freely available on his site, should you want to make your own. The only thing that we didn’t see was the code for the Atmega, but we’re guessing he has that posted somewhere as well.

A Design Contest With High Odds Of Winning!

[John] wrote in to tell us about this contest hosted by Avnet. All one has to do is upload a video of their design to Avnet’s Youtube page.  There are four categories to choose from including: Solar, Communications, Transportation, and Entertainment. Four contestants can win an iPad2.

The only catch, if you can call it that, is that one would have to use at least one component from their “more than five million SKUs available.”  The thing that makes this contest more interesting than it usually would be is that there appears to be no contest entries as of August 24th. Official rules can be found on their site here.

The contest runs through the end of August, so there isn’t a lot of time to get a design together. However, it’s possible that you have something already built that fits into their product catalog. Make a 30-90 second video of it in action and you’ve got a (very good apparently) chance of winning an iPad2! Check out the contest video after the break. Continue reading “A Design Contest With High Odds Of Winning!”

High Voltage Hacks: All About Electroluminescence

Although many might not know it, electroluminescent materials use high voltage, and thus qualify for our featured topic. Many may assume that these sheets work in the same way as LED lights, using low-voltage DC power.  This, however, is not the case, as they need around 100 volts of AC current to allow them to light up.

For a battery-powered solution, this means converting the battery’s DC power to AC. Adafruit has a good tutorial about working with EL wire and powering it up using a portable inverter. One should obviously be careful to properly insulate any clothing using this material as being shocked is generally not fun.

The video after the break is pretty long, but is well produced and will give you a good background of EL use. If you don’t have 30 minutes to dedicate to this, be sure to at least skip to 2:43 to see one of the coolest EL shirts we’ve seen. Continue reading “High Voltage Hacks: All About Electroluminescence”

Vintage Phone Has A Dirty Android Secret

android_based_vintage_phone

Instructables user [apple_fan] likes vintage telephones from the early 1900s, but while they are nice to look at, they’re clearly not too useful nowadays. He decided to change that, and retrofitted an old operator-dialed telephone with some modern amenities.

He gutted the phone, stripping out the large electromagnets and capacitor that were once used to facilitate placing and receiving calls. He added an Archos 28 tablet to the box, wiring it an IOIO board, allowing him to interface it with his Android phone. The old microphone and speaker were swapped out for updated components, and a new ringer actuator was built to replace the bulky old unit. The tablet and ringer, along with the rest of the components were then carefully hidden away inside the box as not to alter the aesthetics.

To place and receive calls, he installed CMU Sphinx on the Archos tablet, allowing him to interact with the phone using voice recognition, as if he was talking to a live operator.

It’s a pretty neat project, and while we might have opted for a small micro combined with a Bluetooth headset, [apple_fan] makes it clear why he made the hardware decisions he did. We’re always up for letting people show us a different way to get a job done, so we’re down with that.

Check out a short video demo of the phone in action after the jump.

Continue reading “Vintage Phone Has A Dirty Android Secret”

When Airsoft Gets Boring, Build A Coil Gun!

airsoft_coilgun

Here at Hackaday, we’re all about repurposing old items you no longer use. Reader [Liquider] wrote in to share his latest creation, a coil gun built from an old Airsoft pistol.

He removed a handful of components from the pistol and installed a 800 uF/300V capacitor inside the grip. A small storage compartment was added under the barrel, which houses the AA battery he uses to drive the circuit. A modified reloading mechanism makes it easy to drop a metal projectile right in front of the coil before firing.

Once the pistol is charged up, a switch installed behind the trigger discharges the cap, creating a magnetic pulse that accelerates the metal projectile forward. [Liquider] estimates that the kinetic energy produced by the coil is 0.1 Joules, which fires of the slug at a reasonable speed.

Continue reading to see a quick video demo of the pistol in action.

Continue reading “When Airsoft Gets Boring, Build A Coil Gun!”