Building A K9 Toy

[James West] has a young Doctor Who fan in the house and wanted to build something that could be played with without worrying about it being bumped and scratched. So, instead of creating a replica, [James] built a simple remote controlled K9 toy for his young fan.

K9 was a companion of the fourth Doctor (played by Tom Baker) in the classic Doctor Who series. He also appeared in several spin-offs. A robotic dog with the infinite knowledge of the TARDIS at hand, as well as a laser, K9 became a favorite among Who fans, especially younger children. [James] wanted his version of K9 to be able to be controlled by a remote control and be able to play sounds from the TV show.

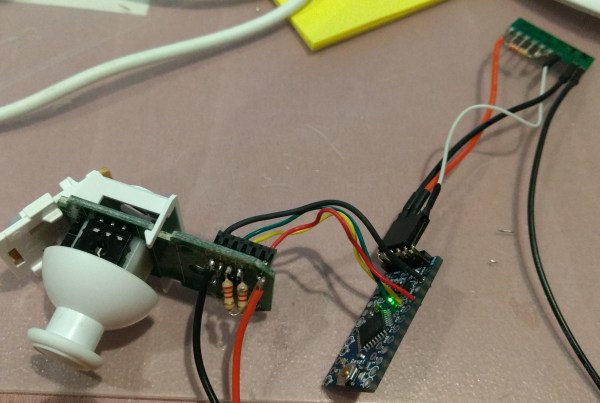
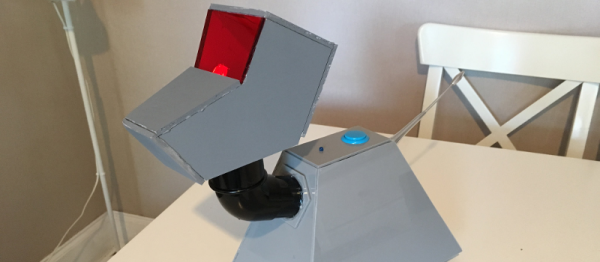
Using some hand-cut acrylic, [James] built K9’s body, then started on plans for the motion control and brains. [James] selected the Raspberry Pi Zero for the controller board, a Speaker pHat for the audio, a couple of motors to move K9 around, and a motor controller. K9 is controlled by a WiiMote and has a button on his back to start pairing with the WiiMote (K9 answers with “Affirmative” when the pairing is successful.) When it came to the head, [James] was a little overwhelmed by trying to make the head in acrylic, so he got some foam board and used that instead. A red LED in the head lights up through translucent red acrylic.

It’s a great little project and [James] has put the Python code up on Github for anyone interested. We’ve had a couple of robot dog projects on the site over the years, like this one and this one.

Continue reading “Building A K9 Toy”

Wireless Nunchuck R/C Remote!

[Dan], admirably rose to the occasion when his son wanted a new toy. Being a dedicated father — and instead of buying something new — he took the opportunity to abscond to his workbench to convert a Wiimote Nunchuck into a fully wireless controller for his son’s old r/c car — itself, gutted and rebuilt some years earlier.

Unpacking the nunchuck and corralling the I2C wires was simply done. From there, he combined a bit of code, an Arduino pro mini, and two 1K Ohm resistors to make use of an Aurel RTX-MID transceiver that had been lying around. Waste not, want not.

A TI Stellaris Launchpad is the smarts of the car itself, in concordance with a TB6612FNG motor controller. The two Solarbotics GM9 motors with some 3D printed gears give the car some much needed gusto.

Continue reading “Wireless Nunchuck R/C Remote!”

The Power Glove Ultra Is The Power Glove We Finally Deserve

How do you make the most awesome gaming peripheral ever made even more bad? Give it a 21st-century upgrade! [Alessio Cosenza] calls this mod the Power Glove Ultra, and it works exactly as we imagined it should have all those years ago.

The most noticeable change is the 3D-printed attachment that hosts the Bluetooth module, a combination USB charger and voltage booster, and a Metro Mini(ATmega328) board. On top of a 20-hour battery life, a 9-axis accelerometer, gyroscope, and compass gives the Power Glove Ultra full 360-degree motion tracking and upgrades the functionality of the finger sensors with a custom board and five flex sensor strips with 256 possible positions for far more nuanced input. [Cosenza] has deliberately left the boards and wires exposed for that cyberpunk, retro-future look that is so, so bad.

Continue reading “The Power Glove Ultra Is The Power Glove We Finally Deserve”

Pi Zero Powered Skateboard

There’s something to be said for whizzing around town on your own automatic personal transport. It’s even better when you’ve built it yourself. That’s just what [The Raspberry Pi Guy] did – built a Wiimote controlled, Raspberry Pi Zero powered skateboard and whizzed around Cambridge to show it off.

It’s a fairly simple build – skateboard, battery, motor and mount, controller, Wiimote and Pi Zero. The Raspberry Pi controls the motor controller which in turn controls the motor speed. The Python code that [The Raspberry Pi Guy] wrote comes in at around a hundred lines and manages the motor controller and the Bluetooth connection to the Wiimote, which is used to control the board’s speed while the user controls the steering. [The Raspberry Pi Guy] says he’s gotten up to 30 km/h on the skateboard, which, given a powerful enough motor and a non-bumpy surface isn’t hard to believe.

It may seem a bit of overkill, running a bit of Python on a Raspberry Pi to run a motor (others have done it with something simpler) but it’s a fun project nonetheless. [The Raspberry Pi Guy] describes where he got the parts to put the skateboard together and has released the Python code on his GitHub page.

Continue reading “Pi Zero Powered Skateboard”

NES Zapper: Improved With Lasers

The Zapper gun from the original Nintendo was ahead of its time. That time, though, was around 30 years ago and the iconic controller won’t even work with most modern televisions. With a little tinkering they can be made to work, but if you want to go in a different direction they can be made to do all kinds of other things, too. For example, this one can shoot green lasers and be used as a mouse.

The laser pointer was installed in the gun using a set of 3D printed rings to make sure the alignment was correct. It’s powered with a Sparkfun battery pack and control board which all fit into the gun’s case. The laser isn’t where the gun really shines, though. There’s a Wiimote shoved in there too that allows the gun to be used as a mouse pointer when using it with a projector. Be sure to check out the video below to see it in action. Nothing like mixing a little bit of modern Nintendo with a classic!

The Wiimote is a great platform for interacting with a computer. Since the Wii was released it’s been relatively easy to interface with them via Bluetooth. One of the classic Wiimote hacks is using an IR pen and projector to create a Smart Board of sorts for a fraction of the price. They’ve also been used with some pretty interesting VR displays.

Continue reading “NES Zapper: Improved With Lasers”

Tricking Duck Hunt To See A Modern LCD TV As CRT

A must-have peripheral for games consoles of the 1980s and 1990s was the light gun. A lens and photo cell mounted in a gun-like plastic case, the console could calculate where on the screen it was pointing when its trigger was pressed by flashing the screen white and sensing the timing at which the on-screen flying spot triggered the photo cell.

Unfortunately light gun games hail from the era of CRT TVs, they do not work with modern LCDs as my colleague [Will Sweatman] eloquently illustrated late last year. Whereas a CRT displayed the dot on its screen in perfect synchronization with the console output, an LCD captures a whole frame, processes it and displays it in one go. All timing is lost, and the console can no longer sense position.

[Charlie] has attacked this problem with some more recent technology and a bit of lateral thinking, and has successfully brought light gun games back to life. He senses where the gun is pointing using a Wiimote with its sensor bar on top of the TV through a Raspberry Pi, and feeds the positional information to an Arduino. He then takes the video signal from the console and strips out its sync pulses which also go to the Arduino. Knowing both position and timing, the Arduino can then flash a white LED stuck to the end of the light gun barrel at the exact moment that part of the CRT would have been lit up, and as far as the game is concerned it has received the input it is expecting.

He explains the timing problem and his solution in the video below the break. He then shows us gameplay on a wide variety of consoles from the era using the device. More information and his code can be found on his GitHub repository.

Continue reading “Tricking Duck Hunt To See A Modern LCD TV As CRT”

Marc with cannula and brain monitor

In Bed With An Arduino, Fighting Sleep Apnea

Sometimes the journey is as interesting as the destination, and that’s certainly the case with [Marc]’s pursuit of measuring his sleep apnea (PDF, talk slides. Video embedded below.). Sleep apnea involves periods of time when you don’t breathe or breathe shallowly for as long as a few minutes and affects 5-10% of middle-aged men (half that for women.) [Marc]’s efforts are still a work-in-progress but along the way he’s tried a multitude of things, all involving different technology and bugs to work out. It’s surprising how many ways there are to monitor breathing.

Debugging the Eeonyx conductive fabric approach

His attempts started out using a MobSenDat Kit, which includes an Arduino compatible board, and an accelerometer to see just what his sleeping positions were. That was followed by measuring blood O2 saturation using a cheap SPO2 sensor that didn’t work out, and one with Bluetooth that did work but gave results as a graph and not raw data.

Next came measuring breathing by detecting airflow from his nose using a Wind Sensor, but the tubes for getting the “wind” from his nose to the sensor were problematic, though the approach was workable. In parallel with the Wind Sensor he also tried the Zeo bedside sleep manager which involves wearing a headband that uses electrical signals from your brain to tell you what sleep state you’re in. He particularly liked this one as it gave access to the data and even offered some code.

And his last approach we know of was to monitor breathing by putting some form of band around his chest/belly to measure expansion and contraction. He tried a few bands and an Eeonyx conductive textile/yarn turned out to be the best. He did run into noise issues with the Xbee, as well as voltage regulator problems, and a diode that had to be bypassed.

But while [Marc]’s list of approaches to monitor sleep is long, he hasn’t exhausted all approaches. For example there’s monitoring a baby using lasers to detect whether or not the child is still breathing.

Continue reading “In Bed With An Arduino, Fighting Sleep Apnea”