When it was first introduced in 1968, Fairchild’s 741 op-amp made quite a splash. And with good reason; it packed a bunch of components into a compact package, and the applications for it were nearly limitless. The chip became hugely popular, to the point where “741” is almost synonymous with “op-amp” in the minds of many.
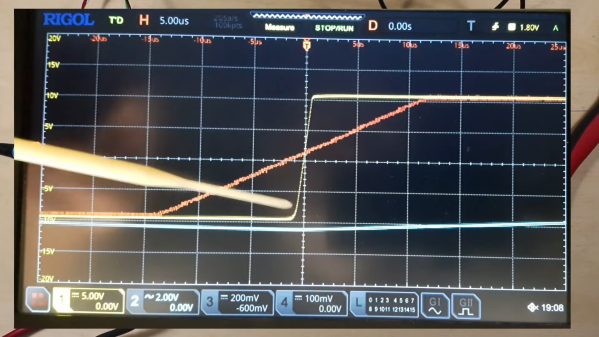
But should it be? Perhaps not, as [More Than Electronics] reveals with this head-to-head speed test that compares the 741 with its FET-input cousin, the TL081. The test setup is pretty simple, just a quick breadboard oscillator with component values selected to create a square wave at approximately 1-kHz, with oscilloscope probes on the output and across the 47-nF timing capacitor. The 741 was first up, and it was quickly apparent that the op-amp’s slew rate, or the rate of change of the output, wasn’t too great. Additionally, the peaks on the trace across the capacitor were noticeably blunted, indicating slow switching on the 741’s output stage. The TL081 fared quite a bit better in the same circuit, with slew rates of about 13 V/μS, or about 17 times better than the 741, and nice sharp transitions on the discharge trace.
As [How To Electronics] points out, comparing the 741 to the TL081 is almost apples to oranges. The 741 is a bipolar device, and comparing it to a device with JFET inputs is a little unfair. Still, it’s a good reminder that not all op-amps are created equal, and that just becuase two jelly bean parts are pin compatible doesn’t make them interchangeable. And extra caution is in order in a world where fake op-amps are thing, too.
Continue reading “Op-Amp Drag Race Turns Out Poorly For 741”