Normally bubbles appearing in your extruded filament would be considered a bad sign, but it turns out you can now buy filament that has been specifically formulated to foam. [Stefan] from CNC Kitchen has doing some experiments with these bubbly filaments, and the results have been very interesting.
The filaments in question are VARIOSHORE TPU and LW-PLA, both by ColorFabb. Both filaments have a blowing agent added to the formulation, which releases gas as the temperature is increased. This causes bubbles to form, creating a cellular structure, which decreases the density and increases the flexibility of the printed part. This isn’t the first time that foaming is sold as a feature, but previously it was only done for aesthetic purposes in Polymaker’s Polywood filament.
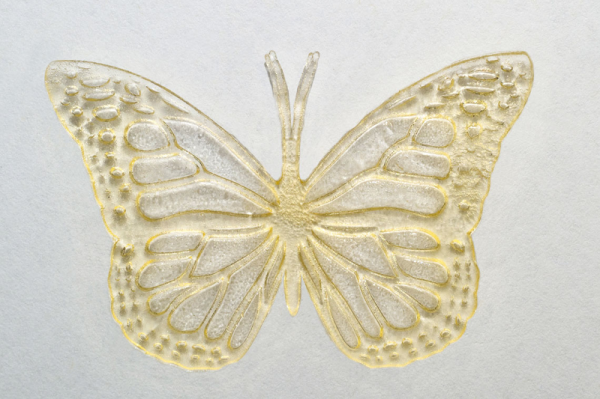
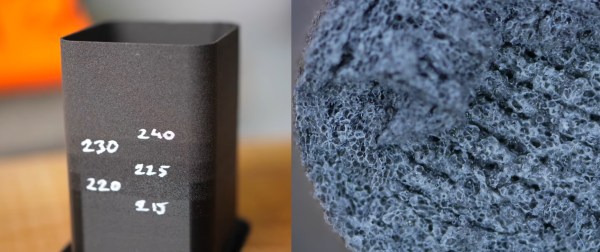
Before putting the materials through his excellent test procedures, [Stefan] first goes through the process of tuning the print settings. This can be tricky because of the foaming, which increases the effective volume of the plastic, requiring careful adjustment of the extrusion rate. Foaming in the PLA filament reached its maximum foaming at 250 C, at which its density was 44% of the unfoamed filament.
In testing the physical properties, [Stefan] found that the tensile strength and stiffness of printed parts are reduced as foaming increases, but the impact strength is improved. He concludes that the lightweight PLA can have some interesting applications because of the reduced weight and increased impact strength, with 3D printed RC aircraft being an excellent example of this. It should also be possible to change the between layers, effectively sandwiching the foamed layers between solid skins.
[Stefan]’s videos are an excellent resource for those looking to master the finer points of 3D printing with different materials. He has reinforced prints with carbon fiber, played with extrusion widths and developed an ingenious gradient infill technique.
Continue reading “Bubbly Filament Works Better Than You Think”