Huge Hand-Wired Ortho Is A Beautiful Battleship Keyboard

There are all sorts of reasons to build your own keyboard, and we would argue that the more custom the layout, the easier it is to justify the time and expense. At least, that’s what we’re going with for this post about [GoldenSights]’ big, beautiful custom ortholinear called Nearer, as in nearer to perfect. Just look at this battleship!

[GoldenSights] has long wanted a mechanical keeb, but has never been into any of the commercial offerings. That goes double since none of them seem to have a vertical Home/End cluster, which [GoldenSights] has become quite attached to thanks to a space-saving Logitech rectangle keeb. But if you’re going to make your own keyboard, you should go all out, right? Right. So [GoldenSights] started by adding another 12 F keys and making it ortholinear. Then things got personal with an extra Backspace where Num Lock usually lives, and dedicated keys for switching between English, Korean, and Chinese.

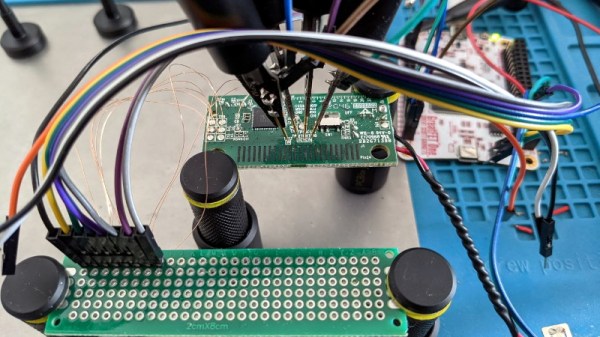
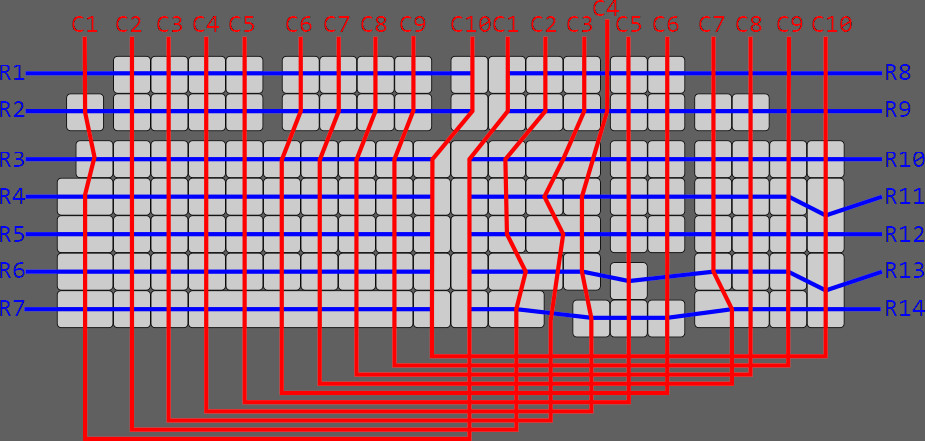
[GoldenSights] wanted USB-C and so they used an Elite-C microcontroller, but there’s one big problem — it only has 24 pins, and according to the matrix math, the board needs 27 total. Rather than using an I/O expansion chip or a second microcontroller, they wired it up as duplex matrix. This is an alternative way of wiring up a matrix so that it’s closer to being square by doubling up the rows and halving the number of columns.

We don’t think [GoldenSights] gives themselves enough credit here. They say that they lean toward calling it assembly rather than a build, but we disagree with that assessment. [GoldenSights] broke in this giant keeb with giant write-up of the build, so go see for yourself. There’s a ton of build pictures and a fair amount of hot glue, so be warned.

Let’s talk about those keycaps for a second. The space bar was supposed to be black PBT like the others, but the keycap manufacturer didn’t have a 6u space bar in black and sent a gray one instead. Honestly, we like the way it looks. And we love that [GoldenSights] painstakingly laid out the keys on foam board before committing to a laser-cut metal switch plate.

Want a space-saving ortholinear that doesn’t feel too cramped? Check out this wafer-thin keyboard that’s designed to squat over your inferior laptop keys.

Via KBD and r/mk

An Exercise In Firmware Dumping With The GreatFET

Looking to hone his hardware hacking skills, [James Chambers] recently set out to reverse engineer a common cheap wireless keyboard: the Logitech K360. The chipset it uses has already been fairly well explored (and exploited) by security researchers, but the goal here was more about gaining some practical hands-on experience than it was breaking any new ground.

The first post in what we’re sure will be a fascinating series deals with dumping the board’s firmware using the GreatFET. We actually haven’t seen too many projects that showcase the capabilities of this highly capable open hardware multi-tool, so the post serves as a nice demonstration of how one goes about writing the necessary Python scripts to put it to work in a practical scenario.

Some promising bytes.

Of course, even with the best of tools, there’s always a few stumbling blocks. After identifying what was clearly some kind of programming header on the K360’s diminutive PCB, it took a few failed attempts at reading the firmware before [James] realized he needed to tap into more pins on the keyboard’s nRF24LE1 microcontroller. Once everything was physically wired up, he wrote some code for the GreatFET that would perform the proper incantations on the chip’s PROG and RESET pins to enable its programming interface.

[James] goes on to explain how you can pull some extended chip information out of the hardware and verify the contents of the firmware dump with Gihdra, but any more advanced analysis will have to wait until the next post in the series. In the meantime, if you like reading about hardware hacking from this “over the shoulder” viewpoint, you should check out some of the fantastic work that [wrongbaud] has sent in over the last year or so.

Miss The Predictive Text From Your Old Nokia? Build Your Own T9 Keypad

Do you miss the mind-blowing typing speed of your old Nokia brick with predictive text turned on? Well, so did [Guy Dupont], so he created a USB keypad with T9 predictive text built-in to turn typing into a one-handed affair. Video after the break.

T9 was the first predictive text technology to gain widespread use in the late ’90s and early 2000s. The goal was to minimize the number of keypresses required for typing on multi-press keypads by matching key sequences to a dictionary of the possible words. It prioritizes words based on the frequency of use and can adapt to user preferences. [Guy] implemented T9 in Circuit Python, mainly for the RP2040 microcontroller used on the Raspberry Pi Pico, which will appear as a normal USB keyboard when plugged into any device. The dictionary is stored in the flash memory and can be updated using a tool also created by [Guy]. It can also change modes for old multi-press typing, numeric pad, or macro pad.

We would be interested to see just how fast it’s possible to type one handed with T9, and what application our readers can imagine. It doesn’t look like this implementation can learn the user’s preferences, which we think would be a worthy feature to add.

We’ve covered several unique custom keyboards recently, some more practical than others. On the silly side, these include a grenade-shaped function pad, a five-button chording keyboard, and a tiny two-key keyboard. Continue reading “Miss The Predictive Text From Your Old Nokia? Build Your Own T9 Keypad”

This ESP32 Bluetooth Page Turner Can’t Get Any Easier

Commercial Bluetooth pedals, designed to allow musicians to flip pages of sheet music on a tablet, have the sort of inflated price tag you’d expect for a niche electronic device. Rather than forking as much as $100 USD over for the privilege of hands-free page flipping, [Joonas Pihlajamaa] decided to build his own extremely low cost version using an ESP32 and a cheap foot pedal switch.

In terms of hardware, it does’t get much easier than this. All [Joonas] had to do was hook the pedal up to one of the ESP32’s digital pins, and plug the microcontroller into a USB power bank. From there, it became a software project. With the ESP32-BLE-Keyboard library, it only took a few lines of code to send RIGHT_ARROW or LEFT_ARROW depending on whether the pedal was quickly tapped or held down for a bit; allowing him to navigate back and forth through the pages with just one button.

[Joonas] mentions that the ESP32 development board he’s using is too large to fit inside the pedal itself, though we wonder if the bare module could get slipped in there someplace. Of course you could always build your own pedal with a bit of extra room to fit the electronics, but for less than $2 USD on AliExpress, it’s hard to go wrong with this turn-key unit.

Looking for an alternate approach? We covered a Bluetooth page turner last month that doubled the inputs and packed it all into a handsome wooden enclosure.

Continue reading “This ESP32 Bluetooth Page Turner Can’t Get Any Easier”

3D Printed Joystick Using Spherical Flexure Joint

One of the many advancements brought about by 3D printing is the rapid development of compliant mechanisms and flexure joints. One such example is [jicerr]’s joystick, which uses a pair of spherical flexure joints recently developed by researchers from Delft University of Technology in the Netherlands, See the videos after the break.

Both flexure joint designs make use of tetrahedron-shaped elements, allowing an object to pivot around a fixed point in space like a ball-and-socket joint. One of the joints, named Tetra 2, is perfect for printing on a standard FDM printer, and the 3D files were uploaded to Thingiverse by [Jelle_Rommers], one of the researchers. [jicerr] took the design and created a base to mount an HMC5883 3-axis magnetometer a short distance from the focal point, which senses the rotation of a small magnet at the focal point. An Arduino takes the output from the magnetometer, does the necessary calculation, and interfaces to a PC as a joystick. Demonstrates this by using it to rotate and pan the design in Solidworks. One thing to keep in mind with this design is that it needs a fixed base to prevent it from moving around. It should also be possible to integrate the design directly into the housing of a controller.

Another amusing application is to turn it into a pen holder with a chicken head on the front, as demonstrated by [50Pro]. If you have any ideas for other applications, drop them in the comments.

Compliant mechanisms have a number of interesting applications, including harmonic drives, dial indicators and thrust vectoring mounts.

Continue reading “3D Printed Joystick Using Spherical Flexure Joint”

A Close Look At USB Power

It’s not a stretch to say that most devices these days have settled on USB as their power source of choice. While we imagine you’ll still be running into the occasional wall wart and barrel jack for the foreseeable future, at least we’re getting closer to a unified charging and power delivery technology. But are all USB chargers and cables created equal?

The answer, of course, is no. But the anecdotal information we all have about dud USB gear is just that, which is why [Igor Brkić] wanted to take a more scientific approach. Inspired by the lighting bolt icon the Raspberry Pi will flash on screen when the voltage drops too low, he set out to make a proper examination of various USB chargers and cables to see which ones aren’t carrying their weight.

In the first half of his investigation, [Igor] tests four fairly typical USB chargers with his TENMA 72-13200 electronic load. Two of them were name brand, and the other just cheap clones. He was surprised to find that all of the power supplies not only met their rated specifications, but in most cases, over-performed by a fair amount. For example the Lenovo branded charger that was rated for only 1 A was still putting out a solid 5 V at 1.7 A. Of course there’s no telling what would happen if you ran them that high for hours or days at a time, but it does speak to their short-term burst capability at least.

He then moved onto the USB cables, were things started to fall apart. The three generic cables saw significant voltage drops even at currents as low as 0.1 A, though the name brand cable with 20 AWG power wires did fare a bit better. But by .5 A they were all significantly below 5 V, and at 1 A, forget about it. Pulling anything more than that through these cables is a non-starter, and in general, you’ll need to put at least 5.2 V in if you want to actually run a USB device on the other side.

Admittedly this might not be groundbreaking research, but we appreciate [Igor] taking a scientific approach and tabulating all the information. If you’re still getting low voltage warnings on the Pi after swapping out your cheapo cables, then maybe the problem is actually elsewhere.

Transparent Hard Drive Gives Peek At The Platters

Solid-state drives (SSDs) are all the rage these days, and for good reason. But that doesn’t mean the era of the spinning disk is over, as traditional mechanical hard drives still offer a compelling value for mass storage applications where access times aren’t as critical. But the components inside these “slow” mechanical drives are still moving at incredible speeds, which [The Developer Guy] has nicely illustrated with his transparent hard drive.

Now unfortunately the technology to produce a fully transparent hard drive doesn’t exist, but laser cutting a new top plate out of acrylic is certainly within the means of the average hacker. The process is pretty straightforward: cut out a piece of clear plastic in the same shape and size as the drive’s original lid, put the appropriate mounting holes in it, and find some longer screws to accommodate the increased thickness.

Because this is just for a demonstration, [The Developer Guy] doesn’t need to worry too much about dust or debris getting on the platters; but we should note that performing this kind of modification on a drive you intend on actually using would be a bad idea unless you’ve got a cleanroom to work in.

In the videos below [The Developer Guy] records the drive while it’s in use, and at one point puts a microscope on top of the plastic to get a close-up view of the read/write head twitching back and forth. We particularly liked the time-lapse of the drive being formatted, as you can see the arm smoothly moving towards the center of the drive. Unfortunately the movement of the platters themselves is very difficult to perceive given their remarkably uniform surface, but make no mistake, they’re spinning at several thousand RPM.

Have an old mechanical drive of your own that you’re not sure what to do with? We’ve seen them turned into POV clocks, impromptu rotary encoders, and even surprisingly powerful blower fans.

Continue reading “Transparent Hard Drive Gives Peek At The Platters”