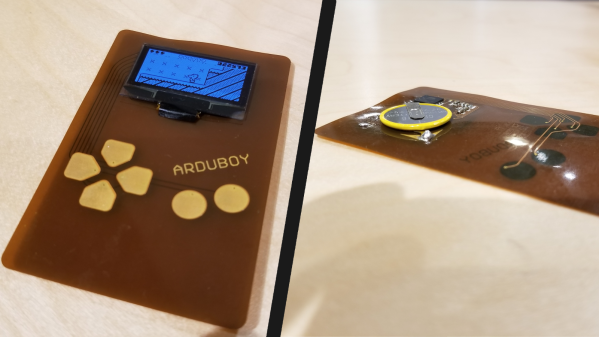
“DB” = Abbreviated Microcontroller Debugging

We’ve all been there. When debugging a microcontroller project, we just want to put in a print statement to figure out what’s going on with the microcontroller in real time. However, advanced embedded programmers know that printf statements are verboten: they’re just too SLOW. While not fixing this plight entirely, [Atakan Sarioglu] has come up with a clever way to create readable debug messages with minimal runtime overhead.

[Atakan Sarioglu]’s innovation, called BigBug (Github), is a dynamically-generated codebook. The codebook translates abbreviated messages sent over serial (UART here) to longer-form human-readable messages. To generate the codebook, BigBug automatically parses your comments to create a lookup between an abbreviation and the long-form message. When you are running your program on the microcontroller, BigBug will translate the short codes to long messages in real-time as you send log/debug data over serial. Continue reading ““DB” = Abbreviated Microcontroller Debugging”

Arduino One Pixel Camera Sees All (Eventually)

Taking pictures in the 21st century is incredibly easy. So easy in fact that most people don’t even own a dedicated camera; from smartphones to door bells there are cameras built into nearly electronic device we own. So in this era of ubiquitous photography, you might think that a very slow and extremely low resolution camera wouldn’t be of interest. Under normal circumstances that’s probably true, but this single pixel camera built by [Tucker Shannon] is anything but normal.

Continue reading “Arduino One Pixel Camera Sees All (Eventually)”

Button, Button, Who’s Got The (One) Button?

We often think that less is more, but what can you do with a device that has only a single button? [Danko Bertović] wondered the same thing and he built an Arduino with a single button and a display. After doing some obvious things  (like a counter or stopwatch) he decided to make a calculator for his latest Volos Projects video.

You can find the source code online and he used a library from GitHub to handle the reaction to single presses, double presses, and long presses. Is it ideal? Probably not. But if you only have a limited amount of space or pins, it can make the difference between a feasible project and one you can’t finish.

His original projects also included a Flappy Bird clone. The OLED display is only 64×48 so that’s not a lot of room. The packaging of the tiny Arduino, the battery, and the display in a good looking case, was pretty impressive. So the device might be usable for something.

Of course, the library will work with any program and there’s no reason you can’t have more than one button and simply multiply their functions with the same strategy. There’s a sample on GitHub that shows how you can create two OneButton objects connected to different hardware devices.

By the way, the little box may have only one button, but it also has a power switch. Turns out, you can use it as an input in certain circumstances. If the OLED display strikes you as too luxurious, try the DUO BINARY.

Continue reading “Button, Button, Who’s Got The (One) Button?”

Arduino-Powered Rocket Test Stand

If you’re into amateur rocketry, you pretty quickly outgrow the dinky little Estes motors that they sell in the toy stores. Many hobbyists move on to building their own homebrew solid rocket motors and experimenting with propellant mixtures, but it’s difficult to know if you’re on the right track unless you have a way to quantify the thrust you’re getting. [ElementalMaker] decided he’d finally hit the point where he needed to put together a low-cost test stand for his motors, and luckily for us decided to document the process and the results.

The heart of the stand is a common load cell (the sort of thing you’d find in a digital scale) coupled with a HX711 amplifier board mounted between two plates, with a small section of vertical PVC pipe attached to the topmost plate to serve as a motor mount. This configuration is capable of measuring up to 10 kilograms with an 80Hz sample rate, which is critically important as these type of rocket motors only burn for a few seconds to begin with. The sensor produces hundreds of data points during the short duration of the burn, which is perfect for graphing the motor’s thrust curve over time.

Given such a small window in which to make measurements, [ElementalMaker] didn’t want to leave anything to chance. So rather than manually igniting the motor and triggering the data collection, the stand’s onboard Arduino does both automatically. Pressing the red button on the stand starts a countdown procedure complete with flashing LED, after which a relay is used to energize a nichrome wire “electronic match” stuck inside the motor.

In the video after the break you can see that [ElementalMaker] initially had some trouble getting the Arduino to fire off the igniter, and eventually tracked the issue down to an overabundance of current that was blowing the nichrome wire too fast. Swapping out the big lead acid battery he was originally using with a simple 9V battery solved the problem, and afterwards his first test burns on the stand were complete successes.

If model rockets are your kind of thing, we’ve got plenty of content here to keep you busy. In the past we’ve covered building your own solid rocket motors as well as the electronic igniters to fire them off, and even a wireless test stand that lets you get a bit farther from the action at T-0.

Continue reading “Arduino-Powered Rocket Test Stand”

Every Computer Deserves A Rotary Encoder

In the era of touch screens and capacitive buttons, we’d be lying if we said we didn’t have the occasional pang of nostalgia for the good old days when interfacing with devices had a bit more heft to it. The physical clunk and snap of switches never seems to get old, and while you can always pick up a mechanical keyboard for your computer if you want to hear that beautiful staccato sound while firing off your angry Tweets, there’s a definite dearth of mechanical interface devices otherwise.

[Jeremy Cook] decided to take matters into his own hands (literally and figuratively) by designing his own multipurpose USB rotary input device. It’s not a replacement for the mouse or keyboard, but a third pillar of the desktop which offers a unique way of controlling software. It’s naturally suited to controlling things like volume or any other variable which would benefit from some fine tuning, but as demonstrated in the video after the break even has some gaming applications. No doubt the good readers of Hackaday could think of even more potential applications for a gadget like this.

The device is built around the diminutive Arduino-compatible PICO board by MellBell, which features a ATmega32u4 and native USB. This allowed him to very rapidly spin up a USB Human Interface Device (HID) with minimal headaches, all he had to do was hang his buttons and rotary encoder on the PICO’s digital pins. To that end, he [Jeremy] used the fantastic I2C rotary encoder designed by [fattore.saimon], which readers may remember as a finalist in the Open Hardware Design Challenge phase of the 2018 Hackaday Prize. He also added a NeoPixel ring around the encoder to use for some visual feedback and because, well, it just looks cool.

Since all of the core components are digital, there’s not a whole lot required in the way of wiring or passive components. This let [Jeremy] put the whole thing together on a piece of perfboard, freeing him up to spend time designing the 3D printed enclosure complete with translucent lid so he can see the NeoPixel blinkenlights. He got the tolerances tight enough that the whole device can be neatly press-fit together, and even thought to add holes in the bottom of the case so he could push the perfboard back out if he needed to down the line.

[Jeremy] spends a good chunk of the video going over the software setup and development of the firmware, and details some of the nuances he had to wrap his head around when working with the I2C encoder. He also explains the math involved in getting his encoder to emulate a mouse cursor moving in a circle, which he thinks could be useful when emulating games that originally used an encoder such as Tempest or Pong.

We’ve seen similar USB “knobs” in the past for controlling volume, but the additional inputs that [Jeremy] built into his version definitely makes it a bit more practical. Of course we’re suckers for interesting USB input devices to begin with.

Continue reading “Every Computer Deserves A Rotary Encoder”

Christmas POV Display Makes Viewer Do The Work

Hackaday readers have certainly seen more than a few persistence of vision (POV) displays at this point, which usually take the form of a spinning LED array which needs to run up to a certain speed before the message becomes visible. The idea is that the LEDs rapidly blink out a part of the overall image, and when they get spinning fast enough your brain stitches the image together into something legible. It’s a fairly simple effect to pull off, but can look pretty neat if well executed.

But [Andy Doswell] has recently taken an interesting alternate approach to this common technique. Rather than an array of LEDs that spin or rock back and forth in front of the viewer, his version of the display doesn’t move at all. Instead it has the viewer do the work, truly making it the “Chad” of POV displays. As the viewer moves in front of the array, either on foot or in a vehicle, they’ll receive the appropriate Yuletide greeting.

In a blog post, [Andy] gives some high level details on the build. Made up of an Arduino, eight LEDs, and the appropriate current limiting resistors on a scrap piece of perfboard; the display is stuck on his window frame so anyone passing by the house can see it.

On the software side, the code is really an exercise in minimalism. The majority of the file is the static values for the LED states stored in an array, and the code simply loops through the array using PORTD to set the states of all eight digital pins at once. The simplicity of the code is another advantage of having the meatbag human viewer figure out the appropriate movement speed on their own.

This isn’t the only POV display we’ve seen with an interesting “hook” recently, proving there’s still room for innovation with the technology. A POV display that fits into a pen is certainly a solid piece of engineering, and there’s little debate the Dr Strange-style spellcaster is one of the coolest things anyone has ever seen. And don’t forget Dog-POV which estimates speed of travel by persisting different images.

[Thanks to Ian for the tip.]

Thrift Store Razor Scooter Gets More Kick

Beyond pride, the biggest issue keeping adults off small motorized scooters is the fact that their tiny motors usually don’t have the power to move anything heavier than your average eighth grader. That didn’t stop [The_Didlyest] from snapping up this $7 thrift store find, but it did mean the hot pink scooter would need to be beefed up if it had any hope of moving 170 lbs of hacker.

Logically, the first step was fitting a more capable motor. [The_Didlyest] used an electric wheelchair motor which had a similar enough diameter that mounting it was fairly straightforward. The original sprocket and chain are still used, as are the mounting holes in the frame (though they had to be tapped to a larger size). That said, the new motor is considerably longer than its predecessor so some frame metal had to be cut away. This left the scooter without a kickstand and with a few inches of motor hanging out of its left side, but it’s all in the name of progress.

Naturally the upgraded motor needed similarly upgraded batteries to power it, so [The_Didlyest] put together a custom pack using eighteen 18650 cells spot welded together for a total output of 25V. Coupled with a 60A battery management system (BMS), the final 6S 3P configured pack is a very professional little unit, though the liberal application of duct tape keeps it from getting too full of itself.

Unfortunately the original motor controller consisted of nothing but relays, and didn’t allow adjusting speed. So that needed to go as well. In its place is a homebrew speed controller made with three parallel MOSFETs and an Arduino to read the analog value from the throttle and convert that into a PWM signal.

[The_Didlyest] says the rear tire is now in need of an upgrade to transmit all this new power to the road, and some gearing might be in order, but otherwise the scooter rebuild was a complete success. Capable of mastering hills and with a top speed of about 10 MPH, the performance is certainly better than the stock hardware.

Of course this is far from the first time we’ve seen somebody put a little extra pepper on a scooter. Some of them even end up being street-legal rides.