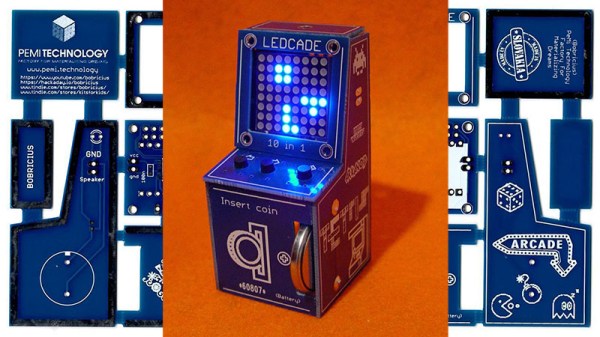
A Smartwatch You Can Easily Build Yourself

The concept of a smartwatch was thrown around for a long time before the technology truly came to fruition. Through the pursuit of miniaturisation, modern smartwatches are sleek, compact, and remarkably capable for their size. Companies such as Apple and Samsung throw serious money into research and development, but that doesn’t mean you can’t create something of your own. [Electronoobs] has done just that, with this Arduino-based smartwatch build.

The brain of the watch is that hacker staple, the venerable ATmega328, most well known for its use in the Arduino Uno and Nano platforms. An FTDI module is used for USB communication, making programming the board a snap. Bluetooth communication is handled by another pre-built module, and a smartphone app called Notiduino handles passing notifications over to the watch.

This is a build that doesn’t do anything crazy or difficult to understand, but simply combines useful parts in a very neat and tidy way. The watch is impressively thin and compact for a DIY build, and has a host of useful functions without going overboard.

We’ve seen other DIY builds in this space, too – such as this ESP8266-based smartwatch. Video after the break.

Continue reading “A Smartwatch You Can Easily Build Yourself”

Voice Controlled Camera For Journalist In Need

Before going into the journalism program at Centennial College in Toronto, [Carolyn Pioro] was a trapeze performer. Unfortunately a mishap in 2005 ended her career as an aerialist when she severed her spinal cord,  leaving her paralyzed from the shoulders down. There’s plenty of options in the realm of speech-to-text technology which enables her to write on the computer, but when she tried to find a commercial offering which would let her point and shoot a DSLR camera with her voice, she came up empty.

[Taras Slawnych] heard about [Carolyn’s] need for special camera equipment and figured he had the experience to do something about it. With an Arduino and a couple of servos to drive the pan-tilt mechanism, he came up with a small device which Carolyn can now use to control a Canon camera mounted to an arm on her wheelchair. There’s still some room for improvement (notably, the focus can’t be controlled via voice currently), but even in this early form the gadget has caught the attention of Canon’s Canadian division.

With a lavalier microphone on the operator’s shirt, simple voice commands like “right” and “left” are picked up and interpreted by the Arduino inside the device’s 3D printed case. The Arduino then moves the appropriate servo motor a set number of degrees. This doesn’t allow for particularly fine-tuned positioning, but when combined with movements of the wheelchair itself, gives the user an acceptable level of control. [Taras] says the whole setup is powered off of the electric wheelchair’s 24 VDC batteries, with a step-down converter to get it to a safe voltage for the Arduino and servos.

As we’ve seen over the years, assistive technology is one of those areas where hackers seem to have a knack for making serious contribution’s to the lives of others (and occasionally even themselves). The highly personalized nature of many physical disabilities, with specific issues and needs often unique to the individual, can make it difficult to develop devices like this commercially. But as long as hackers are willing to donate their time and knowledge to creating bespoke assistive hardware, there’s still hope.

Continue reading “Voice Controlled Camera For Journalist In Need”

Automatic Soap Dispenser Hides Arduino Board

If you’ve been hanging out here at Hackaday for awhile, you’ve certainly seen projects that were based around the concept of putting a miniature computer inside the carcass of some other piece of electronics. In fact at this point it’s something of a running joke, certainly we must have seen an Arduino or Raspberry Pi shoehorned into every type of consumer gadget ever built by this point. But if you thought this would be another example of that common trope by the headline, you might be in for something of a surprise.

[zapta] didn’t put an Arduino inside this GOJO LTX-7 soap dispenser, it was already in there to begin with. That’s right, apparently we’ve hit the point that even cheap soap dispensers are now running on programmable microcontrollers. While we can’t blame those of you who are no doubt groaning and/or rolling their eyes thanks to this particular case of computational gluttony, it does mean we’re able to report with a straight face something which frankly would have passed as an April Fool’s joke in previous years: the development of an open source soap dispensing firmware.

So how does one upload a new Arduino sketch to their GOJO soap dispenser? It’s not like the thing has a USB port on the side for convenient hacking. As explained by [zapta], it involves stripping the dispenser all the way down until the electronics board is free, and then adding in a programming header to make subsequent firmware fiddling a bit easier. Writing a new firmware to the ATTiny48 powered board will require an external ISP (the Atmel AVRISP MKII was used for this hack, though any should work), but it’s otherwise pretty painless.

[zapta] has done an excellent job documenting the different components on the board, and reverse engineered enough of the critical aspects (such as the motor controller and proximity sensor) to write a new open source firmware which can be flashed to the GOJO LTX-7. Beyond allowing you to “Open Source All the Things”, using this new firmware does have some practical advantage in that you can configure how much soap is dispensed per activation. Going further, we’d be exceptionally interested in hearing about anyone who manages to come up with a firmware that enables some hitherto impossible soap dispensing trickery.

We’ve seen hacks involving dispensers of all types, from Halloween games that spit out candy to gadgets which let dogs get their own treats, but a soap dispenser hack is something truly new for us. More proof that there’s still plenty of hardware out there just waiting to be hacked!

Machine Learning On Tiny Platforms Like Raspberry Pi And Arduino

Machine learning is starting to come online in all kinds of arenas lately, and the trend is likely to continue for the forseeable future. What was once only available for operators of supercomputers has found use among anyone with a reasonably powerful desktop computer. The downsizing isn’t stopping there, though, as Microsoft is pushing development of machine learning for embedded systems now.

The Embedded Learning Library (ELL) is a set of tools for allowing Arduinos, Raspberry Pis, and the like to take advantage of machine learning algorithms despite their small size and reduced capability. Microsoft intended this library to be useful for anyone, and has examples available for things like computer vision, audio keyword recognition, and a small handful of other implementations. The library should be expandable to any application where machine learning would be beneficial for a small embedded system, though, so it’s not limited to these example applications.

There is one small speed bump to running a machine learning algorithm on your Raspberry Pi, though. The high processor load tends to cause small SoCs to overheat. But adding a heatsink and fan is something we’ve certainly seen before. Don’t let your lack of a supercomputer keep you from exploring machine learning if you see a benefit to it, and if you need more power than just one Raspberry Pi you can always build a cluster to get your task done just a little bit faster, too.

Thanks to [Baldpower] for the tip!

Arduino And Pi Share Boardspace

A Raspberry Pi Zero (W) and Arduino are very different animals, the prior has processing power and connectivity while the latter has some analog to digital converters (ADCs) and nearly real-time reactions. You can connect them to one another with a USB cable and for many projects that will happily wed the two. Beyond that, we can interface this odd couple entirely through serial, SPI, I2C, and logic-level signaling. How? Through a device by [cburgess] that is being called an Arduino shield that supports a Pi0 (W). Maybe it is a cape which interfaces with Arduino. The distinction may be moot since each board has a familiar footprint and both of them are found here.

Depending on how they are set up and programmed, one can take control over the other, or they could happily do their own thing and just exchange a little information. This board is like a marriage counselor between a Raspberry Pi and an Arduino. It provides the level-shifting so they don’t blow each other up and libraries so they can speak nicely to one another. If you want to dig a bit deeper into this one, design files and code examples are on available.

Perhaps we’ll report on this board at the heart of a pinball machine retrofit, a vintage vending machine restoration, or maybe a working prop replica from the retro bar in Back to the Future II.

Arduino Heart Rate Monitor Has Star Trek Chic

Building a real-life version of the Star Trek tricorder has been the goal of engineers and hackers alike since the first time Dr McCoy complained about being asked to work outside of his job description. But while modern technology has delivered gadgets remarkably similar in function, we’ve still got a long way to go before we replicate 24th century Starfleet design aesthetic. Luckily there’s a whole world of dedicated hackers out there who are willing to take on the challenge.

[Taste The Code] is one such hacker. He wanted to build himself a practical gadget that looked like it would be at home on Picard’s Enterprise, so he gathered up the components to build a hand-held heart rate monitor and went in search for a suitable enclosure. The electronics were simple enough to put together thanks to the high availability and modularity we enjoy in a post-Arduino world, but as you might expect it’s somewhat more difficult to put it into a package that looks suitably sci-fi while remaining functional.

Internally his heart rate monitor is using an Arduino Pro Mini, a small OLED screen, and a turn-key pulse sensor which was originally conceived as a Kickstarter in 2011 by “World Famous Electronics”. Wiring is very simple: the display is connected to the Arduino via I2C, and the pulse sensor hooks up to a free analog pin. Everything is powered by 3 AA batteries delivering 4.5 V, so he didn’t even need a voltage regulator or the extra components required for a rechargeable battery pack.

Once everything was confirmed working on a breadboard, [Taste The Code] started the process of converting a handheld gyroscopic toy into the new home of his heart rate monitor. He kept the battery compartment in the bottom, but everything else was stripped out to make room. One hole was made on the pistol grip case so that a finger tip could rest on the pulse sensor, and another made on the side for the OLED screen. This lets the user hold the device in a natural way while getting a reading. He mentions the sensor can be a bid fiddly, but overall it gives accurate enough readings for his purposes.

If you’re more interested in the practical aspects of a real-life Star Trek tricorder we’ve seen several projects along those lines over the years, including a few that were entered into the Hackaday Prize.

Continue reading “Arduino Heart Rate Monitor Has Star Trek Chic”

Manual 3D Digitizer Works A Bit Like 3-Dimensional Measuring Tape

Digitizing an object usually means firing up a CAD program and keeping the calipers handy, or using a 3D scanner to create a point cloud representing an object’s surfaces. [Dzl] took an entirely different approach with his DIY manual 3D digitizer, a laser-cut and 3D printed assembly that uses rotary encoders to create a turntable with an articulated “probe arm” attached.

Each joint of the arm is also an encoder, and by reading the encoder values and applying a bit of trigonometry, the relative position of the arm’s tip can be known at all times. Manually moving the tip of the arm from point to point on an object therefore creates measurements of that object. [Dzl] successfully created a prototype to test the idea, and the project files are available on GitHub.

We remember the earlier version of this project and it’s great to see how it’s been updated with improvements like the addition of a turntable with an encoder. DIY 3D digitizing takes all kinds of approaches, and one example was this unit that used four Raspberry Pi Zeros and four cameras to generate high quality 3D scans.