Dreamcast Homebrew Gets Boost From SD Card Cache

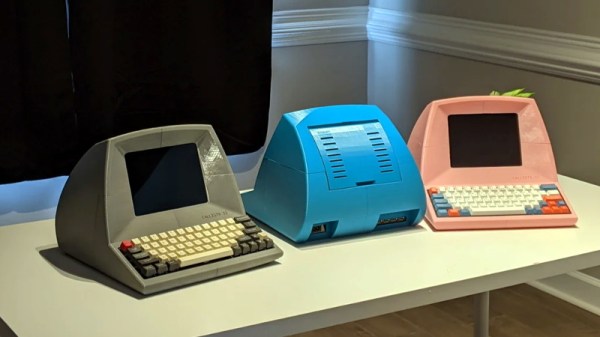
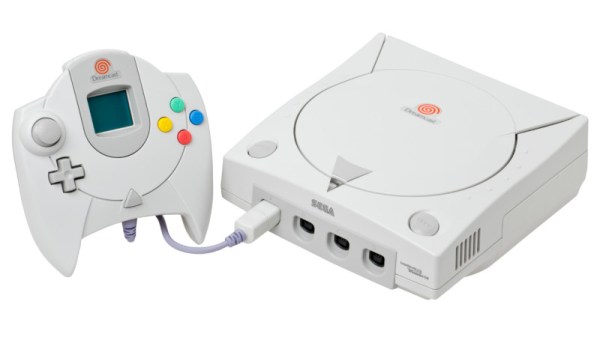
While it might have been a commercial failure compared to contemporary consoles, the Sega Dreamcast still enjoys an active homebrew scene more than twenty years after its release. Partly it’s due to the fact that you can burn playable Dreamcast discs on standard CD-Rs, but fans of the system will also point out that the machine was clearly ahead of its time in many respects, affording it a bit of extra goodwill in the community.

That same community happens to be buzzing right now with news that well-known Dreamcast hacker [Ian Micheal] has figured out how to cache data to an SD card via the console’s serial port. At roughly 600 KB/s the interface is too slow to use it as swap space for expanding the system’s paltry 16 MB of memory, but it’s more than fast enough to load game assets which otherwise would have had to be loaded into RAM.

A third-party Dreamcast SD adapter.

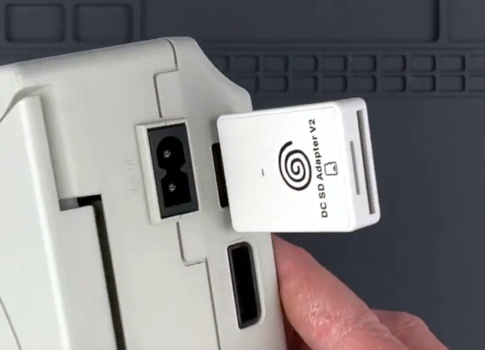
In the video below, [Ian] shows off his new technique with a port of DOOM running at 640×480. He’s already seeing an improvement to framerates, and thinks further optimizations should allow for a solid 30 FPS, but that’s not really the most exciting part. With the ability to load an essentially unlimited amount of data from the SD card while the game is running, this opens the possibility of running mods which wouldn’t have been possible otherwise. It should also allow for niceties like saving screenshots or game progress to the SD card for easy retrieval.

[Ian] says he’ll be bringing the same technique to his Dreamcast ports of Quake and Hexen in the near future, and plans on posting some code to GitHub that demonstrates reading and writing to FAT32 cards so other developers can get in on the fun. The downside is that you obviously need to have an SD card adapter plugged into your console to make use of this technique, which not everyone will have. Luckily they’re fairly cheap right now, but we wouldn’t be surprised if the prices start climbing. If you don’t have one already, now’s probably the time to get one.

To be clear, this technique is completely separate from replacing the Dreamcast’s optical drive with an SD card, which itself is a very popular modification that’s helped keep Sega’s last home console kicking far longer than anyone could have imagined.

Continue reading “Dreamcast Homebrew Gets Boost From SD Card Cache”

Disposable Rocket Stove Keeps You Fueled In The Wild

Don’t know about you, but we can’t start the day without coffee and a shower. If you were to drag us on some overnight trip into the wilderness, we could probably forego the shower for a day, but we will be a grumpy trail mate without some kind coffee, even instant.

Yes, if you were to get us on an overnight outdoor adventure, we would insist on bringing along a couple of these little disposable, self-destructing rocket stoves, if for no other reason than that we can have some coffee without having to forage for a bunch of firewood and build a whole regular-sized campfire. Don’t worry — we’ll share the water because there’s plenty of time built in. Per [smogdog], these Swedish torches will boil water in 20 minutes and burn for 60 — that’s enough time to make a coffee, a bowl of soup, and toast a single marshmallow before the fire consumes the scrap wood.

We love the use of bike chain as a burner to raise up the pot for fire ventilation. But our favorite bit has to be the dual-purpose packaging. It’s nice-looking, it’s informative, and it’s paper, so you can use it as a fire starter. Failing that, [smogdog] has a backup fire starter system — rubbing alcohol in a small spray bottle. Unwrap a protein bar and check out the demo video after the break.

Tired of the same old, boring trail foods? How about flat-pack pasta that morphs into fun shapes when you boil it?

Continue reading “Disposable Rocket Stove Keeps You Fueled In The Wild”

Living Robots: Revisiting BEAM

You’re hit by the global IC shortage, reduced to using stone knives and bearskins, but you still want to make something neat? It’s time to revisit BEAM robots.

Biology, electronics, aesthetics, and mechanics — Mark Tilden came up with the idea of minimalist electronic creatures that, through inter-coupled weak control systems and clever mechanical setups, could mimic living bugs. And that’s not so crazy if you think about how many nerves something like a cockroach or an earthworm have. Yet their collection of sensors, motors, and skeletons makes for some pretty interesting behavior.

My favorite BEAM bots have always been the solar-powered ones. They move slowly or infrequently, but also inexorably, under solar power. In that way, they’re the most “alive”. Part of the design trick is to make sure they stay near their food (the sun) and don’t get stuck. One of my favorite styles is the “photovore” or “photopopper”, because they provide amazing bang for the buck.

Back in the heyday of BEAM, maybe 15 years ago, solar cells were inefficient and expensive, circuits for using their small current were leaky, and small motors were tricky to come by. Nowadays, that’s all changed. Power harvesting circuits leak only nano-amps, and low-voltage MOSFETs can switch almost losslessly. Is it time to revisit the BEAM principles? I’d wager you’d put the old guard to shame, and you won’t even need any of those newfangled microcontroller thingies, which are out of stock anyway.

If you make something, show us!

Vintage HP-25 Calculator Gets Wireless Charging

[Jan Rychter] really likes his multiple HP-25C calculators, but the original battery pack design is crude and outdated. No problem — he whips up a replacement using Fusion 360 to design an enclosure, prints a few on his SLS 3D printer, and packs them with LiPo batteries and Qi/WPC wireless charging circuits.

In his blog post, he explains the goals and various design decisions and compromises that he made along the way. We like [Jan]’s frank honesty as he remarks on something we have all been guilty of at one time or another:

In the end, I went with design decisions which might not be optimal, but in this case (with low power requirements) provide acceptable performance. In other words, I winged it.

One problem which proved difficult to solve was how to provide a low battery indicator. Since low voltage on a LiPo is different from the original HP-25’s NiCad cells, it wasn’t straightforward, especially since [Jan] challenged himself to build this without using a microcontroller. He discovered that the HP-25’s internal low battery circuit was triggered by a voltage of 2.1 volts or lower.

In a really clever hack, [Jan] came up with the idea of using an MCU reset supervisor chip with a low voltage threshold of 3.0 volts, which corresponds with the low voltage threshold of the LiPo battery he is using. The reset signal from the supervisor chip then drives one of the pins of the TPS62740 programmable buck converter, changing its output from 2.5 volts to 2.1 volts.

This project is interesting on several levels — extending the life of a useful but end-of-life calculator, improving the original battery design and introducing new charging techniques not available in the early 1970s, and it is something that a hobbyist can afford to do in a home electronics lab. We do wonder, could such a modification could turn an HP-25 into an HP-25C?

We’ve written about battery pack replacement project before, including one for the Sony Discman and another for an electric drill. Let us know if you have any battery pack replacement success (or failure) stories in the comments below.

Spacewar! On PDP-11 Restoration

If you want to play the original Spacewar! but you don’t have a PDP-1 nearby, then you’re in luck — assuming you have a PDP-11, that is. [Mattis Lind] has successfully restored a PDP-11 port of the game from PDF scans of the source code, which was thought to have been lost to the trash bins of DECUS (Digital Equipment Computer Users’ Society). Fortunately, [Mattis] learned that [Bill Seiler], one of the original authors, had saved a printout of the assembly language. 
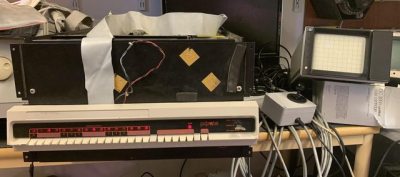
Using a combination of OCR and manual transcription to retrieve the code, [Mattis] took a deep dive into cleaning up the errors and solving a whole lot of system library and linking issues. Adding to the difficulty is that his PDP-11 is slightly different from the one used in 1974 when this port was written.

The project was not all software — [Mattis] also needed to make a pair of joysticks, which he made from a handful of items found on AliExpress. As you can see in the video below, he indeed got it all working. [Mattis] is no stranger to the PDP-11 world. We wrote about his PDP-11 restoration project back in 2015, a quest that took over 18 months.

Continue reading “Spacewar! On PDP-11 Restoration”

3D Printed Terminal Takes Computing Back In Time

It’s hard to look at today as anything but the golden age of computing. Even entry level machines have quad-core processors and a terabyte or more of storage space, to say nothing of the incredible amount of tech packed into the modern smartphone. But even so, there’s something to be said for the elegant simplicity of early desktop computers.

Looking to recreate the feeling of those bygone days, [Pigeonaut] created the Callisto II. Its entirely 3D printed case snaps together without glue or screws, making it easy to assemble, and the parts have been sized so they’ll be printable even on smaller machines like the Prusa Mini. Inside you’ll find a 1024×768 Pimoroni HDMI 8″ IPS LCD, 60% mechanical keyboard, four-port USB 3 hub, Raspberry Pi 4, and a 22 watt USB power supply to run it all.

The internal components can be easily accessed with the hatch on the rear of the case, and there’s plenty of room inside to add new hardware should you want to toss in a hard drive or even swap out the Pi for a different single-board computer.

To really drive home the faux-retro concept of the Callisto II, [Pigeonaut] has created a website for the fictional computer company behind the machine, replete with all the trappings you’d expect from the early web. There’s even a web-based “operating system” you can use to show off your freshly printed Callisto II.

Incidentally the II suffix isn’t just part of the meme, there really was a Callisto before this one. We covered the earlier machine back in 2019, and while we’re a bit sad to see that the functional 3.5 inch floppy drive has been deleted, we can’t deny the overall aesthetics have been greatly improved in the latest version.

Continue reading “3D Printed Terminal Takes Computing Back In Time”

Original Game Boy Powered Up With GBA Motherboard

The Game Boy DMG-01 is about as iconic as a piece of consumer electronics can get, but let’s be honest, it hasn’t exactly aged well. While there’s certainly a number of games for the system that are still as entertaining in 2021 as they were in the 80s and 90s, the hardware itself is another story entirely. Having to squint at the unlit display, with its somewhat nauseating green tint, certainly takes away from the experience of hunting down Pokémon.

Which is precisely why [The Poor Student Hobbyist] decided to take an original Game Boy and replace its internals with more modern hardware in the form of a Game Boy Advance (GBA) SP motherboard and aftermarket IPS LCD panel. The backwards compatibility mode of the GBA allows him to play those classic Game Boy and Game Boy Color games from their original cartridges, while the IPS display brings them to life in a way never before possible.

Relocating the cartridge connector took several attempts.

Now on the surface, this might seem like a relatively simple project. After all, the GBA SP was much smaller than its predecessors, so there should be plenty of room inside the relatively cavernous DMG-01 case for the transplanted hardware. But [The Poor Student Hobbyist] made things quite a bit harder on himself by deciding early on that there would be no external signs that the Game Boy had been modified; beyond the wildly improved screen, anyway.

That meant deleting the GBA’s shoulder buttons, though since the goal was always to play older games that predated their addition to the system, that wasn’t really a problem. The GBA’s larger and wider screen is still intact, albeit hidden behind the Game Boy’s original bezel. It turns out the image isn’t exactly centered on the physical display, so [The Poor Student Hobbyist] came up with a 3D printed adapter to mount it with a slight offset. The adapter also allows the small tactile switch that controls the screen brightness to be mounted where the “Contrast” wheel used to go.

An incredible amount of thought and effort went into making the final result look as close to stock as possible, and luckily for us, [The Poor Student Hobbyist] did a phenomenal job of documenting it for others who might want to make similar modifications. Even if you’re not in the market for a rejuvenated Game Boy, it’s worth browsing through the build log to marvel at the passion that went into this project.

Some would argue [The Poor Student Hobbyist] should have just put a Raspberry Pi into a Game Boy case and be done with it, but where’s the fun in that? Sure it might have been a somewhat better Bitcoin miner, but there’s something to be said for playing classic games on real hardware.