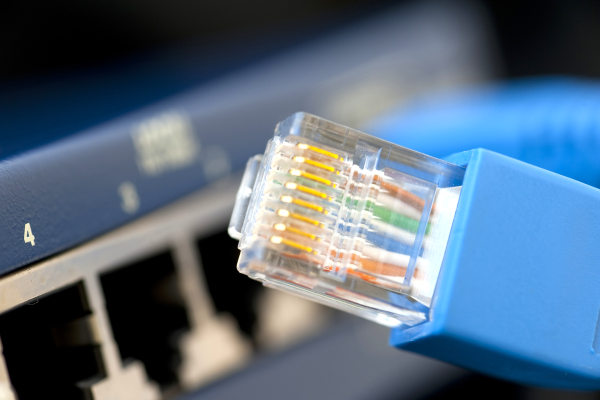
In the world of digital art, distinguishing between AI-generated and human-made creations has become a significant challenge. Almost overnight, tool sets for generating AI artworks became commonly available to the public, and suddenly, every digital art competition had to contend with potential submissions. Some have welcomed AI, while others demand competitors create artworks by their own hand and no other.
The problem facing artists and judges alike is just how to determine whether an artwork was created by a human or an AI. So what can be done?
It used to be that building the Linux kernel was not easy. Testing and debugging were even worse. Nowadays, it is reasonably easy to build a custom kernel and test or debug it using virtualization. But if you still find it daunting, try [deepseagirl’s] script to download, configure, build, and debug the kernel.
The Python program takes command line arguments so you can select a kernel version and different operations. The script can download the source, patch the configuration, build the kernel, and then package it into a Debian package you can boot under qemu. From there, you can test and even debug with gdb. No risk of hosing your everyday system and no need to understand how to configure everything to run.
Engineers tend to worry about uptime, whether it’s at a corporate server farm or just our own little hobby servers at home. Every now and then, something will go wrong and take a box offline, which requires a little human intervention to fix. Ideally, you’ll still have a command link that stays up so you can fix the problem. Lose that, though, and you’re in a whole lick of trouble.
That’s precisely what happened to Australia’s second largest telecommunications provider earlier this month. Systems went down, millions lost connectivity, and company techs were left scrambling to put the pieces back together. Let’s dive in and explore what happened on Optus’s most embarrassing day in recent memory.
It used to be only high-end test equipment that had some sort of remote control port. These days, though, they are quite common. Historically, test gear used IEEE-488 (also known as GPIB or, from the originator, HPIB). But today, your device will likely talk over a USB port, a serial port, or a LAN connection. You’d think that every instrument had unique quirks, and controlling it would be nothing like controlling another piece of gear, especially one from another company. That would be half right. Each vendor and even model indeed has its unique command language. There has been a significant effort to standardize some aspects of test instrument control, and you can quickly write code to control things on any platform using many different programming languages. In a few posts, I will show you just how easy it can be.
The key is to use VISA. This protocol is defined by the IVI Foundation that lets you talk to instruments regardless of how they communicate. You do have to build an address that tells the VISA library how to find your device. For example: “TCPIP::192.168.1.92::INSTR.” But once you have that, it is easy to talk to any instrument anywhere.
I say that thinking it is a problem is half right because talking to the box is one task of the two you need to complete. The other is what to say to the box and what it will say back to you. There are a few standards in this area, but this is where you get into problems. Continue reading “How To Talk To Your Scope”→
The Coleco Adam? A not-so-great home computer that likely contributed to the downfall of the company. The keyboard, however, is a different story, and worth repurposing.
[Nick Bild] has created a USB adapter that uses a Teensy 4.1 and an RJ-12 breakout board. Now this wasn’t just a simple matrix to decode. No, the fine folks at Coleco rolled their own communications protocol called AdamNet.
The keyboard uses an RJ-12 connector and a single data line to communicate over a 62.5 kbit/s, half-duplex serial bus. Inside the keyboard is a Motorola 6801 that caches the key presses and sends them to the computer. So the BOM is limited to what you see above — an RJ-12 breakout and a Teensy 4.1. It’s great to see old keyboards come alive again, especially one with such cool sci-fi keycaps. Want to hear it clack? Of course you do.
You might remember that KiCad 7 came out this February, with a multitude of wonderful features. One of them was particularly exciting to see, and the KiCad newsletter even had an animated GIF to properly demo it – a feature called “Background Bitmaps”, which is the ability to add existing board images into your board editor, both front and back, and switch between them as you design the board. With it, you can draw traces, recreate the outline and place connectors over these images, giving you a way to quickly to reproduce everything on an existing PCB! I’ve seen some friends of mine use this feature, and recently, I’ve had a project come up that’s a perfect excuse for me to try it.
By [Yoggy], CC-BY-2.0Back in 2020, I managed to get a Sony Vaio P from a flea market, for about 20€. It’s a beloved tiny laptop from 2009, now a collectors item, and we’ve covered a few hacks with it! The price was this wonderful only because it was not fit for regular flea market customers – it was in bad condition, with the original DC jack lost and replaced by some Molex-like power connector, no hard drive, and no battery in sight.
In short, something worth selling to a known tinkerer like me, but not particularly interesting otherwise. Nevertheless, about half a year later, when I fed it the desired 10.5 V from a lab PSU and gave the power button a few chances, it eventually booted up and shown me the BIOS menu on the screen! I’ve disassembled and reassembled it a few times, replaced the DC jack with an original one from a different Vaio ultrabook I happened to have parts from, and decided to try to bring it back to original condition.
With the zombies, ghouls, and ghosts now safely returned to their crypts until next October, it’s time to unveil this year’s winners for the 2023 Halloween Hackfest.
For this contest, sponsors DigiKey and Arduino challenged the community to come up with their best creations for what’s arguably the most hacker-friendly of holidays. Pretty much everything was fair game, from costumes to decorations. The top three winners will get $150 credit from DigiKey and some treats from Arduino — just don’t try to eat them.