Tiny Orrery Keeps The Planets In Their Places

[Frans] claims to have made the world’s smallest wooden orrery. We won’t take a position on that — such things are best left up to the good folks at Guinness. But given that the whole thing is seriously in danger of being dwarfed by a USB-C connector, we’d say he’s got a pretty good shot at that record.

The key to keeping this planetarium so petite while making it largely out of wood is to eschew the complex gear trains that usually bring the Music of the Spheres to life in such devices. The layered base of the orrery, with pieces cut from a sheet of basswood using a laser cutter, contains a single tiny stepper motor and just two gears. A zodiac disc sits atop the base and is the only driven element in the orrery; every other celestial body moves thanks to a pin set into the zodiac disc. An ESP32 C3 contacts a NASA feed once a day to get the relative positions of the planets and uses the zodiac disk to arrange everything nicely for the day. The video below shows the “Planet Spinner” in action.

We love the look of this project; the burnt edges and lightly smoked surface of the laser-cut wooden parts look fantastic, and the contrast with the brass wires is striking. We’ve seen an orrery or two around here, executed in everything from solid brass to Lego, but this one really tickled our fancy. Continue reading “Tiny Orrery Keeps The Planets In Their Places”

Easter’s Over, But You Can Still Dye Keycaps

While it’s true that keycap colorways abound these days, one can’t always find exactly what one is looking for. And once found, the set is often either prohibitively expensive, or it doesn’t come in the desired layout, or both. So, why not color your own keycaps?

That’s exactly what [amphiboi] did, while standing on the shoulders of [CrowningKnight]’s imgur post on the subject. Essentially, you use Rit dye and PBT keycaps for best results. Rit has a comprehensive guide to mixing their dyes to achieve pretty much whatever colors you want. Once that’s all squared away, it’s time to gather your cooking supplies.

Starting with a pot you don’t care about and four cups of boiling water. Add about a teaspoon of dish soap, which helps the dye settle evenly across the keycaps. Then you just add the dye(s) and stir with an expendable spoon, then add your keycaps. 5-10 minutes later, depending on your desired outcome, the ‘caps are ready to be rinsed, dried, and pushed on to your switches.

Satisfied with the color of your keycaps, but wish they had cool legends? Check out this waterslide decal tutorial.

Carbon Fiber And Kevlar Make This Linear Actuator Fast And Strong

When it comes to the “build versus buy” question, “buy” almost always wins. The amount of time you have to put into building something is rarely justified, especially with a world of options available at the click of a mouse.

That’s not always the case, of course. These custom-made linear actuators are a perfect example of when building your own wins. For a planned ball-juggling robot, [Harrison Low] found himself in need of linear actuators with long throw distance, high speed, and stiff construction. Nothing commercially available checked all the boxes, so he set out to design his own.

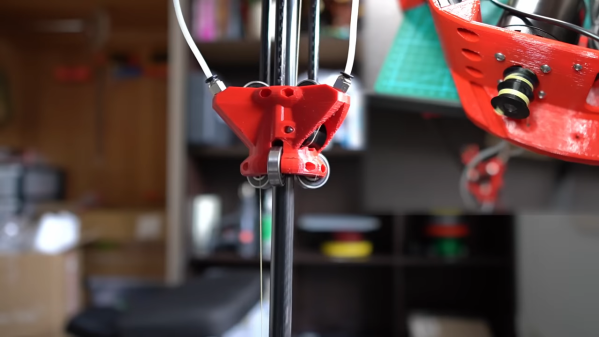
A few design iterations later, [Harrison] arrived at the actuators you see in the video below. Built mainly from carbon fiber tubing and 3D-printed parts, the actuators have about 30 centimeters of throw, and thanks to their cable-drive design, they’re pretty fast — much faster than his earlier lead screw designs. The stiffness of the actuator comes by way of six bearings to guide the arm, arranged in two tiers of three, each offset by 60 degrees. Along with some clever eccentric spacers to fine-tune positioning, this design provides six points of contact that really lock the tube into place.

The cable drive system [Harrison] used is pretty neat too. A Kevlar kite string is attached to each end of the central tube and then through PTFE tubes to a pulley on an ODrive BLDC, which extends and retracts the actuator. It’s a clever design in that it keeps the weight of the motor away from the actuator, but it does have its problems, as [Harrison] admits. Still, the actuator works great, and it looks pretty cool while doing it. CAD and code are available if you want to roll your own.

These actuators are cool enough, but the real treat here will be the ball juggler [Harrison] is building. We’ve seen a few of those before, but this one looks like it’s going to be mighty impressive.

Continue reading “Carbon Fiber And Kevlar Make This Linear Actuator Fast And Strong”

The Nuts And Bolts Of Nuts And Bolts

If you’re a mechanical engineer, the material covered in this video on the basics of bolted joints probably won’t cover any new ground. On the other hand, if you aren’t a mechanical engineer but still need to bring a little of that discipline to your projects, there’s a lot to learn here.

If there’s one takeaway lesson from [The Efficient Engineer]’s excellent examination of the strength of bolted joints, it’s the importance of preload. Preload is the tensile force created by tightening a bolt or a screw, which provides the clamping force that keeps the joined members together. That seems pretty self-obvious, but there’s more to the story, especially with joints that are subject to cycles or loading and unloading. Such joints tend to suffer from fatigue failure, but proper preloading on the bolts in such a joint mitigates fatigue failure because the bolts are only taking up a small fraction of the total cyclical force on the joint. In other words, make sure you pay attention to factory torque specs.

Continue reading “The Nuts And Bolts Of Nuts And Bolts”

The Shuttle Engine Needed 3D Printing, But…

If we asked you to design a circuit to blink a flashing turn signal, you would probably reach for a cheap micro or a 555. But old cars used bimetallic strips in a thermomechanical design. Why? Because, initially, 555s and microcontrollers weren’t available. [Breaking Taps] has the story of NASA engineers who needed some special cooling chambers in a rocket design for the Space Shuttle. Today you’d 3D print them, but in the 70s, that wasn’t an option. So they used wax. You can see a video about the process, including a build of a model rocket engine, in the video below.

The issue is the creation of tiny cooling channels in the combustion chamber. You can use additional thin pipes brazed onto the engine. However, there are several disadvantages to doing this way, but early rocket engines did it anyway. Having the cooling path integrated into the system would be ideal, but without 3D printing, it seems difficult to do. But not impossible.

Continue reading “The Shuttle Engine Needed 3D Printing, But…”

A small speaker with an LCD showing chatbot responses

AI-Powered Speaker Is A Chatbot You Can Actually Chat With

AI-powered chatbots are pretty cool, but most still require you to type your question on a keyboard and read an answer from a screen. It doesn’t have to be like that, of course: with a few standard tools, you can turn a chatbot into a machine that literally chats, as [Hoani Bryson] did. He decided to make a standalone voice-operated ChatGPT client that you can actually sit next to and have a conversation with.

The base of the project is a USB speaker, to which [Hoani] added a Raspberry Pi, a Teensy, a two-line LCD and a big red button. When you press the button, the Pi listens to your speech and converts it to text using the OpenAI voice transcription feature. It then sends the resulting text to ChatGPT through its API and waits for its response, which it turns into sound again through the eSpeak speech synthesizer. The LCD, driven by the Teensy, shows the current status of the machine and also provides live subtitles while the machine is talking.

To spice up the AI box’s appearance, [Hoani] also added an LED ring which shows a spectrogram of the audio being generated. This small addition really makes the thing come alive, turning it into what looks like a classic Sci-Fi movie prop. Except that this one’s real, of course – we are actually living in the future, with human-like AI all around us.

All code, mostly written in Go, is freely available on [Hoani]’s GitHub page. It also includes a separate audio processing library called toot that [Hoani] wrote to help him interface with the micophone and do spectral analysis. Anyone with basic electronic skills can now build their own AI companion and talk to it – something that ham radio operators have been doing for a while.

Continue reading “AI-Powered Speaker Is A Chatbot You Can Actually Chat With”

New Tool Helps Create Laser-Cut Doom Maps

Doom has a larger cultural footprint than the vast majority of video games ever made. That inspired [Theor] to see if it was possible to laser-cut some of the game’s maps to create a real-world model of those famous original levels.

Level data was extracted from the game’s original WAD data files using code written in Rust. Maps are described by multiple “lumps” within the WAD file format, each containing information on vertexes, walls, and floors. This data was scraped and converted into SVG files suitable for laser cutting. [Theor] then built a visualizer that could display what a stacked-up laser cut map would look like in 3D, to verify everything worked correctly. With that done, the map could be laser cut without worries that it would come out a jumbled, janky mess.

[Theor] kept the finished product simple, creating the map as a stack of blue acrylic pieces. We can imagine this tool being perfect for creating a high-quality diorama though, with some work done to paint the map to match what the player sees in game. If you happen to take that approach, don’t hesitate to notify the tipsline!