Of all the things evolution has stumbled across, the eye is one of the most remarkable. Acting as sort of a ‘biological electromagnetic transducer’, the eye converts incoming photons into electrical and chemical spikes, known as action potentials. These spikes then drive the brain of the host life form. Billions of years of natural selection has produced several types of eyes, with some better than others. It would be an honest mistake to think that the human eye is at the top of the food chain, as this is not the case. Mammals underwent a long stint scurrying around in dark caves and crevasses, causing our eyes to take a back seat to other more important functions, such as the development of a cortex.
There are color sensitive cones in all eyes. Mammals have three types of cones, which are…wait for it…Red, Blue and Green. Our red and green cones are relatively recent on the evolutionary timescale – appearing about 30 million years ago.
The way these cones are distributed around our eyes is not perfect. They’re scattered around in lumpy, uneven patterns, and thus give us an uneven light sampling of our world. Evolution simply has not had enough time to optimize our eyes.
There is another animal on this planet, however, that never went through “the dark ages” as mammals did. This animal has been soaring high above its predators for over 60 million years, allowing its eyes to reach the pinnacle of the natural selection process. A bald eagle can spot a mouse from over a mile away. Birds eyes have 5 types of light sensitive cones – red, blue and green like our own. But add in violet and a type of cone that can detect no light, or black. But it is the way these cones are distributed around the bird’s eye that is most fascinating, and the subject of today’s article.
This article is the fifth in a series looking at the process of bringing an electronic kit to market from a personal project. We’ve looked at market research, we’ve discussed making a product from your project and writing the best instructions possible before stuffing your first kits ready for sale. In this article we’ll tackle the different means of putting your kits out there for sale.
Given a box of ready-to-sell kits, what next? You have to find some means of selling them, getting them in front of your customer, making the sale, sending them to the purchaser, and safely collecting their money. A few years ago this was an expensive and risky process involving adverts in print magazines and a lot of waiting, but we are fortunate. The Internet has delivered us all the tools we need to market and sell a product like an electronic kit, and in a way that needn’t cost a fortune. We’ll now run through a few of those options for selling your kits, before looking at shipping, marketing, and post-sales support in the final article in the series.
Summer is the season for family road trips here in the US, and my family took to the open road in a big way this year. We pulled off a cross-country relocation, from Connecticut to Idaho. Five days on the road means a lot of pit stops, and we got to see a lot of truck stops and consequently, a lot of long-haul truckers. I got to thinking about their unique lifestyle and tried to imagine myself doing that job. I wondered what I’d do hour after long hour, alone in the cab of my truck. I figured that I’d probably just end up listening to a lot of audio books, but then I realized that there’s a perfect hobby for the road — ham radio. So I decided to see how ham radio is used by truckers, and mull over how a truck driver version of me might practice The World’s Best Hobby.
Imagine this: you come home after a day at work. As you open the door, your nose is the first alert that something is very, very wrong. Instead of the usual house smell, your nose is assaulted with the distinctive aroma that means your dog had an accident. The smell is stronger though — as if Fido brought over a few friends and they all had a party. Flipping the lights on, the true horror is revealed to you. This was a team effort, but only one dog was involved.
At some point after the dog’s deed, Roomba, your robot vacuum, took off on its scheduled daily run around the house. The plucky little robot performed its assigned duties until it found the mess. The cleaning robot then became an agent of destruction, smearing a foul smelling mess throughout the space it was assigned to clean. Technology sometimes has unintended consequences. This time, your technology has turned against you.
This scene isn’t a work of fiction. For a select few families, it has become an all too odoriferous reality just begging for a clever fix.
When was the last time you went to a library? If it’s been more than a couple of years, the library is probably a very different place than you remember. Public libraries pride themselves on keeping up with changing technology, especially technology that benefits the communities they serve. No matter your age or your interests, libraries are a great resource for learning new skills, doing research, or getting help with just about any task. After all, library science is about gathering together all of human knowledge and indexing it for easy lookup.
It doesn’t matter if you’re not a researcher or a student. Libraries exist to serve everyone in a class-free environment. In recent years, patrons have started looking to libraries to get their piece of the burgeoning DIY culture. They want to learn to make their lives better. Public libraries have stepped up to meet this need by adding new materials to their collections, building makerspaces, and starting tool libraries. And this is in addition to ever-growing collections of electronic resources. Somehow, they manage to do all of this with increasingly strained budgets.
The purpose of this article is to explore the ways that libraries of all stripes can be a valuable resource to our readers. From the public library system to the sprawling academic libraries on college campuses, there is something for hackers and makers at all levels.
If you had made it this far in your journey from project to kit, you would now have a box of electronic components, a pile of printed instructions, and a box of plastic bags, thin card boxes, or whatever other retail packaging you have chosen for your kit. You are ready to start stuffing kits.
It’s All In The Presentation
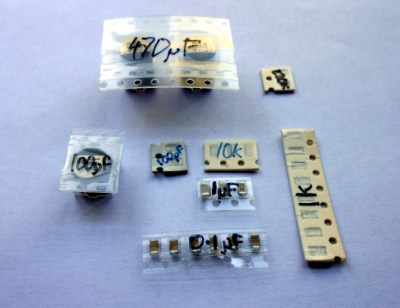
Label all your hard-to-identify components, your customers will appreciate it.
Your priorities when stuffing a kit are to ensure that your customer receives all the components they should, they can easily identify each component, and that the whole kit is attractively presented such that it invites them to buy or build it when they first see it. This starts before you have packed any components, you must carefully prepare each component into units of the required number and label them if they are otherwise not easy to identify. Pre-cut any components supplied on tape, and write the part number or value on the tape if it is not easily readable. You may even have to package up some difficult-to-identify components in individual labeled bags if they can not have their values written on them, though this incurs an extra expense of little bags and stickers. Some manufacturers will insist on using black tape on which an indelible pen doesn’t show up!
Take care cutting tapes of components, it is sometimes easy to damage their pins. Always cut the tape from the bottom rather than the side with the peelable film, and if necessary carefully bend the tape slightly to open up the gap between components for your scissors.
If you start by deciding how many kits you want to stuff in a sitting, list all the kit components and prepare that number of each of them in the way we’ve described. Then take the required number of packages or bags, and work through each component on the list, stuffing all the bags with one component before starting again moving onto the next. In time you will have a pile of stuffed kits ready to receive their instructions and labeling.
The next step will be to fold your instruction leaflet and pack it in the kit. Take a moment to consider how it can be most attractively presented. For example with a kit packaged in a click-seal plastic bag it makes sense to fold the leaflet such that the colour photo of a completed kit is visible from the front. And when you place it in the bag make sure that the PCB is visible top-outwards in front of it. A customer looking at your kit wants to immediately see what they are likely to create with it.
You can now seal the bag or box, the kit is packed. It only remains to give it a label that has all the pertinent information and is attractive to the customer. You will probably want to put your logo or web address on the label as well as any small print required, alongside the most important feature — the kit description. We’ve put a warning about small parts and curious children, you may also want to put any reglatory or compliance information here. For example in Europe you might have a CE mark and a WEEE logo. Once you have your design sorted you can run it up in your favourite label designing software – we used gLabels – and print as many as you like on sheets of sticky labels. We strongly suggest buying good quality branded labels, the extra money is well worth it when you consider that they will have much more reliable glue, and the extra cost per individual kit will be marginal. Pick a label size which fills a decent space and is easy to read on your packaging without being too big, we used 70mm x 37mm laser labels of which 24 can be had on a single sheet.
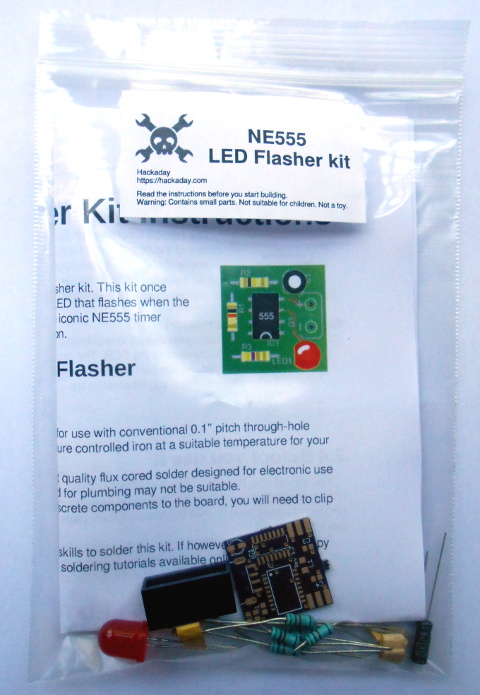
Your First Finished Product
If Hackaday made electronic kits, they might look a little like this.
It’s an exciting moment when you apply a label to your first fully packed kit and see for the first time what your customers will see: a finished product. You aren’t quite done though, because there is still the small matter of quality control. Take a kit or two from your batch at random, and count all their contents off against your list of what they should contain. This should help you ensure you are packing the kits correctly. Finally, give a completed kit to a friend who has never seen it before, and tell them to build it as a final piece of quality control. They are simulating your customer in every way, if they have no problems then neither should anyone who buys the kit.
Once you’ve built your batch of kits, you will now have the stock you will send out to your customers. Imagine yourself as a customer, if you order a kit you will expect it to arrive in pristine condition. You should therefore now take care of this stock of kits to ensure that it does not come to any harm, its packaging is as crisp and new when you send it out as when you packed it, and it has not attracted any dust while in storage. We would suggest having a separate plastic box for the stock of each kit in your range, and protecting the kits from dust with a lid, or by storing them inside a larger plastic bag.
As we’ve worked through this series of articles, we’ve tried to give you a flavour of the process of bringing an electronic kit from a personal project to the masses. We’ve looked at learning about the market for your kit, we’ve discussed turning a project into a product before writing the best instructions possible and now stuffing your first kits ready for sale. In the next article in the series we’ll talk about how you might sell your products, the different choices open to you for online shops, marketplaces, and crowdfunding.
The recent movie “The Imitation Game” gave [Alan Turing] some well-deserved fame among non-computer types (although the historical accuracy of that movie is poor, at best; there have been several comparisons between the movie and reality). However, for people in the computer industry, Turing was famous for more than just helping to crack Enigma. His theoretical work on computing led to the Turing machine, which is still an important concept for reasoning about computers in a mathematical way. He also laid the foundation for the stored program computer that we take for granted today.
What’s a Turing Machine?
A Turing machine is deceptively simple and, like many mathematical models, highly impractical. Leading off the inpracticalities, the machine includes an infinite paper tape. There is a head that can read and write any symbol to the tape at some position, and the tape can move to the left or the right. Keep in mind that the head can write a symbol over another symbol, so that’s another practical difficulty, although not an insurmountable one. The other issue is that the symbol can be anything: a letter, a number, a jolly wrencher, or a bunch of dots. Again, not impossible, but difficult to do with practical hardware implementations.


 You can now seal the bag or box, the kit is packed. It only remains to give it a label that has all the pertinent information and is attractive to the customer. You will probably want to put your logo or web address on the label as well as any small print required, alongside the most important feature — the kit description. We’ve put a warning about small parts and curious children, you may also want to put any reglatory or compliance information here. For example in Europe you might have a CE mark and a WEEE logo. Once you have your design sorted you can run it up in your favourite label designing software – we used